Thursday, November 18, 2010

Feet for Marcy Tilton's knit

Love, love, love this knit from Marcy Tilton. It's called *Midnight Black Rayon/Lycra Jersey* and it sews up beautifully. And it drapes elegantly. And it is slenderizing. Love, love, love it.

I was a happy sewer, humming along with the Weather Girls "Success" as I attached the waist band to the pants. Then I created a circle of elastic and began the Sandra Betzina technique for inserting elastic in a waist band. This requires stitching-in-the-ditch and this is where things went south.
Skipped stitches were everywhere. Luckily it's easy to remove such stitches because there's not much to hold them to the fabric. Otherwise, removing stitches from this jersey would've been impossible. But on the other hand I became very frustrated in my attempts to solve the skipped stitch issue.

Everything I tried seemed to make things worse.
I changed the needle first to a ball point, then to a jersey needle. No improvement. I changed to a single stitch plate. No improvement. I changed feet - first the ditch-stitching foot and then the zipper foot. All roads led to skipped, ugly stitches. Finally I just used the straight-stitch foot, and gave up on the ditch-stitching idea. The right toe of my straight-stitch foot is just about 1/8" wide so I arranged my stitching to have that narrow toe next to the bulk (elastic enclosed in waistband). Technically it's not stitched in the ditch - it's 1/8" away from the ditch. This created a perfect stitch.

I guess that sewing with this very, very stretchy knit requires a firm grip from the foot. So the winning combination is...
  • Straight-stitch foot (#13)
  • Universal needle for everything except the hem
  • Stretch twin needle for hem
  • Regular stitch plate - no need for the straight-stitch plate

Wednesday, November 10, 2010

My Only Knife Trick

Now that I've finished the Verona Coat/Jacket/Vest (my first one), I need to concentrate on some basics. So what could be more basic than black pants? A while back, I purchased this fabulous black, black knit from Marcy Tilton. It's probably her rayon, lycra jersey that she describes as *beefy.* It doesn't really feel like a jersey but then it's *beefy* so maybe that's why. It has lovely drape and the kind of weight that feels good in a top or bottom piece. Pinning pattern pieces to this stuff can be challenging. Several years ago I happened on to this technique. I place my everyday cutlery knives on the pattern tissue as weights. Then with a very sharp rotary blade I cut out the pieces. It is no-fail.

I used my TNT pants pattern that started life out as the Sewing Workshop Mimosa pants - a very basic fitted pants pattern with no waist band, darts in the front and back. Cynthia Guffey fitted it to me several years ago and it is now my go-to pants pattern. I've made shorts, pants with fly front and even skirts. I wondered how it would be in knit. I took 3/4 inch SA on the sides and inseam, took a standard 5/8 inch SA in the crotch to preserve that curve, and simply ignored the darts. I cut a 3 inch band that was slightly smaller than the top raw edge of the pants and attached it by stretching it to fit the pants waist. This seemed to take care of the excess fabric resulting from ignoring the darts. Because it is so stretchy, it fits without a zipper. Now I just need to insert the elastic and hem these pants so I can have something to wear. How is it that I sew almost everyday and have so little to wear?

Sunday, November 7, 2010

Needing closure


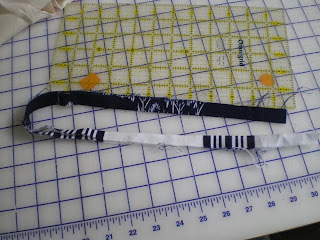
The Verona jacket is drawing to a close but needs closures. I'm not sure about button holes so I'm playing with some bias tubes made from the sleeves I decided to omit. I think I really like it as a vest. DH says it looks like some other things I've made. How can that be? Am I in a sewing rut? It still needs a good press too, but I'm thinking I like it and it's warm and I'll wear it now that we've gone from summer directly into winter. Oh, autumn where art thou?

I got to use some great marking chalk I bought from Pam Howard. It disappears when it is ironed. I tried to capture this in the photo - hope the iron-shape shows up properly. It's very cool stuff.

Friday, November 5, 2010

Quiet House


The house is quiet. No one is here except me. The only sound is the purr of my machine and the occasional puff of steam from my iron. I'm starting a new pattern - the Verona coat from the Sewing Workshop. I'm quilting the pieces following Mary Ray's instructions in Threads. The outer fabric is red wool crepe (color doesn't photograph nicely); the batting is cotton flannel; the lining of the body is black China silk and the sleeves are red Ambience - trying to stay within my stash. I started out with wool batting but it is definitely not the proper kind to use - the loft is too high. I'll use it for a comfy quilt later.

Life is good.

Friday, September 24, 2010

I k i


いきCool chic, subversive fashion among Japanese townspeople during the first half of the 19th century. I love that term. I will aspire to iki, though I will never qualify. From Wikipedia (which I don't like), "Iki is an expression of simplicity, sophistication, spontaneity, and originality. It is ephemeral, romantic, straight forward, measured, audacious, smart, and unselfconscious." Let me see if I can work on one of those qualities. The picture at left is from http://www.japanesestreets.com/.

Wednesday, August 25, 2010

Waist Free

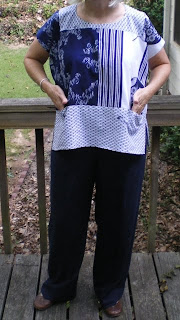
After reading a recent article in Threads Magazine, and then an online piece at the Center for Pattern Design about the concept of "Waste Free" garment construction, I just had to try a piece myself. Having never drafted or draped a garment, this was especially challenging, but my fabric demanded it! At the March 2010 Sewing Expo in Atlanta, I bought these 3 pieces of cotton kimono fabric from June Colburn. Each was about 14" wide and about 36" long, so even if I just stip-pieced them together, my piece would only be about 1 yard square - not much. But they go together so beautifully (thanks to June) and they needed to be used wisely. I ended up with this top and had almost no waste. I had to cut off a bit (less than an inch) from the bottom of the front and the bottom of the back. The striped piece was too sheer so I interlined it with cotton batiste, but did not have quite enough batiste. So I had to cut the fashion fabric.


This is what I started with:


And this is what was left.


The lower band portion was the first part I cut. It was cut into 3 pieces - 2 pieces for the front and back band. The leftover portion was sufficient to make a facing for the neckline. I reversed the facing so that it is a design element on the outside of the neck. This created 2 oval shaped remnants - one from the facing and one from the garment itself. The garment remnant was half from the dark fabric and half from the striped piece due to the way I pieced them right down the center front and center back. These pieces were perfect for little pockets in the front horizontal seam.

I had great fun making this even though DH says it makes me look hippy. I don't think he's referring to that 70's look either. So it really is (almost) waste free and (unfortunately) waist free - not a great look for me. Maybe the same concept can be applied to a larger piece of fabric so that I can avoid the horizontal line at my hips. In fact, I can now visualize an even better way to put these 3 together to avoid that hard horizontal line. It would've been even more cool to make one of the pieces run the length of the front, another run the length of the back, and then fit the leftover pieces into the side front and side back, so that the overall design would be vertical.

Thursday, July 29, 2010

Good, Better, Vest

Things are really starting to take shape. Now is when the sewing is pretty addictive. I'm not sure where I am in the process, but it's a good place in terms of fun. I completed the piecing on all 12 pattern pieces. I did this by cutting out pre-washed flannel roughly around each pattern piece. I was generous in the seam allowance here. Then using 2.5 " strips of each of the silk dupioni fabrics, I attached it to the flannel using the flip and sew technique. I created some of the strips by combining the fabrics in more of a patch-work manner prior to attaching to the flannel base with flip and sew. I left plenty of dangling strips as I completely covered each flannel pattern piece with strips of silk dupioni.

Next I began the truly Zen part of the process - the actual quilting. I placed generously cut solid silver silk dupioni pieces on the flannel, creating the quilt sandwich. Of course, the stripped silk side was already attached to the batting (the flannel) so it is a little different from ordinary machine quilting. Except for the collar pieces, I decided to simply stitch-in-the-ditch on the strip-pieced side. I think creating new quilting lines would be too much. And the quilting is very subtle on the silver side.
For the collar pieces, there was really just one seam in the strip-pieced side, joining a silver tip to plain gold silk dupioni. So here I first stitched-in-the-ditch and then channel stitched at approximately 1" intervals. Again the quilting is subtle and the hand of each piece is very soft. I now have 12 small quilts since there are 12 pieces in this vest!

At this point, the pieces were still generously cut, not aligning perfectly with my muslin pattern pieces. So I stitched around the perimeter of each piece about 5/8" from the edge of my little quilts to hold them securely in place. Finally I put each original pattern piece from my muslin on top of each quilted piece and re-cut, following the precise edges of the pattern piece. Then I trimmed off the excess silk stripping.

For some pieces, like center backs and center fronts, I wanted the pieces to appear as mirror-images of each other. For example, the center back has a seam so there are 2 center back pieces. To do this, I created a pattern tissue from the muslin piece and placed the tissue over the untrimmed piece and determined where to trim off the edges. Each center back piece was trimmed separately. This allowed me to trace part of the patch-work design onto the pattern tissue when I cut the first piece and then flip the pattern tissue and precisely place it on the remaining center back piece prior to cutting this 2nd center back piece. Now my center back pieces (and front pieces) are more-or-less mirror images as can be seen in the picture of the center back pieces.


Perhaps I should've done this earlier, but I'm now re-reading all of Mary Ray's relevant articles from Threads:
  • Threads #98 January 2002 "Basics: Seam Finishes" page 20
  • Threads #100 May 2002 "Binding Notched Collars" page 52
  • Threads #122 January 2006 "Batting for Quilted Garments" page 49

So I'm now looking forward to actually attaching the vest pieces. What fun, even if I never actually wear it!