Tuesday, November 2, 2021

Sewing with Love

As a grandma of 11, I have sewn items for all the grands - one quilt each plus the occasional PJ pants and other items. That activity has dropped away as they've grown older and more aware of their own styles and wishes. I used to go nuts around the holidays, trying to make something special for each one. Now I'm a bit more selective.

The youngest grandson just had his 6th birthday and made a special request - a Paw Patrol shirt. How could I refuse? The only down side is that I had to buy that fabric from the big box store that I do not like. They have exclusive licensing to fabrics of that sort. It was not too painful, though.

For children's clothes, I have an nice collection of Ottobre magazines. When the grands were coming fast and furious, I invested in subscriptions for several years and kept them. 

I'm glad I did. I also kept some of the pattern tissues cut out for an older cousin of approximately the same age, allowing me to make an educated guess as to the size for this 6 year old.

One time, I made a grandboy a darling plaid shirt in his team's colors complete with plackets, collar, collar band. He outgrew it in about 10 minutes. That made me sad. I wanted to avoid that this time so aimed a little larger than needed.

These Ottobre patterns are a good starting place for me. The instructions are extremely brief and they sometimes employ non-traditional construction. I chose a sort-of camp shirt, thinking to avoid all the messy (but fun) details of a dress shirt. 

For this shirt, the raw edges between the collar and the body of the shirt were to be covered with a bias binding. I knew I would not like that for a camp shirt because the neckline is kept open, so the binding would show, as would the wrong side of this printed fabric. 

I pulled out one of my husband's guayabera shirts, a lovely silk twill camp shirt. Based on this shirt, I drafted a front facing to enclose the raw edge where the collar is sewn to the shirt. In the back, I was able to enclose all the raw edges by rolling the outer collar edge under and slip stitching it in place. That probably makes no sense, but it worked!

And the shirt is too big. That is a win! Perhaps he will still be able to wear it when the weather once again returns to spring-summer. I think he looks adorable in it!

I'm wearing my fave Peony vest in cashmere-silk

At the same time, I had been visiting with my local grandgirl who was planning a Halloween party with friends around the pirate theme. She had a vision of the costume she wanted to create and began to shop the thrift stores for a vest. She is quite petite and that proved futile. So, of course, grandma to the rescue. And I had just the right pattern, one that I had never opened. I don't remember buying it even - might have been something someone gave me. It is one of those classic Folkwear patterns.

Even though she is local - only a mile away from me - I worried the whole time I was making it that it would not fit. Her mother is also petite and I never had much luck making fitted garments for her due to the need to shorten the torsos of everything. This pattern was just right without those kinds of adjustments. Hooray!

From my stash, she selected the outer fabric and the lining. I did not have enough of the print lining but was able to squeeze two fronts from it. This vest traditionally has a back constructed of two layers of lining, but that wasn't the pirate look she was seeking. 

I basted the shoulders and side seams together and ran over to her house. It was so tiny I could not imagine that it was right even though I had taken careful measurements. But it was very close. I had to let out the back and the side seams at the bustline. I also needed to scoop out the armscye but otherwise it was just right.

This basting led me to screw up the actual sewing of the vest. I came home and made all the adjustments I noted above, and then made duplicate adjustments to the vest lining. That's when I actually consulted the instructions. Oops. The lining was supposed to be attached to the vest while the side seams were still open. My fabric was fraying a bit and I did not dare take it apart again.

Instead, I attached the lining to the vest all around the outer edge (hemline, center front seams, neckline), leaving an opening for turning on the back hem. I carefully stay-stitched the armholes for both the lining and the vest and trimmed the SAs down to about 1/4-3/8". Then I rolled both SAs to the inside and slip-stitched them together. All good!

Then I realized I had omitted the back belt. Dang! Sometimes I just need to slow down but Halloween was looming. To fix that I partially opened the side-seams and slipped the ends into the seam, restitching securely. Whew.

The vest pattern includes 4 welt pockets, each big enough for a quarter. I marked these with tailors tacks and pondered whether to make them, or maybe just the pocket flaps. In the end I omitted them and I'm glad I did. No need to press my already frazzled luck, really. And welt pockets are dicey in the best of times for me. 

Making 7 perfect buttonholes reminded me how much I love my now old Bernina machine. It really came through for me. I returned to the big box and bought D rings for the back belt and the vest was complete. 

And it fits her perfectly. She says she'll wear it in the future too. She looks adorable in it. I am maybe a little biased but not much.

This Victorian pattern from Folkwear was gratifying to sew. It made me wonder if I would wear a fitted vest like this one. Nah. 

But these makes were very satisfying.


Monday, October 25, 2021

Stencil Play

As I have blogged previously, I had the opportunity to take a class in Florence AL this past spring and learn some of the Alabama Chanin techniques. In addition to my two kits (blogged here and here), I purchased one of their stencils.

I have collected more than a few stencils over the years, especially those I've used over and over again with Nancy Shriber's contemporary sashiko technique. That is a sure-fire technique for me and I return to it over and over again. Such a meditative practice. 

I've also had some small successes with paint. I've used make-up sponges and I've tried stencil brushes. It is very hard, IMO, to get the paint applied smoothly. At AC, they use a commercial air brush machine that is very even and predictable. It does not change the hand of the fabric much at all. And the person applying the paint is an artisan in her own right. It takes just the right touch even with the best equipment.

Here is my first result using that AC stencil I purchased:

It is two layers of AC organic cotton and the sewing pattern is a variation on the Sewing Workshop's eTee. I applied the stencil to the outer light gray cotton. The paint is a metallic silver from stash. I used a make-up brush to apply it. It worked OK. But the paint was a bit uneven and, in places, it feels kind of leathery and stiff.

This is not terrible because I cut away most of the interior of the stencil, AC style. And I am quite pleased with the result. I sure do like the AC technique for applying a binding to a V neck. So good.

In September I took a class locally from Kathy Colt. The title was something like Printing with Natural Dyes. It checked a number of boxes for me so I signed up. And it was a great class.

The class spanned 2 consecutive days because natural dyes require quite a lot of processing. She wanted to walk us through the entire procedure from applying the thickened dyes to finished product. She gave us a recipe for creating the thickened paints from natural dyes. I'll try that some day.

before

The resulting fabrics are quite soft as the paint does not change the hand much at all. Natural dyes do finish much lighter than they look when initially applied though. This can be a good or bad thing, depending on your goals.

after

We had quite a lot of time to experiment on our own. Kathy brought with her a large selection of stencils, some purchased and some she created from photographs (another class!). She guided us in her process of applying thickened dyes to stencils on fabric. 

This was a "duh" moment for me. She uses a plain framed silk screen with the stencil sandwiched between the fabric and the screen. In a similar manner, she applies masking tape to fabric and prints geometric shapes flawlessly. Voila! The paints were so easy to apply evenly and not too thickly.

Kathy also brought a wonderful selection of her own creations - bags and garments and experimental pieces. She is a gifted artist, so inspiring. I have several samples from the class to incorporate in future projects and the left-over paint is still in my refrigerator. I must get to that soon!

My first step after Kathy's class was to purchase a plain framed silk screen. It is probably made from polyester and not silk. I don't think that matters much in this process. It was not expensive and I'm glad I added it to my tool kit.

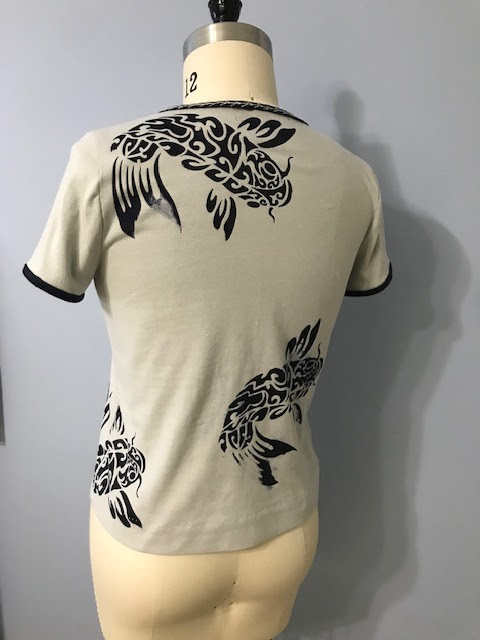
My first project with this tool used up more stash of AC organic cotton.  The pattern is the Lark tee from Grainline Studio. I printed a front and back of a plain tee shirt with my koi stencil. I am smitten with the design. I took almost a week, working a few minutes each day so that the paint on each stenciled shape had time to dry. It was during a rainy period and it took a while for the prints to dry out.

I used ordinary fabric paint, navy blue. Unlike the natural paints, this produces a crisp dark image. I do love that! The silk screen worked like a charm. My work is not perfect, but it is getting better.

It has been suggested to me that you can make your own screen by placing polyester organza in a large embroidery hoop. I think that would work as well. However the framed one I purchased was not expensive. The paint does stain the frame or hoop. And I think it's easier to apply the paint in a rectangular space. So why not have a dedicated tool?

And there's more, right? I may create my own stencils now that I have a better understanding of the process and some keys to success. It is not a quick process but it is artistically satisfying.


Good times! I hope you too are finding time to explore your artistic side. We all have one.


Friday, September 24, 2021

Alabama Chanin No 2

When I attended an Alabama Chanin workshop in April, I purchased a second kit. The first kit was included in the class price and the second was discounted, so I had to buy it, right? And I am glad I did. I finished the jacket a while back (blogged here) and I'm just waiting for the weather to turn a bit cooler to start wearing it. This tee shirt has been fun to work on, with only the tiniest of challenges. 

The Pattern:

The pattern is labeled the Alabama Sweater. You can make it in 3 lengths. I chose the middle ground with the top. I shortened the sleeves to 3/4 length and raised the neckline about an inch all the way around, maybe more. At this point I'm not sure. The sample I tried on felt way too open in the front. I'm quite bony in that area and more than a little self-conscious. I now think it could have been a little more open, but this is just fine. 

The physical pattern is not included in the kit, but the instructions are. There is not much that is challenging about the construction. It is slow-going and portable. And I love that it is entirely made by hand.

The sleeves are sewn in flat rather than in the round. This resulted in a remarkably high armscye - great range of motion and no bunching in the armpit.

I mostly needed the instructions to use in adding their signature binding to this V-neck. Their method is fabulous for these cotton knits! The binding is single layer on both sides, simply wrapped around the raw edge. I basted it on and then worked the cretan (creten?) stitch to secure it. And their method for the V? That is quite fabulous too. I'll be using that technique elsewhere.

The Fabric and Stencil:

The fabric is of course two layers of their organic cotton jersey. The top layer is light gray and the bottom layer is a beautiful red, *my* red with blue undertones. 

The stencil is a darker gray or silver, random words and lettering in a variety of fonts and sizes.  I asked them to print it diagonally on the fronts and backs, with lots less on the back. In fact, I omitted stenciling entirely on one side of the back. I asked them to print the sleeves partially, as you can see. 

Honestly I don't think I would select that stencil again as it does not lend itself to the standard AC technique of sewing around the shapes and cutting away some of the fabric inside the stencil or around it. Some of the shapes were too thin to sew around, so I sewed on top of them. I did sew around most of the letters using a simple running stitch. 

Each kit includes an 8x10 double-layer sample with stenciling so that you can determine which of their techniques works best. I tried cutting away the foreground on my sample and learned what I did NOT want to do. To me it looked like a flannel board with letters stuck on.

After completing the outlining of the letters, I slit open the larger letters and even removed miniscule slices of the interior of a few letters. Others I slit, thinking that these will open a bit more when I wash it. I had to leave the smaller ones alone.

When I had completed the construction, except for the hems and neckline, I tried it on. It felt like that blanket I wear at the dentist when they x-ray my teeth, only nicely fitted through the shoulders, bust and arms. I put it away for a while and worked on other projects.

After reassurance from one of you, kind readers, I cut away the bottom layer (the red) from around the lettering. This did not change the appearance at all, but it made it much lighter and quite comfortable to wear. And that plain back just had to change - too much flat gray after the business in the front. So, for now, it is solid red. 

I took a class on printing with botanical dyes this past weekend - such fun! I learned some new things about printing, so I now have an idea about a way to keep the red half of the back more in line with the overall design. Just waiting for a few supplies to arrive.

I turned the bottom hem up and stitched it in place with a running stitch which gives it some weight. I had enough red left over from my cutting away the bottom layer to make red binding for the sleeves.


This piece is finished. For now. I may or may not add to the red back half. What do you think? Is it too jarring as is? 

Thanks for reading. I hope you are happily making something today.