Thursday, February 24, 2022

Vestments

From time to time I find myself making textiles for my church, vestments and related textiles for the altar. It has now been more than a decade since I made my first one - a stole created as a welcome gift for a newly hired priest. As it happens, he was fond of elaborate textiles. With some other church ladies, we made an embarrassingly expensive set of vestments including a frontal I constructed. At $200 per yard, it was a stressful make for me. And yet I wanted to make it.

Recently my current priest requested that I make new vestments and altar textiles for the church (different church). In this case, the vestments are owned by the church, not an individual priest. The old textiles have been in rotation for more than twenty years and are most definitely ready to be retired.

Initially I understood that he just wanted a stole replacement. As the project evolved it turned out much more was involved.

The only requirement is that they be green. My church follows a Christian liturgical seasonal color scheme. Green is the color of *ordinary* time which is almost any time outside of Easter and Christmas. In other words, these textiles are well used throughout the year.

The project started in November. I was struggling with a design to be honest, but then I broke my ankle and could not sew. That gave me a pass, and we were headed into Advent and then Christmas, so I had some time. I struggled with a design.

Here is one path I started to pursue. It looked very unsophisticated to me and I could not imagine it in church. Now I go to a very casual church and have a very easy-going priest. I'm sure he would have worn it. I abandoned the project.

Since my ankle surgery, I've been lucky to see lots of improvement and a gradual return to my sewing room. So a few weeks ago I decided I really wanted to get this done and let it go.

I still made lots of mistakes and kept telling myself that I was almost done. My husband stopped listening to me every time I said, I'm almost there! But I did finally finish everything. 

Here is what I made:

  1. Two stoles - one for an average height priest and one for a taller priest. This is a kind of scarf that goes around the priest's neck and hangs nearly to the floor under other garments.
  2. A chasuble - This is a poncho-like garment that is worn during Mass.
  3. The chalice veil and the burse - The veil covers the chalice that contains wine for communion. The burse sits on top of the veil and contains additional linens used in the Mass.
  4. A cover for the cushion that holds the Missal during Mass.
I learned a whole new vocabulary during this process. Like Steve Martin said about the French, my church has a special word for everything. I had no patterns for any of these items.

THE STOLES

When I finished the first one, I learned that another was needed for extra tall priests. I pulled out my drafted tissue from the first one and realized that during the design process, I had managed to make the first one too short! So I added a section to the bottom of the shorter one and I honestly like it better. I'm sure I made mistakes on the longer one too but I cannot remember any more.

THE CHASUBLE

After much fiddling, I decided that the best design would be one that I like. I know that sounds a little selfish but he gave me free reign and it ultimately made more sense to me to follow my instincts. The design is an abstraction of the ubiquitous crosses that appear in all Christian churches. I wonder if that comes through at all.

My most significant challenge was the lining. I *finished* it back in January and left it parked on my dress form while I struggled with the other items. The outer material is silk dupioni and the lining is my go-to, Bemberg rayon. Perhaps something else would have worked better but I was too far in to turn back. The rayon sagged and pulled and drove me nuts every time I looked at that dress form.

The final result involved removing the hem, shifting and pressing and fiddling until I felt there was nothing more to be done to make the outer fabric and the lining meld. I did add a bias cut facing all along the hem. My thinking is that if it continues to shift, then the silk dupioni facing will show, rather than the lining which is of course not an exact match in color. The lining is certainly visible but does not appear so sloppy now. Anyway I'm pleased with it.

THE CHALICE VEIL

This appeared to be fool-proof at first blush. It's a 24 inch square with some decoration. I borrowed a blue version from church and made lots of notes, but evidently not enough. I added a cotton canvas interfacing to make it easy to drape in the desired shape. As I was finishing, I decided to take a look at the altar one Sunday and discovered that it should not be that stiff. So off to remove the stiff interfacing and on to add something with body but way softer. Whew!

THE BURSE   

I knew from the get-go this would be a stretch for me. The examples from my church were like a little book cover covered in silk. Of course I consulted Dr. YouTube and I did find some tutorials. Just not for the style my church uses. You may have noticed that I incorporated sashiko in the above designs. The cover for the Burse presented a great little spot for a Celtic design done in sashiko stitch. To stiffen the front and back of the burse, I bought two cut-to-size mat boards from my local Dick Blick.  I stitched the design and made the two sleeves for the boards about 1/8 inch larger. I  finished it with hand-stitch on the inside, trying to keep it flexible for use. I hope it holds up to use. It was satisfying to see it come together.

COVER FOR CUSHION

Somehow I managed to make mistakes even on this! It's really just a pillow cover. The old ones close with hook-and-loop on the back. I asked the ladies in charge of such things gave me permission to use an invisible zipper instead. I think it will look nice longer that that sticky hook-and-loop stuff. 

Hudson Hack


It has been over a month since I blogged. What happened? I have been sewing but not really much for myself. Rather I finally forced myself to finish a project I started in November for my church. I will recount that in another post, primarily in case I make such liturgical pieces again! I'll want to avoid repeating all my mistakes. And there were lots of mistakes to avoid.

This past Sunday, I took it all to church and declare it DONE. Then I got right to work sewing for ME!

First up was the February project for Sew Confident! from the Sewing Workshop. In my previous blog post I described the new rendition of the Quincy jacket, now called the Sterling jacket. This year in Sew Confident! the theme is wardrobing. The Sterling jacket was for January and a hack of the old Hudson pants was introduced as the February project.

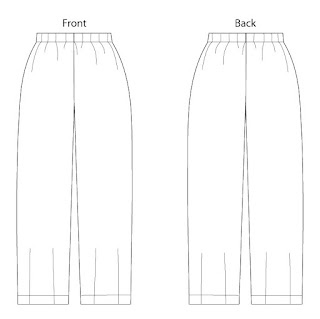
Original Hudson Pants


Hudson Pants Hack

The Sewing Workshop offered kits and I chose a dark navy linen version. The lovely thing about a kit in this situation is that I was sure it would match the Sterling jacket which I also purchased as a kit. The navy blue linen did not disappoint. It is one of those lovely soft linens that looks good when it wrinkles, especially after washing and drying. It is a nice medium weight fabric that was great fun to cut, sew and press.

The Hudson pants are a basic pull-on pant with only two pattern pieces - the front and the back. It is interesting because of the vertical hem darts. The addition of the darts slightly alters the overall silhouette and shape. I've made them a number of times but not recently.

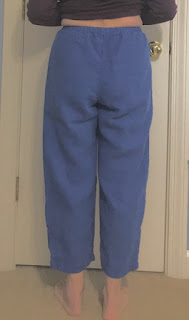
an old shot of me in linen Hudson pants

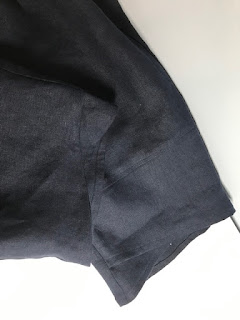
The hack for February includes eliminating the hem darts, creating a separate waistband, and adding pockets. The pants are shortened, then overlapping panels are added to the bottom of each leg. The final piece has a silhouette similar to the original Hudson pants, I think. But it was more interesting to sew.

Dark navy is hard to photograph but maybe you can see the sweet overlapping panels.

There was also an emphasis on pants fitting for February so I took the opportunity to re-evaluate my older Hudson pants to see what I liked and what I did not. I lost some weight about a year ago now, so I took in the side seams to create a more slim look.

Recently adjusted for my current size.

I made a serious attempt to *read the wrinkles* in the back, but also consulted a bit with Linda Lee via email before making the new pair of Hudson pants. The separate waistband gave me a late-stage opportunity for better fit than the original cut-on waistband did. 

I made some tweaks and then added extra height in the upper portion of the pants. Before adding the separate waistband, I pulled them on with a knotted elastic at my waistline. Once I adjusted the position of the elastic band, I marked the elastic position with chalk. I stay-stitched along the chalk mark and cut off the excess fabric. Then I added the waistband and inserted the elastic.

For elastic waistbands, I like to mark the two ends with Sharpee so that when I insert it, I don't twist it. The elastic provided with the kit is softer and more stretchy than I'm used to sewing with and required a number of tweaks to make the pants fit closely enough. I may need to remove just a little more but it's pretty good for now.

I do love the pockets. They are lifted directly from the West End pants, an older TSW pattern. They are simple and fool-proof to add to any garment with side seams, I think. The result is a pocket with very little bulk.

This is a super comfortable ensemble and really puts me ahead in my spring sewing. The jacket is made with cotton jacquard from the January project kit. The pants and tank are linen from the February kit. There were lots of color ways from which to select a kit. I'm pleased with my navy pieces. Just right for spring in Atlanta.

MixIt Tank top with Hudson (Hack) pants

I cannot decide if I like the overall length of the pants. I may take the lower panels off, shorten the main body of the pants, and then re-attach the panels. They seem just a little longish for cropped pants.

Through careful placement of the Hudson pattern pieces, I had enough fabric left over to make a little shell using the MixIt tank pattern. Yay!

I adjusted the hem so that it is a sort-of shirt tail. I used the navy linen for a bias facing around the neck but created a more light weight bias facing for the armholes using a not-silky silk from stash. I used it in the Sterling jacket too.

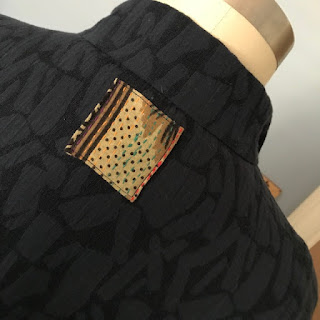
I added a little patch to the back neckline (of course) using my shrinking stash of remnants purchased from Mieko Mintz. I'm sad to report that she no longer sells her remnants, as far as I know. Too bad. They are so pretty.

And now I have an ensemble! Maybe. Should I shorten them?

Thursday, January 13, 2022

Now Sewing!

Happy New Year and hooray for 2022! 

DH helped reconfigure my sewing room to make sewing a possibility. It's still a bit challenging to maneuver knee scooter, crutches and/or a boot, but I'm feeling good about it all. And I'm making real progress on the healing of the ankle I fractured over Thanksgiving. Life is good.

My first make of the year was constructed using the Sewing Workshop's Quincy jacket. I made it when it was first published in a light weight linen, I think. It was the wrong fabric and moved into the donate pile pretty quickly. 

During her regular Tuesday FB live broadcasts, right before Thanksgiving, Linda Lee of TSW showed the first garment for her 2022 Sew Confident series. This is her extremely successful subscription program that I've been participating in for a number of years now. The new pattern is called the Sterling jacket and is a riff on the old Quincy. There are enough changes that I'm glad I purchased the new one.

While waiting on the publication of the Sterling, I decided to revisit the Quincy, using this cotton fabric that looks like it's quilted. It is not quilted exactly, but woven to look like it, a jacquard, I believe. The back side of this fabric is not pretty at all, kind of like a loose weave terry cloth, so I definitely had to line it. The lining I chose was one gifted to me by BSF. I think it is silk. I just love the way it looks peeking out.

I cut the Quincy out before Thanksgiving and cut out part of the lining. When I returned to it this month, I somehow forgot that I must have lengthened the Quincy, as my lining was too short for the outer pieces. I shortened the fashion fabric and actually like the result quite a lot. It reminds me of a cross between a bed jacket and Chinese peasant jacket. It's cozy but not too warm.

I added patch pockets but then realized I did not line them up correctly, so I removed them. I may add some smaller patch pockets later, as I do like something for a tissue or two.

I also added a simple placket to the left side so that when I close it, right over left, there is not a gap. I created bias tubes for button closures and used some fun buttons that read "Sewing Workshop." That must have been a party favor during Sew Kansas. Except for needing to add pockets back, I like it a lot.

Then the Sterling came out last week. It's a PDF download pattern, not a printed pattern. There are a number of options for printing these PDF patterns. I was stuck on the couch anyway, so I printed it at home and taped it together. 

I had seen Linda's Sterling mock-up at a sewing retreat - several of us there encouraged her to publish it. It is based on the Quincy but shortened, and a bias flange has been added to the hem. It also has a more narrow collar, extended center fronts for buttons, and appliqued front plackets. All edges have a 5/8" seam allowance with instructions to finish with a 3-thread serged rolled hem.

Kits were also made available last week. I had seen a preview of the kits and the various color choices. I knew I really, really wanted to make up the navy fabric. Ordinarily I resist kits, but this was just too good to pass up. And I'm so glad I did not. This navy fabric is just lovely with great drape for this pattern. Unlike the gray Jaquard, this one is pretty on both sides, with that positive-negative light-dark effect. I had trouble determining which side to use and marked it very carefully!

This is how it looked prior to adding the flange - cute, I think!

The kit included 4 spools of cotton thread, 3 for the serged edges, and one for regular sewing. I tested my serger with the fabric and thread, along with some edge finishes I like. The rolled hem was better than I expected, probably because the cotton thread is more beefy than typical serger thread. I was tempted but, in the end, I chose my more conventional finishing methods. This is an unlined garment, so I also spent time thinking about how I wanted seams finished, as well as the collar.

Seam finishes:

For the shoulders I used a mock fell seam. For the long sleeve seams, I used a French seam. I knew I'd like that best when rolling the sleeves. For other seams, I finished with a serger and then top-stitched so it has the outer appearance of a felled seam too.

Hem finishes:

For both sleeves and the lower edge of the flange, I created 3" bias strips from a light weight silk in stash. I folded the strips wrong sides together so that one edge was a fold. Then I attached the raw edges of the bias strips to the raw edges on my hemlines, graded the seams, and turned the bias tape completely to the wrong side. It looks similar to a narrow facing. 


For the lower front corners, I followed the excellent instructions in Linda Lee's old pamphlet on miters. It worked beautifully. I am very happy with the result.

Collar:

Here I followed very traditional techniques used in shirt making. I sewed upper and lower collars right sides together along 3 sides, graded the seam allowances, turned and pressed. I machine sewed one collar to the jacket and invisibly stitched the other collar to the neckline, enclosing the raw neck edge.

All in all, the Sterling was a fun make and I think I'll wear it a lot. It works well as a shirt. It also works well as a jacket. I put my blue-black silk Now shirt under it and like that looks a lot. Unfortunately I do not think the photos show that as I see it IRL. 


I may add another button to collar so that it can be buttoned up higher. And I may add a patch pocket or two. I do like a pocket in a jacket.

This is really a good pattern with lots of possibilities. For this first one, I used size M. I added a little length to the back pattern to manage my rounded back (I did not want a CB seam  with this particular fabric). I also added a forward shoulder adjustment. Lastly I rotated the grainline on the side panels just slightly, as I noticed in the Quincy that there is a tendency for it to flare out too much in the back. 

I hope to explore this pattern quite a bit more. It is similar to the patterns from Fit for Art. Both are similar to a much older jacket designed by Jean Cacicedo, now published by Diane Ericson. I' hope to explore that one from Jean Cacicedo soon too. The square armhole is holding my interest for now.


Friday, December 31, 2021

Not Sewing

The past 2 months has been busy and challenging. There has been virtually no sewing. Instead, lots of knitting.

I get such a sense of grounding and satisfaction from stepping into my sewing room and stitching. Even if I'm just repairing a terry bath towel that has come unstitched, I find pleasure. Of course, making a garment from start to finish is my preference, but even the necessary sewing is helpful at times.

During this time, we've traveled to visit grandchildren in 3 different locations, we had a sudden death in the family that necessitated a trip to TX to be with family, we had Thanksgiving plans to meet some of the grands on Fripp Island in SC. 

Then I missed a step, twisted my ankle, and had surgery. Recovery is slow. I know, in my heart and mind, that I should not complain. After all, this episode of temporary disability has given me a tiny glimmer of what it would be like to suffer a permanent disability. And compassion is a good thing, no matter its source.

Then Covid Omicron visited our family and upended Christmas plans. So many people have suffered from this, many in ways so much harder than mine. But I miss seeing some local grands and their parents. It is still rolling through them and we have evidently dodged that particular bullet for now. Thank goodness for vaccines and boosters.

It is not impossible to sew with a cast from the knee down, nor is it impossible with the boot I now wear. I did manage to make a silk pillow case for DD at her request. I was lucky to have a piece in stash that was just right. And she seemed pleased.

I alternate between crutches and a knee scooter, neither of which works well moving between my ironing board and sewing machine. Maybe DH will help me re-order my sewing room to accommodate me better. He's been my hero during all of this.

Knitting, well, it turns out you can do that almost upside down. And I have been doing a lot of that, foot above heart. Talk about slow sewing. It does not get much slower than when I knit. Therefore, it is not terribly expensive and keeps me occupied.

I first learned to knit (crochet, needlepoint, embroidery, etc) as a child but it did not stick. Then when I was living in Princeton NJ in the 1980s, and desperate for the company of ladies who make, I took a knitting class. I acquired some tools and some yarn but never made anything I really loved. And life took different turns requiring my attention to career, marriage and raising kids.

There is a sweet little knit shop in the town next to my son in NH. I first learned of it because she originally had a rather large store in Nashua that was half sewing fabric and half knitting. The knitting has survived her down-sizing and move to the tiny town.

I have sewing friends who knit. They made these cool hats that you knit really large and then full in the washing machine. One friend gave me some yarn, a hat pattern, and encouragement. And I was off to learn knitting again.


That endeavor is now serving me well, though I do miss sewing garments so very much. I've learned not only how to KNIT but how to TINK (un-knit). I am fearless in the tinking. Thank goodness for youtube, my constant teacher.

Before tinking

I had almost finished a sweater, took it to NH to finish, and it was attacked by my son's cat. He evidently just loved to dig into that texture and lanoline. He managed to bite significant holes in it before being caught. I took it to that sweet knit shop in the next town over and asked for expert advice. She said without hesitation, rip it out. 


BTW, son feels horrible about this, but I wish he did not. After all Mao was just being a cat. And I think the results are going to be so much better that the original as I improve my skills and spot major errors I made the first time around. As I un-knitted and re-knitted, I realized the large number of mistakes I had made!

Since then I've finished that wool sweater up to the sleeves and decided that I'll leave it as a vest. That yarn is unforgiving and the results are not stellar. I need to block it and maybe that'll help a little, but I don't want to invest any more time trying to save it. But I've learned so much. And I have to give credit to the author of this video for all the detailed guidance on knitting the Weekender.

I hope to make it again with a higher quality of yarn. I am realizing that, much like with sewing garments, quality in yarn makes a huge difference in the result. I love knitting merino wool, but even merino wools vary quite a lot. For this sweater I plan to use a lovely wool that has been treated to prevent shrinkage when hand-washing. 

Making the classic World War II watch caps has been much more satisfying. This is primarily because I invested in some better yarn. I managed to eek out 7 of them for Christmas presents. 

Since then I decided to use the yarn left over from my sweater to try a purse that will be fulled in the washer. Maybe it will work. Either way is actually OK right now.

So I wish you a very happy 2022. May it be full of creativity and love and good health! I have so many sewing projects in my head right now!