Monday, February 25, 2013

A Jewel Neckline

The design of Cutting Line Design's Artist In Motion tunic illustrates the advantages of the jewel neckline, I think. I tend to prefer a V neck but this shirt is just so much fun to make AND wear, that I find myself liking the simplicity of a jewel neckline.

This is my second version; the first was made out of  an artsy linen/cotton blend. Just realized I forgot to publish that blog earlier. I love that version.

This is a perfect little tunic. An interesting placket. Louise's signature top-stitching. Pretty inside and out. So simple, yet so versatile.

This one is even more simple, made out Radiance - a blend of silk and cotton. It has a sheen on one side, flat on the other. I think I'd prefer another button, but this is a good place holder.


Besides, it's a jewel neckline...

Saturday, February 23, 2013

Thursday, February 21, 2013

Silk Dye Painting Class

Hellenne's piece
Kathy's piece

Mine - lots left to do!
Rosalyn's


My class with teacher Hellenne Vermillion continues. What fun we all had today!

Wednesday, February 20, 2013

Vogue 7881 - in pursuit of perfect pants

I seem to be forever looking for the perfect pants pattern. This pair is so close to right for my body that I must admit to looking for a new body now.

And this is a pretty darned good pair of pants. I just finished a pants fitting class with Pam Howard about a week ago - hence the darned good fit.

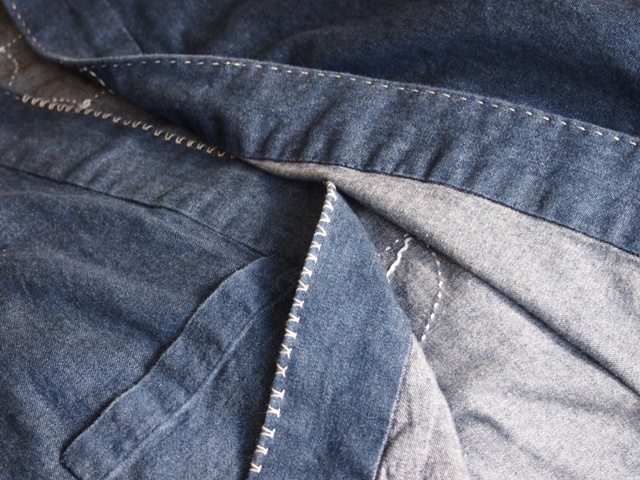
Vogue 7881 is a Claire Schaeffer design: contour waistband (oh, so comfortable), straight legged silhouette, and the option of darts in the front and back. For this first pair, I was able to ease the pants into the waistband without the darts, though now that I look at the pix, I see the easing.

Isn't that always the case? I see the problem areas.

Pam helped adapt a size 16 to my shape. I needed less fabric near my buttocks and more at the top of the back waistband. And a little more room in the crotch.

TMI?
This first real pair from the muslin/pattern is made from a baby whale cotton corduroy, interlined with rayon Bemberg ambiance.

I added a little more room to the hips (through the side seams) and I took 4 inches out of the pants hem on each leg - that is, an inch is tapered out of each vertical seam. Maybe I'm foolin' myself, but it looks pretty straight-legged to me.

Yep, pretty close.
Before, when it really was straight-legged, it looked too generous for the pants silhouette now in style. I think that happens when your hips are a little - ahem - fluffy.

I recommend this pants pattern even if you cannot take a fitting class from Pam. The instructions are so very interesting - Claire's approach to couture finishing. I loved inserting the zipper (and I got to do it twice*) as well as applying the waistband facing by hand.

And these pants are wonderfully comfortable.

*Somehow I managed to forget my tried-and-true approach to inserting a zipper that is too long:

  • If the top of the zipper is at the neck where you would have to fold the zipper teeth down over themselves, then cut from the bottom. That is, keep the zipper stop at the top of the zipper. 
  • If, as is the case here, the excess zipper tape easily disappears into a piece above it (here, the waistband), then cut off the excess at the top, and keep the zipper stop at the bottom.


I found out the hard way, cutting off the zipper tape at the bottom without sealing it off. The first time I tried them on for fit, the zipper pull came right off, of course.

Sunday, February 17, 2013

Design Mending a la Jude

running stitch then combination wrap stitch
As I have mentioned previously here, I have been enrolled in Jude Hill's classes recently. I am letting it steep, trying some little samples here and there. Not trying to force it.

One of my favorite garments is a kimono made out of a 7 ounce denim - not as sturdy as indigo, I expect, but it was the closest I could come to indigo at the time I made it. I have now discovered sources online, like especially Shibori Girl.

As denim does, this one is beginning to show wear at the edges. First it fades to white, then it begins to fray. And without my taking note, the entire garment has become a softer blue, a softer textile, a softer item to wear.

Today I am adding some stitch to the edge to provide a buffer from normal wear. It's a stitch I made up, but it is probably not original with me.

I started with a running stitch all along the edge. Next I anchored a thread at one end and began to wrap the running stitch on both sides - moving from a stitch on the front to a stitch on the back.

Looking a little faded. I like it.

To me the resulting stitch looks like bird tracks. I'll call it the bird track stitch for now.

Cross Training - Silk Dye Painting

Quite by accident, I have discovered the advantages of cross-training.

I have learned to quilt, while continuing to construct clothes. And I've explored art quilting, which I love almost as much as clothing construction. I always return to clothing construction, my first and favorite hand craft. Often I return, affected by, inspired by, informed by the new aesthetics and techniques.

Now I am in the midst of a fun and relaxing adventure outside of my comfort zone. I am taking an 8 week class in silk dye painting from Hellenne Vermillion, a wonderful artist AND teacher. This is the first piece I've taken from start to finish.

I have applied new-to-me techniques to get it to this point: doodle drawing with the resistad, a resist agent; then painting inside the drawn resist lines. I tried to produce as many different, and bright colors as I could. And I tried a little blending while painting on the silk. Some of it was on purpose.

Lastly I steamed it and washed it out. I did not believe that it would really work, so I took *before* pictures, in case it returned to its orginal state of off-white silk crepe de chine. It really worked! A testimony to Hellenne's teaching skill.

It is not a work of art, but it is joyful. So I am joyful with it.

It will become something - perhaps a happy surprise on the inside of a garment? Wall hanging? Window decoration? An infinity scarf? It looks the same on both sides, given the nature of dye painting. So it would be interesting as a mobius scarf.

Before steaming and washing

After


Sunday, February 10, 2013

Winter Crop Circle

Recent projects include this very small piece - 12 inches by 12 inches. The off-white is a silk noil lined in cotton flannel; the black is a light-weight wool with heavy interfacing.

I stitched what I thought was Jude's wrap stitch. But now I cannot find her info about it. Did I imagine it?

The stitch involves two passes.  I used pearl cotton for both.

The first pass is a simple running stitch, worked from the back on a piece of flannel. That way, I could mark the lines and follow them easily.

The second pass is worked on the surface. I attached the second piece of thread on the back and came through to the front, near a running stitch. Then I used the end of the needle to gently lift each running stitch, sliding the second thread under it with the tip of the needle. It creates a texture sort of like small waves. Twisted. Wrapped. Snugged.

To me it looks like a crop circle viewed from an airplane window after a heavy snow. A little thought for the blanket son and family are experiencing in NH.

I did use Jude's method of managing the ragged edge, though I sewed the edge with my machine. The silk noil was just right for this.

I am also intertwined with this prayer quilt. Small quilt. Huge prayers for Katie. She knows.


Tuesday, February 5, 2013

Steely beast

Queen of hearts
Jude was right. Denim is the devil to needle.