Monday, November 19, 2018

Archer Button Up in White Linen

This one has been in the in-box of my mind for quite a while. I cut it out and took the pieces to NH to visit DS and family. No real sewing occurred there. DGD and I retrieved the sewing machine I've stashed there and made some scrunchies she wanted. I will cheerfully sew anything with her!


When I arrived back home, I decided to take my time making this Archer Button Up. What a pleasure it was.


I made one other Archer, the view with the back peplum. I like it quite a lot and picked up some ideas for improvement.


The view I selected this time is almost a classic shirt. It contains a double layer yoke with forward shoulders as well as a collar with a collar stand, though it's not at all obvious from their line drawing. The back contains an inverted pleat and no peplum.

The line drawing looks like a Peter Pan collar. The pattern contains a collar band and collar.
The not-so-classic characteristics include separate right and left fronts. The left front has a cut-on front placket and the right front has a separate placket pattern piece. This could be quite handy if you're working with a plaid and want to position the front placket on the bias, or if you want to highlight a second fabric down the front.

It's not handy if you're trying to match a pattern because you have an extra vertical seam to match. I cut two left fronts - there was no need for a separate button placket piece. In this solid white, the top-stitching makes it almost impossible to determine if the front band is a separate piece or not, IMO.


Another not-so-classic characteristic is the continuous bias sleeve placket.

Although this is faster than a typical menswear shirt placket, I don't think it is quite as sharp-looking. I have fun making conventional menswear shirt plackets every time I don't screw up. This time the sewing goddess was watching over me and I got each completed in a single try. Hooray!

I do like the notched corner of the Archer shirt
I used my modified collar stand from my previous make of the Archer. It's a little deeper than the collar stand included in the pattern envelope. I'll make another version with the classic collar and stand at some point in the future.


I shortened the sleeves per my notes from version 1 of the Archer shirt. My arms are not proportionally short. Reviews over on pattern review indicate this is an issue for lots of people.

It's worth noting that the sleeve edge has a lovely curve where it attaches to the cuff. It is such a nice draft. It has just the right amount of poof and looks better on the body, I think.


I made one other teeny-tiny change in the pocket, something no one will ever notice. It's the little things that make sewing fun for me. I top-stitched each pocket onto the shirt in what is mathematically a continuous loop. That is, I started and stopped at the same point. The appearance is just 2 rows of top-stitching. It secures the top corners nicely.


I used flat-felled seams throughout the process. The seam allowances are only 0.5" so a mock flat-felled seam was tricky. Midway through I realized this was an opportunity to make real flat-felled seams by positioning the back seam allowance below the front seam allowance.


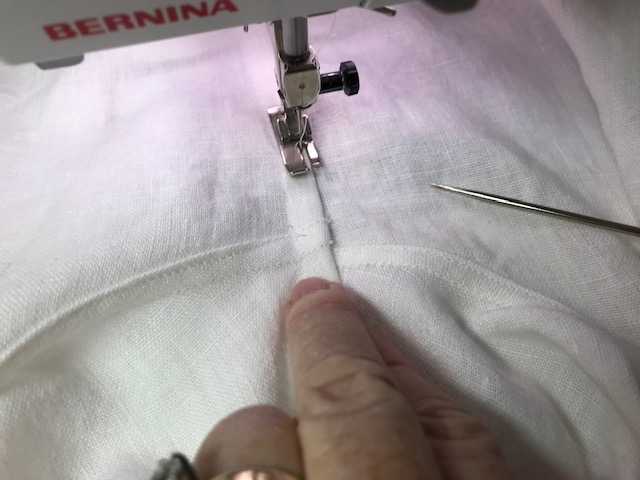
Of course, it's a bit anxiety-producing to sew that flat-felled seam from the shirt hem, under the armpit, finishing at the sleeve hem. It's like a journey to the center of the earth. Woot! when I successfully arrive at the center.

Woot!

I made a change in the order of completion. I prefer to finish a shirt tail hem before sewing the side seams. This reduces the size of the wings at the hips, I think. Otherwise the shape of the hem tends to flare out at the side seams when the hem is finished.


It was fun to press it this morning and look at it, all crisp and white on the dress form. That won't last but I will definitely enjoy having this basic in my wardrobe.


Friday, November 16, 2018

Two Pieces for Layering

Filmore duster with Hudson top (TSW)
As usual, it seems that we're speeding into winter here in the southeastern US. It always seems that way to me because I love seeing the fall colors and I miss them when they're gone. There are still some beautiful trees here but we're beginning to light the fire at night.


As winter approaches, I think about 3-piece ensembles. One of my tried-and-true layering pieces is the super simple Hudson top, from the Sewing Workshop (TSW). I like to make the shorter version so it slides easily under a vest or a jacket. I know that a current style includes the hem of a shirt showing beneath a short jacket, but I have not been able to adjust my eye.  It just looks wrong to me.


This season's first Hudson was made with a swoon-worthy cotton Ikat in black and brown purchased online from Stonemountain and Daughter. I did not have enough fabric, per usual, and so added a band to the front hem and bias binding to the sleeve hems.


There is always enough fabric for a little something on the back.


Today I made a project of determining what pieces will layer nicely with my new Hudson tops. Here are the pieces I pulled from my closet for the Ikat version:

Chateau jacket in wool Melton maybe (TSW)

Marcy Tilton design in a cotton-linen blend

Wiksten Kimono Jacket in washed linen (also lined with linen)

Wool tweed and silk vest, OOP pattern Hong Kong vest from TSW

My most recent make is the Hudson in a pebble textured polyester (yikes!) piece I purchased from the Sewing Workshop (TSW). It was a pain to sew, but I'm glad I persisted. It came very close to the trash bin after I completed French seams on the neckline only to realize that I had sewn it all backwards! I kept reminding myself that black is a core color and I needed this top!


Due my recurrent theme of too-little-fabric, I discovered that I could cut the front and back as one piece with a center-back seam. The side seams are completely straight on grain so it was easy to overlap the pieces by 1.25".


It doesn't photograph well but it goes with just about everything in my closet:

This jacket is made with a heavy Japanese cotton using the Now and Zen pattern (TSW)

Hong Kong vest again

A more recent make, this is the Stafford pattern in linen from a curtain, lengthened and sleeves omitted (TSW)

Fillmore duster in Brussels washer linen (TSW)

Chateau coat again, always sharp with black, I think
It's good to bring out some old friends from the winter closet. Now I can look forward to wearing them on these dreary winter days.


Monday, November 5, 2018

Seasonal Changes

It is finally autumn here in the southeastern part of the US. And it feels a bit like we're heading into winter quickly. It always feels that way because I love the feel and look of fall and want it to stay a while.


Twice a year, I move my clothes from one closet to another. It is always a good time to assess the items I'm not wearing or items that need mending. And I find myself enjoying the making of small tweaks in a few items.


First up is this black cotton shirt with white sashiko, constructed 2 years ago. It is made in a medium weight cotton that feels a bit like washed linen. I traced the pattern while at Sew Kansas. It has never been published by the Sewing Workshop.

This neckline is not part of the pattern. I adapted it from the Egyptian shirt from Folkwear.
I like it a lot and have worn it often. Black pants; black top; done. No surprise that is began to look quite washed out after a number of washings. And I have all this black walnut juice around, so I thought, why not?


But I did not want to dye the white sashiko so I removed it. I let the top soak in a solution of black walnut juice and iron water for several days, simmering it on the stove from time to time. I think it did get a bit blacker. Afterwards I restitched the sashiko. Yes, I did. Who does that?!?


Next up was an unlined version of the the Sewing Workshop Tremont jacket. I have used this pattern more than once. It's a charming pattern, I think, with its asymmetrical fronts, set-in sleeves, and face-framing collar. This one was constructed using a hefty loosely-woven cotton ikat. I added some red accents that got in my way when I actually wanted to wear it. And it really should have been lined from the get-go.

I now see that the red accents are just about invisible. sigh.
So I removed the red accents and lined it. I used a soft light-weight cotton Ikat for lining the body and rayon Ambiance for the sleeves. I really like the weight of it now.


I also added a new closure using remnants from another cotton ikat project. I created frog knots per Sandra Betzina and simple loops on the other side.


And then I decided I didn't like that and removed the closures. Jeez.


Last weekend I signed up for an indigo dip at my local recreation center. I looked around and saw this nice white top I made with a French pattern, the Cezembre. I had already adjusted it once, as the cotton shirting was too tightly woven for the sleeves to fit smoothly into the armscye.

Cezembre before
I tried to create a gradiated indigo color with the darkest portion at the bottom. It was impossible (for me) to keep the upper portion white, so I dipped it all. I'm pretty happy with this color. I do love indigo blue.

Cezembre after
Ah, well. Two steps forward, three steps back. It's all about the joy of working with cloth in my hands.