Sunday, September 30, 2018

A San Diego jacket

I have just finished a San Diego jacket. It is a versatile pattern and so I'll probably make it again. I made the shirt almost two years ago when the Sewing Workshop (TSW) updated and reissued it. I blogged about it here.


From time to time, I have thought about making a jacket version. I have seen so many pretty San Diego jackets, in person and online. First there was this vintage version from the basement at the Sewing Workshop in Topeka KS. I think it must be a beefy silk tweed. Isn't it lovely?


The one below has been modified (I think) to make the fronts extend horizontally to create an extended collar with more vertical drape.


And the Sewing Workshop hosts a trip to France that often involves lovely versions of the San Diego jacket. I watch for those posts on Instagram. Always inspiring.

So this time I made the jacket version. My fabric is a linen-cotton blend from stash. I think it is a Robert Kaufman fabric probably purchased at a quilt shop. I like these fabrics that are cross-dyed, this one in burgundy and off-white. The addition of linen makes it right for a light-weight fall jacket.


It is not dramatic and the making is quite simple. There is a Y seam that forms the collar, but otherwise it is very easy. The pattern does have a 2-piece sleeve but I'm not sure why. It is strictly a design feature and that may be enough. It would certainly be an interesting place to insert some pretty piping. You can tell by looking at the two pieces that this is essentially a one-seam sleeve. The seam between them follows the straight-of-grain.


To me, this seemed a blank slate for pattern play. I started by reading about the anatomy of sleeves in Helen Armstrong's Patternmaking for Fashion Design. That gave me the basics of drafting a sleeve but it did not help me alter an existing sleeve. A quick search on Youtube led me to a tutorial by Christopher Sartorial. His video was clear and exactly what I wanted.

The first step was to convert the original two pieces into a single piece. This was accomplished by overlapping the seams by 1.25" as seen below. 
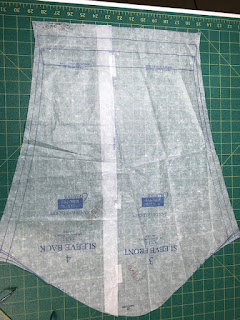

I traced this onto a single piece of tissue and removed all seam and hem allowances. The first step on the tutorial was to fold the single pattern tissue so that the underarm stitching lines met. This was interesting to me because it showed that all sleeve shaping had been shifted into this one seam. You can see that in the gap created when I brought the underarm seam lines together.

Original 1-piece sleeve after seam allowances were removed.
Next I traced lines according to the tutorial to create an under sleeve and an upper sleeve. Below you can see that I've added back the 5/8" seam allowances, as well as hem allowances.
Each says Right Side because I discovered I had created a right upper sleeve and a left lower sleeve.

This version of a two-piece sleeves has one vertical seam that is visible from the front and another that is visible from the back. It creates the effect of an elbow dart and some very subtle shaping.


I tested this by creating a toile for just the sleeve pieces and basting them into the jacket armhole. I was (as usual) short of fabric and could not take a chance on my pattern play failing. But it worked. Hooray! I was still a little short on fabric and so added cuffs to my sleeves.


In fact, I had to further piece one of the sleeves. You can see if you look carefully below that the undersleeve has an extra horizontal seam. I sort of like that it's different from the other sleeve.


The original pattern includes a single back piece cut on the fold. In order to add a bit of upper back shaping, I created a center back seam. 


Because this is a light-weight unlined jacket, I sewed flat-felled seams throughout.

Finishing the armscye
I think it might be interesting to make a layering blouse to wear under this. By switching back to the shirt pattern pieces, I think it'll fit nicely under the jacket version. This dark red silk fabric from Laura Murray may be just right.


This was a satisfying experiment. I hope to wade into pattern drafting just a little deeper because this was fun. And honestly I don't need clothes so fast sewing is hard to justify.

Tuesday, September 11, 2018

Sewing with Knits

Swing Tee (cotton knit) with Pencil Pants (ponte)
This is not my first choice for sewing. Knits are simultaneously intimidating and mind-numbing, IMO. I guess that says something about me. I love linen - so predictable, so obedient, just right for little details. But sometimes I find myself sewing with knits.


I subscribe to Sew Confident! which is an annual subscription service from the Sewing Workshop (TSW). As I've said before, I am a Sewing Workshop groupie. I have been since some time back in the 90s when I found this weird pattern called the cocoon coat in my local fabric shop. It was back when I really did have a local fabric shop about 3 miles from my home.


But I digress. It seems that knit garments form a significant portion of the Sew Confident! repertoire for 2018. I have fought this, as in making the Picasso top out of a woven fabric even though knits are recommended. It worked but when I finally made it out of a knit, I loved that one best.


The most recent edition of Sew Confident! includes modifications to the Swing Tee which was introduced in the January 2018 edition. I had skipped over that pattern for a variety of reasons including the fact that I have several basic tee patterns I like OK. When I saw the modifications, I decided I needed to make the original Swing Tee. So here it is.


And, yes, I love it.


My first Swing Tee goes perfectly with my first pair of Pencil Pants, another pattern I ignored initially. I knew I'd make the Pencil Pants eventually. At first I thought they were too similar to the Helix pants which I've used over and over again. However they have a slightly different shape - more narrow at the ankle - and I like the waistband finish much better.

Helix pants: uses wide elastic that is not covered, smooths nicely when worn
The waistband finish on the Helix wears beautifully but it's a bit of a pain to install. The waistband finish on the Pencil Pants is easier to finish, I think, and I like where it sits on my so-called waistline. These are made with a beefy navy blue ponte. I made them a little too large so I'll take them up before I fill them out!

Pencil Pants: elastic enclosed like a yoga pant, also smooths when worn
I have to admit that the Swing Tee is also quite nice. I like the tunic length, as well as the fit at the shoulders. I changed the neckline from a basic crew to a bateau neckline. I used the neckline in the Picasso top to create that. I lengthened the sleeves, one of the changes in the current issue of Sew Confident!


Because I chose a horizontal cotton stripe, I also changed the hemline. It is a lovely curve, but I wanted my stripes to go straight across. I added one pocket near the hem and a patch at the back shoulder. Horizontal stripes may not be my best look, but I've always loved a simple nautical navy and white stripe (*).


I'm happy with this!


* I think I'll open the side seams to create deep vents. Then I can angle the corner at a 45 degree angle which may be more slimming and less jarring than a curved hem. There's always time re-sew.

Friday, September 7, 2018

Two More Picasso Tops


I now have the Picasso Pants and Top pattern from the Sewing Workshop (TSW) out of my system. I've made the top 3 times and the pants once. I don't see any more tops in my immediate future, but who knows? These surprised me. I do definitely see more pants in my future, but possibly not until spring.


In summary, my first version of the top was made from a tablecloth - cotton damask.


And my second one looked like a tablecloth, though made from cotton prints. I have already taken it apart to use in other projects.


My third and favorite one is made with rayon jersey knit, plus some striped accents. This is a bit ironic because I was reluctant to make a knit version even though the pattern envelope requires it. The woven versions are of necessity size Mediums and the knit one is size Small, and I think the size XS might also fit in knits. It is designed as a big boxy top, and I like that a lot!


Above I'm wearing the knit version of the Picasso top with my favorite knit pants (the Helix pattern from TSW). I have made those a number of times just because I like the look. Making them is fast and easy.  Below I'm wearing the Picasso top (in knits) and pants (in rayon crepe), which is a pretty close approximation of the intentions for this pattern.


Now I do think the whole Picasso look is cute. And I will happily wear this ensemble and feel good. And I know the slimmer Helix pants create a more flattering silhouette. Just a little note to self.


I made the same changes to the neckline as in my previous Picasso tops, this time using a bias strip of striped knit. It's not matched at the shoulder seams but the up side is that the shoulder seams are nice and flat. And it was a sweet opportunity for a little sashiko.


Meanwhile there is still a dye pot simmering on the stove, this time with pokeberries. I've printed with pokeberries before but this is my first foray into dyeing with them. I simmered and strained the juice from it. Now a piece of silk noil and another piece of cotton sateen are brewing. I'm realizing I need to be more careful in my handling of this stuff that seems to grow everywhere here in the southern states of the US.

Recent foraging: black walnuts, magnolia pods, pokeberries, queen ann's lace
It is intriguing that pokeweed is both poisonous and edible. The leaves are edible in early spring before the stalk becomes purple. The berries that are growing now can be used to make jelly, once the seeds are removed. That being said, I must be more careful in my handling of the stuff (another note to self). But the color is so seductive. Maybe the dye will be rewarding too.


I'm also ready to do some more avocado dyeing. Here is a shot of them with my new toy - a macro lens for my phone camera.


Some days it feels like there is almost too much fun stuff to do. Does that happen to you?