Tuesday, October 21, 2014

Vogue 9057

Vogue 9057 is a basic and beautiful pattern from Marcy Tilton. She says, "This collection is a long time design dream." I can see why.

It is fast, easy, and creatively satisfying. This is view D with the long sleeves.


As promised, it fits through the neckline, shoulders and bust. It skims the rest. Just right.

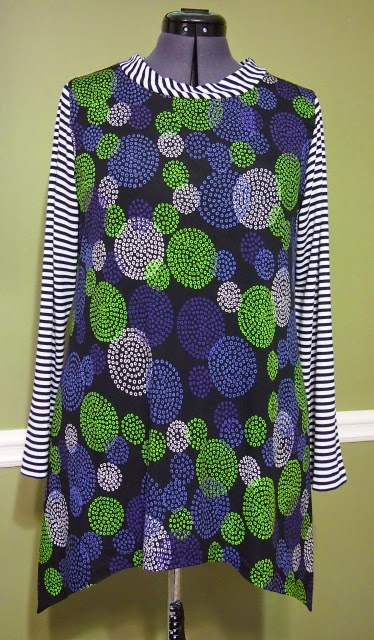
The neck band actually sits a little better on my neck than it does on the dress form. It is not completely flat up against my neck but feels great the way a rayon knit often does.

After seeing a tee shirt made by Margy, I was anxious  to cut the neck band on the bias.

The main fabric is a rayon knit purchased at Five-Eights in Charleston, SC. This is a sweet shop catering to new sewers, I think. They carry mostly quilt cottons, but some nice rayon knits too. The sleeves and neck band are from remnants of a rayon knit purchased in Montreal.


The points appear to be in the side seam, but they are actually part of the front hem shape. The hem shapes make this pattern a bit special. View A is a standard length tee but with a curved hem. Other views include asymmetrical points in the hemline, made even prettier with the layering suggested on the pattern envelope.

When I first saw this pattern, I thought, oh, but I already have several good tee shirt patterns. I'm glad I bought it. It has some easy and fun variations. This is a reminder of why I love to buy and make patterns.


Saturday, October 18, 2014

Vogue 1414 Day 4 and Complete!


Final Steps:
  • Cuffs attached 
  • Shirt tail hemmed
  • Sleeves inserted
  • Bumpy stuff flattened
  • Buttonholes (always a nail-biter)
  • Buttons
Cuffs

I was reminded of a tip from sewing friend June when adding the cuffs. Place cuff and sleeve right sides together, keeping the cuff facing out of the way. If you push the cuff piece about 1/16 inch beyond the sleeve placket edge. Then when you turn it right side out, grade the layers, and tuck the raw edges inside, there is just enough room. Of course, this is known as allowing for turn-of-the-cloth.

When I line up the edges perfectly, with no allowance for turning the cloth, there is either the little bit that wants to jut out, or worse, that awful buckling of the sleeve placket. This fine cotton shirting only needed that 1/16 inch but of course heavier fabrics need more.


Shirt Tail:

Once again, I used Pam Howard's effective technique here to create a smooth curve on the shirt hem. I had added a center back seam to allow for a little curve in my back, so I also created a vent. 


Alert!

Sweet, sweet Pam has given me a link so that you - my blog buddies - can sign up for her excellent shirt making class on Craftsy and receive a discount:


This class, along with the newer one on constructing a tailored jacket, are really wonderful. I use techniques from those two classes constantly.

Bumpy Stuff Flattened

Even with the turn-of-the-cloth technique above, I sometimes grind my teeth when I put a buttonhole in the collar band. If that one looks bad, it is really, really bad. You know what I mean.

My Bernina makes gorgeous buttonholes but it likes a flat surface. So I steamed the collar band as flat as I could, then used the clapper and left it there until everything cooled. The buttonhole went in without a hitch. Hooray!

Smashing

Smashed

Buttonhole success!

Buttonholes and Buttons:

The rest of the buttonholes were a breeze. 

And I just love these buttons. On a recent vacation I shopped at a wonderful little button shop in Montreal. I purchased way too few of these metal buttons made from Canadian coins. So I had to use the US coin buttons on the sleeves. 

I purchased one larger button in Montreal and so put it on the back.

This is a really good pattern. Try it. You'll like it.


And don't forget to use the discount Pam passed along over on Craftsy. Thanks so much, Pam!


Wednesday, October 15, 2014

Vogue 1414 Day 3

Completed today:
  • Collar band
  • Side seams
  • Sleeve plackets
  • Sleeve pleats and side seams

The collar band went in smoothly though it still needs hand-finishing and top-stitching.


I was curious to see how the instructions for the sleeve placket stacked up against the excellent instructions in Louise Cutting's The Blouse Perfected. Those instructions truly are near perfection for a classic technique that is so counter-intuitive. And it's one of those techniques that I have to study a bit each time I make a shirt with a placket.

Used the other side of the fabric for the placket since the *wrong* side shows on the flounce anyway


I like Louise's instructions better. For starters, the plackets for this pattern do not include interfacing. Interfacing is key to being able to carefully fold and stitch precisely on a tower placket, I think. 

There are a few other aspects of Louise's instructions that are superior but I won't detail them here. Her instructions are so much better than my version would ever be. If you are interested in clear, near-fool-proof directions for plackets, I recommend you buy her pattern The Blouse Perfected, even if you don't like the rest of the pattern!

Next up - cuffs and inserting the completed sleeves.

Tuesday, October 14, 2014

Vogue 1414 Day 2

Today I continued working on my version of Vogue 1414, an Anne Klein design. The boob flaps* are complete.

It's a fun project. The fabric, an Italian cotton shirting described here, is delightful to sew. It is hard to find anything more cooperative that a great cotton shirting. This one has a twill weave though it shows up slightly striped in the pictures. It is a yarn dyed fabric composed of black threads and off-white threads.

One of the first steps in Vogue 1414 is to complete the flounce. The flounce is a single layer so, two edges must be clean-finished. I used a method taught by Pam Howard for shirt-tail hems. I like her method better than the one in the pattern instructions. For me, it leads to an even hem (or clean finish).

I think. Pam describes this in her excellent shirt class on Craftsy. It's a felling technique that works great for a number of spots where a clean finish is needed.

This has potential to become a tried-and-true. It will be easy to omit the more distinctive features of this pattern to create a nice basic shirt. This is tunic length, so I will probably shorten it for a basic shirt too.


*A blogger - gosh, I cannot remember who - referred to the features of this pattern as boob flaps. I think they look feminine. I hope it doesn't look like a nursing top.

Monday, October 13, 2014

Vogue 1414 Day 1

Today I finally cut into a piece of men's shirting I purchased when I visited Rome last fall. Pretty fabric and great travel memories - I love that combination.

Finding and shopping in a fabric store was quite an adventure. As it happened, one of the fabric stores I had found on the Internet, Fratelli Bassetti, was a short walk from the Pantheon. And it was very easy to find, except that the storefront was so unassuming. You climb stairs to the level above the street level. And then, oh, my.

Street Level


One room was full of men's shirting. One was full of men's suiting while another focused on women's suiting. And there was an entire room of silk. My son took this picture of his wife, Laura, and me discussing my interests (and budget!) with this charming salesman.


It was a little nerve-wracking to shop there because they spoke just a little English and I speak no Italian. Nevertheless, they were gracious and helpful.

I purchased two pieces in the end - black and white cotton shirting and a piece of the silk charmeuse you can see in the above photo.

Here is the shirting for Vogue 1414.


I understand that this week's Project Runway features the final contestants visiting Rome for inspiration. I hope they visit this wonderful shop!

Saturday, October 11, 2014

Tunic Discovery


As we approach Columbus Day, I think it only fitting to say that I discovered Butterick 5925. Today, in fact.

But - you may say - there are at least 7 reviews of this on Pattern Review. And Katherine Tilton, who designed it, has several versions on her blog. If you google Butterick 5925 images, then even more fabulous versions show up.

My very first Butterick 5925 happened today. What a fun one-day project. It reminds me a little of the newest pattern from Marcy Tilton that is now winging its way to my house - Vogue 9057. But it's different too.

And to think, I used to be such a Vogue snob. Katherine Tilton has definitely raised the level of my expectation from Butterick.

This one has a twisted collar, as well as pocket bands that are twisted. I chose to do something different with the collar, but really enjoyed making the pockets. The twist creates almost a pleated effect.


For the neckline, I decided to create a quasi-V-neck. I kept the curved back of the neckline, but cut straight from the shoulder seam to the center front to create a V. I kept the width of the twisted collar but inserted it in the usual manner for a V. It stands away from my neck just a bit which I like.

I worried that the neck would be too preppy for me, but the width gives it another look. I think. I hope.

I made no other changes. The pattern includes godets on the side along with the interesting (and deep!) pockets. The godets provide the dip in the hem at the sides. It seems to fit great. Of course the fit only matters through the shoulders, bust, and arms, but I'm relieved anyway.

And the fabric is just delicious. It is a French rayon jersey from Sawyer Brook, called Street Fair. This fabric is wild with color, all brights. It makes me smile to see it.


It was relatively easy to cut, sew and press. Almost no rolling when I was cutting and sewing. I did some double stitching at the sleeve hems, as well as the shirt hem. The top-stitching doesn't show much with all that color. So I'm OK that my stitching was less than perfect.

Like the really good rayon knit that it is, the hand of the fabric is buttery, and the drape is just right for this pattern.

I'll be reaching for this tunic quite a lot, I think.


Friday, October 10, 2014

Still Sewing

Most recent project: Child's kimono made with Japanese linen/cotton, lined with cotton and ambiance

PJ's for 6'7" nephew. Super soft yarn dyed cotton plaid from Tiny Stitches in Marietta

OOOOOOhhhh! This lovely knit has been cut out. Cannot wait to sew it up. From Sawyer Brooks in MA.


Finished this child's kmono. Lined with a soft cotton lawn from Gail K. Orange is linen also from Gail K. Lots of stitch