Showing posts with label hacks. Show all posts

Friday, September 13, 2024

Liberty Shirt Hacks

The Liberty Shirt is one of the most popular patterns ever published by the Sewing Workshop. I have noticed that other pattern companies have similar styles, but the one from TSW is my favorite.


When it was first published, I made this one.


Most of the fabric is a fine Japanese cotton that is printed to look as if it had been pieced. The back shows the original fabric best. It is really one piece of fabric.


As usual I failed to purchase enough fabric for the shirt, so I used solid gray silk dupioni for one sleeve, as well as the left front. I also added tiny burnt orange piping to highlight the wonderful front seams. There are no side seams - the back piece wraps around to the front, creating angled seams where it is sewn to each front. Lastly I spaced my buttons in pairs. Otherwise, I made no changes to it. I loved making it and have worn it quite a lot. 

My next one was made in this gorgeous silk shantung. Since it is fancy fabric, I do not wear it as much, but I love the look of it for a dressy occasion, maybe with black silk pants. I made no changes to this one - instead I let the cool design and the striking solid colored fabric shine.


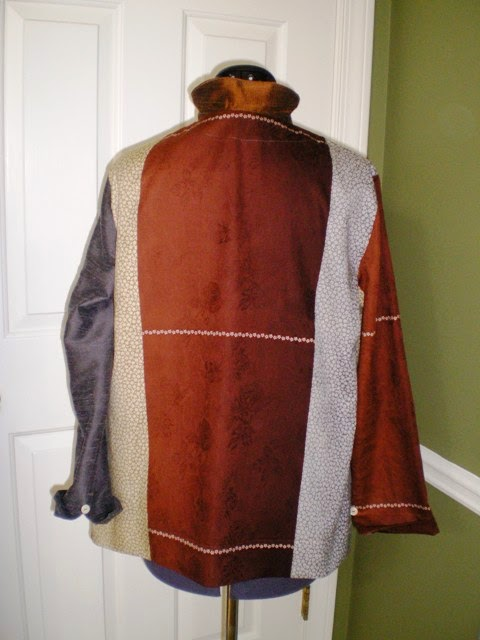
The next time I made it, I used a cotton shirting, cross-dyed in black and white, so it reads gray. This fabric was not fun to sew, as I recall. I behaved like a silk in preserving all areas where I needed to unpick something. And it wrinkles like crazy. I replaced the usual collar with one from TSW's Now and Zen shirt pattern. I used the double collar.


I have made a white version more than once, each with slightly different details. The one below is made in a pretty textured cotton. I created a stand collar to replace the usual one in the pattern.


Evidently I made one in this linen knit. I say, evidently, because I have forgotten all about it. It looks great on the dress form, but I do not like to wear linen knits. They tend to be flimsy and cling to every bump and bubble on my torso. So I expect I gave it away pretty soon after completing it. The significant change in this one was to convert it from a button up top to a pull over. It is such a wonderful color.


The second white shirting version is below. Based on a tutorial from Linda Lee, I used the neckline from the MixIt shirt, omitted the collar, and made the sleeves 3/4 length. It is not visible in the picture, but I added one chest pocket.

My next version was a sweater knit pull-over. I really like this one. The fabric is what Linda Lee calls boucle. It is a wool/rayon blend and a little scratchy. But I always wear it over something else. Other than making it as a pull-over, I made no other changes. I accented those cool front seams with hand-stitch.


My next version was another pull-over, this time in a silk piece with a little lycra. I used black binding to finish the neck and sleeve hems. And I added black piping to the front seams.


And now, here is my latest.

The fabric is fine Japanese cotton from Nani Iro. It is a double weave and super soft. I bought it on a recent trip to NC. My grandson lives there. The fabulous Mulberry Silks and Fine Fabrics is nearby and a must-see for me.

I accented it with a piece of tana lawn that looks sort-of like Liberty of London fabric. I bought it at the local shop, Gail K, and so I do not really know. The piece was only 36" wide, so I suspect it is not Liberty of London. I have enjoyed using it as an accent on various pieces.


The neckline finish is a variation on the Egyptian shirt pattern from Folkwear. It is a shaped, reversed facing. I also used the tana lawn as a flat piping in the forward seams, as well as for sleeve hem facings.


This fabric has a sweet selvedge. So I hand-stitched that down the back to create a little bit of interest there.


I have already enjoyed wearing this. The Nani Iro fabric is so soft, but the flip side is that it sticks to my high hip fluff. That's OK.

Now I am thinking about my next Liberty hack. I've seen vest versions posted online. And I have a piece of nice fine whale corduroy that would be perfect. 


I suppose there might even be a dress variation left. Or a longish duster. Or. Or. Or.


Monday, January 6, 2020

First Make of the Year

My first make of the year happened fast, even for me. I finished it the evening of January 1!

It was a very easy make. I spent more time figuring out what to make than I did actually making it. I'm still not sure I made the right decision. But this is most definitely one of those cases where Finished is Better than Perfect.

Looks like a tablecloth here!
It started when a sweet friend at church said she had something to show me. A friend of hers had brought her a length of fabric from Viet Nam and she didn't know what to do with it, so she wanted me to "make something." And pay me. Not that payment does much to motivate me these days.


Instead of saying no, I said I'd think about it. And I took it home. Bad idea. Now it was too late to say no. Really. So I said to her, how about a scarf? Or a tote? Or a top? She said, you choose - you know best.


This piece of fabric is, shall we say, unusual. It is pretty clearly hand-woven and prone to massive raveling. I initially thought it must be cotton, but a burn test confirmed polyester. It makes me a little sad to think that some hard-working artisan had to use such materials to hand-weave this piece. The weave itself is quite lovely with a striped effect on either end, and pure plaid in the center.

It was 36" wide and almost 2 yards long, too small for many projects I initially visualized. I finally managed a hack of the Sewing Workshop Hudson top, view A.


Even so, I did not have enough for that cowl collar. I redrafted the neckline, applying a favorite facing technique. I used a red linen remnant for the neckline and sleeve hem facings.


I tried it on, just to see. I really don't mind sending it off to its rightful owner.


I'm delivering it tonight and I have no idea at all what to charge. Another good reason to avoid these situations!

Thursday, September 22, 2016

Pattern Hacks

You see pattern hacks all around the internet. Mine is not especially different but it was fun to puzzle out.

The bias binding hasn't been pressed, so it is a little bubbly.

It started when I saw a blog post at The Sewing Workshop (TSW) involving a variation on their Eureka top. This is such a simple pattern - front cut on fold, back cut on fold, and sleeve cuffs - so it is perfect for some easy hacks.


The folks at TSW worked with knits, as well as some Alabama Chanin techniques and the results are quite lovely. So I dutifully followed their instructions to create new pattern tissue. That's when I realized that such an approach would not let me use some pretty remnants I wanted to use. So I started over with blank front and back pattern tissues. The tissue was cut for the full front and the full back.


Next I placed a remnant underneath the pattern tissue and determined where my slicing of the pattern tissue should occur. I drew a line on the pattern tissue following a straight edge on the remnant. That way, the slicing was based on the specific remnants I had. After each slice, I added tissue for the 5/8 inch seam. Sometimes I added 1.25 inches to one seam in order to max out my use of a particular piece of fabric. This was a fun puzzle to solve.


Finally I put it all together. I am fairly pleased with the result. The drape is very different with a woven fabric than with the knits that TSW used. My fabrics are cotton (black and white shot), silk dupioni (solid black) and a Japanese cotton print.


I also have been *hacking* on a completed pair of pants. These started life as a nice basic (yawn) pair of Valencia pants in a pretty gray textured linen. No sooner had I finished them than I somehow brushed up against some bleach, leaving an ugly spot in a prominent place.

Another Eureka in a pin-striped woven fabric, Valencia pants in gray shot linen.

The spot was not in a particularly great place for a pocket, so I added a hand-appliqued patch using remnants from the linen. Then I added some additional patches so it would not look so odd. It was OK. In fact the patches are pretty hard to see.

But every time I put them on, I took them back off again. They just seemed frumpy to me.

So the next step was to create 6" darts in the hem at each side. These pants have no side seams and that created a slight lantern shape. I liked that better but it still needed something else. So finally I added a 1 inch horizontal pleat right above the dart, and a pocket (why not?) near the waist band. The pants now hit me right above my ankle, as this shortened them by a total of 2 inches.


You have to look closely to see the patches on the left side. You can see the pocket on the right side.

I like these a lot, way more than the original pants. I think I like pattern hacking.