Showing posts with label buttonhole. Show all posts

Saturday, September 10, 2022

Closures

A few weeks ago, a sewing friend and I made a presentation on closures to our ASG neighborhood group, Citywide Couture. So, of course, the Ericson sewing duo was central to my part.

https://dianeericson.com/blogs/journal/i-ching-in-the-garden

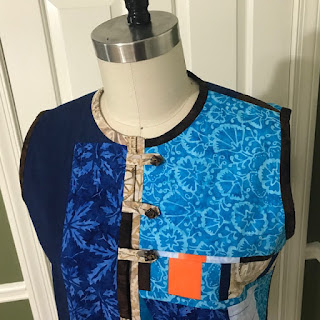
I started with this closure idea from Diane Ericson's online journal. The pattern is the High Five, a joint production from Linda Lee and Louise Cutting. It is mostly rectangles, a super simple sewing project. I had made it as a jacket. This time I made it as a top.


The fabric is interesting, A fellow student in my Susan Brandeis class, Veronica, represents the Diamond company. She brought in her samples for the students to view. She sells to a local quilt store where I was able to find only a limited selection. 

From the limited selection, this deep burgundy with pink crosses spoke to me. I bought 1.5 yard on spec (the way I usually buy fabric). The crosses are formed with long floats on the back. This worried me for a while as they seemed to catch on everything while I was sewing. It does not seem to be a problem now that I'm wearing it. 

Per usual, I was short of fabric. So I used a remnant for the sleeves, as well as the closures. This piece was gifted to me by my then-future SIL, something he brought back from a trip to South Africa. I had enough for the sleeves and the bias strips that make up the buttons.

The "buttons" are formed by simply sewing a 3-4" strip to the spot where I button would be and then tying in a simple overhand knot. Diane suggested painting the ends to discourage fraying. I used a copper colored paint for that. It hardly shows, but was fun to do.

And, of course, I showed my fellow sewists at ASG some books by the undisputed queen of creative closure, Lois Ericson. Her publications are such a treasure trove of ideas - more than could possibly be explored in one lifetime. But she did!

The other closure I presented was the Spanish snap buttonhole as explained in this Roberta Carr publication. It has become my go-to for couture techniques since ASG Atlanta offered a class with her protege, Marla Kazell. 

As you may know, the Spanish snap buttonhole is actually just a faced buttonhole. By using a bias cut hole facing in a contrasting color, you create tiny lips that show on the inside edges of the hole. The "snap" occurs when you turn the facing to the inside and give it a snap to place it. 

It needs another faced hole on the garments back side for a truly couture look. My mastery of that part is not up to par yet. Or maybe I should find a piece of silk organza that matches the fabric better than my sample below does.


I still need to work on my bound button hole skills, someday. Right now I'd much rather spend my time on creative closure, especially closures using bias tubes.


Tuesday, July 9, 2019

Never Say Never


I never wear shorts. Well, almost never. I own one pair of RTW shorts that I wear for walks, hikes, bike rides, rowing machine. Having this one pair of shorts allowed me to avoid making shorts because I do not feel all that comfortable in them.

Truly Terrible RTW shorts
After chaperoning 11 teens in Belize for a week, I have decided to come clean and admit that I wear shorts. There are simply times when shorts make sense. And these old RTWs are quite terrible.
So I made a pair of shorts.


I chose Fit For Art Eureka! pants as the starting point. These are narrow cut pants and so cannot be simply cut off. I think I tried that once and, of course, the results were not good.

Luckily I remembered that Carrie of Fit For Art had done a post on pants-to-shorts once upon a time. I was a little confused about part of it and posted a reply to her blog post. She not only replied on her blog but sent me an email message to make sure I was clear. Thanks so much, Carrie!

The fabric I chose is a linen-rayon blend purchased from the Sewing Workshop. I made a pair of culottes out this fabric and I love the feel and drape of it.

For mine, I first measured the outer seam of the awful RTW shorts, as these were the only reference point I had. I knew I wanted my new shorts to be longer so I added 7 inches to the RTW shorts outer seam.

Then I measured the outer seam of the front piece and the back piece, and folded the leg up so that my new shorts would be long enough, adding some for SA and hem. You can see in the picture the chalk lines I drew for the shorts. Evidently I'm not committed enough to making shorts that I think I need to create new tissue for them!


Based on Carrie's post and additional notes, I knew I needed to reshape the outer seam. Starting at the widest hip point, I dropped a vertical line to my proposed hem line. This added 1.25" to the width at the bottom. I added 1.25" to width at the inseam too, curving it back into the original curve near the crotch. I made the same changes to both the front and back pieces.

So that these would be a bit tailored, I added a fly to the center front of my shorts. Sandra Betzina's book is my go-to on this technique.


Then I decided to get fancy. I thought that perhaps a contour waistband would be quite comfortable, and, really, shouldn't the zipper extend into it? I could not quite conjure it in my imagination but felt confident it would all work out.

First zipper insertion, extending zipper into the contour waistband.
Creating the contour waistband was pretty easy. I created one that finishes at less than 2" in depth.

Extending the zipper into the waistband worked great on the narrow side of the fly front.
I watched several YouTube videos looking for a guide to installing the fly front zipper and extending the zip into the waistband. Nothing. There were several on adding a fly front, and there were several on extending the zipper into a waistband, but none on the combination of the two.

With unreasonable optimism I pushed ahead anyway. First I constructed the front darts. Then I added the front waistbands to each front. Then I installed the fly front zipper. All was swell.

But when I added the waistband facings, I realized that the facing would cover the top of the zipper due to the overlap created on a fly extension. To be honest, I did not realize it right away. I fiddled quite a lot. And let it rest overnight.

Nothing worked so I ripped out the portion of the zipper extending into the waistband. But that made the zipper too short. After an hour or so of picking black thread from black fabric, I was ready to install another zipper.

Second zipper insertion.
Sandra Betzina offers helpful advice on using a too-long zipper in this fly application. The stop goes at the bottom and the excess is cut off after it has been caught in the waistband. This creates a fairly flat transition.

Words were said, but in the end, I'm glad I ripped the first zipper out. I would've been unhappy with a too short zipper.

before the buttonhole fiasco
After that, things proceeded smoothly until I got ready to install a buttonhole in the contour waistband. My Bermina makes gorgeous automatic buttonholes. That's why I bought it. But it is finicky if there is any bump. That tiny zipper extension was just enough to cause it to get stuck.


So more words, more picking black thread out of black fabric.

Next I used the manual buttonhole - which is also darned good - and it worked just great!


I'm quite pleased with these shorts and will wear them proudly when the occasion calls for it.

easy machine hem
I should be careful when I say never. I used to say I'd never go on a zip line. And then I did.


But never again.


I'm serious this time.

Wednesday, August 19, 2015

Tremont Jacket

Just now finished my first Tremont Jacket from The Sewing Workshop (TSW). I like it quite a lot. And there is much to like!


This pattern has not yet been released but Linda Lee allowed participants in the July Sew Kansas to trace a copy. She tells me that the final version is off to the printer and should be available in about 2 weeks. I think this will prove to be a very popular jacket for TSW.

There are some small differences between my jacket and the final version of the Tremont Jacket. My tissue contained separate cuffs and I was short on fabric so that was a good thing. The final version has cut-on fold back cuffs.

Also I have mine crossing left over right which of course is the wrong way. This is OK but you cannot see that the left and right fronts are different. Here is how it looks with the left and right fronts positioned correctly:


The things I love include a sleeve design that sits right at my shoulder. That is my favorite sleeve. The armhole is deep and it is not a set-in sleeve but that will allow easy layering without a blouse sleeve ever bunching under my arm.

I also love the neckline. A lot. I think I've seen this in another TSW pattern. The back collar is actually part of the front pattern piece(s). You sew the shoulder seam and back neckline in one continuous seam. This creates a right angle seam right where the back collar and the shoulder seam meet.

The right angle is not terribly difficult to sew in this stable cotton Ikat. However, this right angle became a fun feature because I got to apply another technique from Marla Kazell's recent lecture at an ASG event in Atlanta. It is also found in the Roberta Carr techniques book. The advantage to the technique is that it strengthens that gap that is created by the 90 degree angle in the seam.

I also used Roberta Carr's mock Hong Kong edge finish as well as the real Hong Kong edge finish. I found I needed the real HK finish on the seam connecting the sleeves to the jacket body. Elsewhere I just used the mock version.

Yet another feature that I like is the opportunity to use Linda Lee's signature mitered corner:


The side seams have deep vents that create a acute angle at the vertex. The result is a lovely drape along the hips, I think.


Lastly I tried my hand at the Spanish Snap Buttonhole. Let me just say that I am feeling very courageous right now. If this had failed, I would be scrambling to fix a hole in my Tremont jacket. Whew!

The Spanish Snap Buttonhole is new to me, but I see lots of related posts out in the blogosphere. Most give credit to Roberta Carr. I highly recommend her book:


The Tremont jacket gave me just the right opportunity to try out a new buttonhole method. It only calls for one button. I wanted to use a relatively large one, too large for a standard machine buttonhole.

I followed her instructions carefully and after 2 samples, I put one in my newly finished Tremont jacket.

Here you can see the wrong side of the jacket front (top part) and the wrong side of the facing (bottom picture). Actually this was sample number 2 but the real version looks just like this. I used red silk dupioni for the buttonhole facings (or lips).

Here is my finished sample.

And here it is buttoned on my finished jacket. I like that the red peaks out just a little.
  
The front side and the back side look identical IMO.
Now I'm just waiting for the temps to drop down low enough to justify a jacket.