Showing posts with label tutorial. Show all posts

Friday, June 14, 2019

Dye Removal

In a recent post, I mentioned a white blouse that had been ruined by bleeding red dye from another garment in the wash. It left pink splotches in various places on the shirt. I tried spot remover. Then I tried washing it with a dye catcher. Neither worked. I figured I would just dye it.


Ah, but you, dear readers, saved the white shirt!


There were several good suggestions. The first one I tried worked. I'm so pleased.


Barb made a winning suggestion and pointed me to a site with more detail. Thanks, Barb!


It's a tip from the quilting world. I soaked my blouse in very hot water with some Dawn dish washing detergent and left it overnight. When I pulled it out, all the dye was gone! I washed it with some sheets to remove any remaining detergent and it is perfect. Or as perfect as it ever was.

Barb pointed me to details on this here.

There were some other worthy suggestions. I had planned to try each one, but no need.

beckster suggested Rite Dye Remover and fadanista suggested a soda ash soak.

Thanks to you all! Sewers are the best.

Saturday, August 20, 2016

A-line Hems

Recently I was asked to describe my approach to hemming an A-line garment. It is the one I used to finish my Soho coat, blogged in the previous post.


It is that situation where the raw hem edge is wider than its final location. This happens often with an A-line skirt or dress. The upper edge of the hem wants to pleat or tuck if pressed into position.

One approach I see in pattern instructions is to run a gathering line along the raw edge and ease it into position. I think that will work and might even end up looking pretty good. But my preference is to hem it with a bias strip.

This approach is similar to creating a facing for the hem. With a true facing you would need to create the same curve in the facing as in the hem edge. No need for this with bias. Bias will re-shape itself as needed with just a little steam.

Cut a bias strip of fashion fabric at least as long as the hem edge. I like to cut it 1.25 inches wide. Much easier than drafting a facing, as you only need to know how long to cut the bias strip.  Cut it the length or circumference of the hem plus an inch or two. It's usually easy to piece the bias pieces if your remnants of fashion fabric are too narrow. Or you can choose a contrasting fabric.

My fashion fabric is solid black on the right side, striped on the wrong side, hence the obvious bias stripe on the wrong side of the bias strip.
First trim the raw edge of the garment to within a 1/4 inch of the desired finished length. Then place the bias strip and raw hem edge right sides together(*). Stitch these together at 1/4 inch. It helps a lot to place the bias strip next to the feed dogs while sewing. Otherwise it will stretch and may cause the hem edge to gather.

*In this instance, I placed the wrong side of the bias strip next to the right side of the garment hem edge so that the bias stripes would be visible on the inside of my garment. In most cases though, you would place right sides together.
Note that the bias strip is next to the feed dogs, garment is on top.

Once these are sewn together, press the seam allowance toward the bias strip. Then fold the bias strip to the wrong side of the garment, and press again. The fold should favor the garment side in order to keep the bias strip from showing on the outside.

Wrong side of garment just after sewing bias strip to hem

1/4 inch hem pressed toward bias strip


right side of garment, pressed to favor the solid black side

wrong side of garment, pressed to favor the solid black side. looks like a tiny piping here

Next I pin the bias strip into its final position with pins on the outside of the garment. I prefer to sew the final top stitch from the right side. Unless the fabric is thick, sew 7/8 inch from the hem fold. If the fabric is thick then you may need to reduce the depth of the hem to 3/4 inch or even 5/8 inch.

Finished hem in sample (wrong side of garment)

Finished hem in coat (wrong side). (I love the Linda Lee approach to mitering.)
This is also a great way to hem something that is too short. The hem take-up is only 1/4 inch.

HTH! Happy sewing.


Thursday, March 3, 2016

Clothesline bowls: Some thoughts


As you probably know, there are all sorts of tutorials and inspiration on the Internet concerning fabric bowls. My primary inspiration came from Flossie Teacakes,  a delightful blogger. 

For what it's worth, here are some things I have discovered that work best for me:
  1. Thread - 100% cotton. Polyester is stronger but you cannot (easily) change your mind. And it will not take dye. That might be a good thing. It's good to have full bobbins when you start but it is easy to stop and start. The thread does not end up showing much as long as it is pretty close to the color of the cording.
  2. Stitch length - 2.5 mm. Some suggest going with a very long stitch length. I found that the bowls were too wobbly with a longer stitch-length. I like for them to be soft but secure in their shape.
  3. Stitch width - The widest my machine will go is 5.1 mm and that is what I like. If you go narrower, you have to be more careful to catch both sides. This is not a big deal, as my machine foot has a little groove down the middle. I just keep an eye on that and make sure the shadow between the two cords is right on the groove. You know, zen sewing.
  4. Cording (clothesline) - I have been happy with Household Essentials from Amazon, but I have not tried any others. It is soft, inexpensive, and easy to sew. Just recently I found something even less expensive at my local grocery store, Kroger.
  5. Starting - for the first one, I hand-stitched a little bend in the end of the cording and cut off the tape at the end that keeps it from fraying. But after that, I found hand-stitching unnecessary. Instead, I cut off the tape at the end and fold the cord over about 1/2 inch. Then I position it under the needle and zig-zag in place. I let the stitches pile up a little just to secure it and then use the awl to give it a little nudge around the corner. I continue to use the awl until the disk is large enough to manage with my finger tips.
  6. Position of coil under machine - some recommend that the coil expand to your left so that the machine does not get in the way. I have found that I prefer to let it expand to my right while I'm making a flat bottom. It seems to stay flatter that way. After the bottom is completed, I remove it and re-position the disk so that it expands to the left.
  7. Gentle curves - the easiest way to shape the bowls. I use my left hand to gently bend the disk up alongside the sewing machine head and sew around and around. It naturally forms a lovely curve.

  8. Vertical sides - these require a good bit of tension on the clothesline as it attaches to the bowl. Once the more-or-less right angle is established, then you can relax again.  
  9. Curving inside - if I want more of an S curve, then I put much more tension on the cording as it flows under the foot. The difference between tip 8 and 9 is subtle but you'll feel it and see the result readily.
  10. Tying off - You can clip the end of the cording at an angle and work it back into the top row, but I much prefer the knotting options available if you play with the end of the cording a bit.
  11. Handles and other gaps in the bowls - To create handles in the bowl, I zig-zag backwards to secure the spot where the handle will begin. Then I pull the available cording away from the needle and zig-zag on the previous row for an inch or more until I reach the point where the handle should re-attach. Then I use the awl to push the available cording back under the needle, zig-zag backwards a few stitches and continue around the bow. As you stitch around again, you have the option of making the handles two, three or more rows deep.
  12. Knotted edge - I used the same technique as tip 11 but left regular gaps in the final row. I would count 8 stitches off the last row, and 10 stitches on the last row as I rounded the final time. Then I used the remaining cord to wind in and out knotting at each gap.


There are almost endless variations to consider but the simpler, the better for me. I may experiment with adding color and bits of fabric. For now, I am happy with the winter white produced with naked clothesline!


Monday, August 31, 2015

Lucille Ball Cuffs

Today's post is a very small tutorial. After a recent post showing these cuffs added to Marcy Tilton's block dress (Vogue 9081), I was asked how the cuffs are constructed. It is a super simple technique and I like the resulting cuff.


Lucille Ball Cuffs:

1.  Cut the cuffs 1 inch wider than the unfinished lower hem of your sleeve pattern in order to create a 1 inch overlap. Because both the sleeve and the cuff are unfinished, you only need to add enough for the final overlap. I like 3 inch deep cuffs, so the raw cuff piece needs to be 7 inches deep. I use a 1/2 inch seam allowance. My finished sleeve is 14.5 x 6 inches before folding the cuff into position. Each cuff is cut 7 x 15.5 inches.

2.  Interface the cuff pieces as needed based on the fabric (*).

3.  Fold each cuff along the long side right sides together. Sew short ends of cuffs using 1/2 inch seam allowance. Turn to right side and press. At this point each cuff measures 14.5 x 3.5 inches.


4.  Mark placement for the cuff overlap on the sleeve hem: My pattern includes a continuous bias vent, so I just used its placement. If there is no other guide on the sleeve, then I suggest dividing the raw hem of the sleeve into thirds. Clip a mark at 1/3 of the way from the BACK seam allowance. This is pretty close to the usual placement of any conventional cuff opening.


5.  Sew the sleeve underarm seam together, as usual.

6.  Pin cuff and sleeve hem wrong sides together. Stitch together using 1/2 inch SA.

7.  Repeat for second sleeve but make sure that the overlap of the second one is the reverse of the first one.


8.  Press seam towards shoulder of sleeve (up).

Seam between sleeve & cuff is exposed when cuffs are folded down. The seam disappears when the cuffs are folded in place.

9.  Fold cuff back into place. I do not press this fold because I like to keep it soft. When it is on my arm, it stays in place better than it does on my armless dress form, so no further stitching is needed.


*This fabric is quite different from the crisp medium weight linen used in Marcy's block dress. Because it is a very soft cotton, I interfaced each cuff piece completely with cotton batiste. For the orange linen dress, I did not need any interfacing.

This idea was inspired by a collar a friend used on a t-shirt. Her collar finished at about 3 inches deep and it probably overlapped a bit more than an inch. I *think* she said the pattern for her collar came from Pamela Erny's web site, Off The Cuff, but I cannot find it. It looks so soft and pretty as a collar and I look forward to using the technique that way too.

This shirt is the Cortona shirt from The Sewing Workshop. I have made a few goofs along the way but it is now moving in the right direction. Stay tuned!


Monday, March 10, 2014

bling


As Charleston Fashion Week (CFW) approaches, I am preparing, as best I can, to blend in. The first year I just wasn't thinking at all. I brought clothes appropriate for a somber meeting, or maybe Sunday School, but not even Easter. Yes, boring.

When we arrived Daughter2 showed me the runway dresses she and BFF had rented for CFW. You know, thirty-somethings, slim, and going to a party.


Last year I did a little better. Black silk TSW Plaza pants with a black silk shell. The jacket is a soft, sheer High-Five jacket with just the smallest bit of bling. Daughter2 modeled during CFF last year for several of  Charleston's boutiques. You can see here that she loves to ham it up in a picture. Her BFF is in the center.

This year I am getting a bit more serious. I am not slim (still) and would not want to be 36 again anyway. Even if I could dress like Daughter, I would feel silly. So my goal this year is a little bling. Lower case bling. bling that allows a sixty-something, over-weight person to sort of blend in.

After much digging at Gail K in Atlanta, I was drawn to a beautiful purple lace that could go to a party. It was just beautiful. I thought - perfect for grandmother-of-the-bride, perhaps. Not the look I wanted.

Then, just as I was about to give up and buy my old standby - silk dupioni - I saw it. Sitting in the isle. $40 per yard. But perfect.


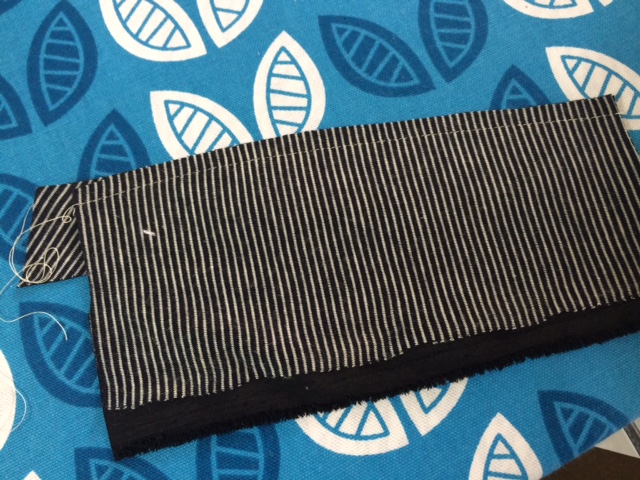
I really love this fabric. I'm keeping this on my dress form so I can pet it. Despite its appearance, it is really quite supple. It is a sheer black mesh with tiny silver sequins. The black lines that show up in the photo are just the bare single layer of mesh. Tiny sequins are stitched on top of it to create the swirled effect. 

After the salesman cut the fabric for me, he had to sweep the cutting table. Sequins everywhere. He assured me that once the seams were enclosed, the shedding would stop. And, amazingly, he was absolutely right.

CLD's Pure and Simple (PAS) top seemed the best pattern in my stash for a fabric that is really not like any fabric I've ever sewn. PAS has horizontal bust darts, a little shaping at the side seams and shoulder seams. Sadly, it is now OOP.


So I cut out the two pattern pieces. My whole sewing room was aglow with sequins. A customer at Gail K's suggested French seams so as to avoid having the raw edges next to my skin.  I sampled a French seam on a remnant and realized that would not make me happy. Way too bulky. 

So I decided to line it with black Bemberg Ambiance. Ambiance works great with so many fabrics and it was just right to pair with this non-fabric fabric. 

I even had fun assembling it, so as to avoid as much handwork as possible. I love handwork but not on sequins. I stitched the front and back together in the sequined fabric, as well as the lining. Then I layered the face fabric and lining, right sides together, stitched the neckline and turned it right sides out. Easy-peasy. A little crunchy, but easy.

Next I used a variation on the bag-a-jacket technique to sew the sleeve edges together. I pinned the shoulder seams together so nothing would twist as I manipulated it. I reached inside, where all the raw edges were and lined up the sleeve edges, RST. Sewing required two passes.


I trained the neck and sleeve edges over my ham with a tiny bit of steam and finger pressure. (And I understitched these edges by hand later to keep things flat.) More crunching, but surprisingly easy to handle.


To finish the lower hem, I turned the piece inside-out and stitched RST for all but about 5 inches so that it could be turned right side out. Again, easy-peasy, but a little fussy. And I only sewed the last 5 inches by hand.

I had thought I'd wear this with a favorite silk-and-wool jacket that gets very little wear in my very casual life.


Husband pointed out that it takes me right back to the office, or maybe an office party. So I guess I'll have to show my arms. Maybe the flash of bling will make it hard to actually see my arms.

Must remember to stand straight
All in all, I'm pretty happy with my first foray into sewing on sequined, fancy fabric.

Saturday, June 16, 2012

Camp Sew N Sew - Smart Phone Case Project

The smart phone case will hold the standard size smart phone or a mobile phone with a bit of space left over for a bit of money or a credit card. Straps are optional.

Materials:
  • 10 x 10 inch square for outer fabric
  • 10 x 10 inch square for inner fabric
  • two 10 x 10 inch med wt interfacing squares
  • one small hair elastic for the closure
  • OPTIONAL:
  • about 30 inches of cord or ribbon for strap
  • one button
  • Finished size:  3.75 inches wide, 6 inches high when buttoned, 8 inches high when open
Figure 1

Directions:
  1. Prepare a pattern: cut a piece of tissue that is 9 x 9 inches. Cut off two triangles - 4.5 inches on each side from two sides to create a *house* with a *roof*. The house is 9 inches high in the center, with 4.5 inch walls, and a 9 inch floor. It should look like Figure 1.
  2. Interface each of the 10x10 squares using the interfacing instructions.
  3. Place the pattern on the interfaced squares and cut each into the *house* shape.
  4. Place right sides together and sew the walls and the roof together using a 1/4 inch seam allowance. Do NOT sew the floor. OPTIONAL: Before sewing this, insert a small hair elastic in the tip before sewing. Also you may insert small loops on either side for straps. These should be 3 inches down from the top.
  5. Trim corners, turn and press, gently pulling out hair elastic and strap loops.
  6. Fold down the center of the house with the outer fabric on the inside. It should look like Figure 2. The yellow print is the lining for this sample.
  7. Stitch the two short sides together using a 1/4 inch SA.
  8. Figure 3
  9. Refold so that this last seam is in the center. See Figure 3.
  10. Stitch across the bottom using 1/4 inch SA. 
  11. Turn to outside. Press.
  12. Figure 2
  13. OPTIONAL: Add strap and button.


Variations
  • This bag can be resized for larger or smaller electronic devices. 
  • You may want to add a small credit card pocket to the back (outside). 
  • Also I used quilt cotton. If you use anything heavier, you may not need to interface both pieces. 

Friday, June 15, 2012

Camp Sew N Sew - Box Bag project


This project for Camp Sew N Sew 2012 is based on several tutorials I have read online, blending the techniques and adding a few of my own to keep it simple. Here is a PDF of slightly modified instructions for easy printing.

Materials:

  • One 12.5 x 17.5 inch piece of quilted fabric (outisde fabric, batting, inside fabric), available at most chain sewing stores. You may want to cut this with pinking sheers or zigzag the edge so it won't fray.
  • One zipper - must be at least 12 inches long. I prefer a 22 inch zipper even though it finishes at 12 inches.
  • 10 inches cotton twill belting about 1 inch wide for the tabs.
  • 5-6 inches of narrow ribbon for zipper pull
Directions:
Figure 1
  1. Open zipper completely and place one side of it, face down on one short side of the fabric, aligning raw edge of fabric with zipper tape. Align the top of the zipper with the raw edge of the fabric. Excess zipper will hang off the other end.
  2. Put the zipper foot on your machine and position it so that you can sew closely to the zipper teeth. Double-check that the zipper tape, not the zipper teeth, is next to the fabric edge. Sew this side of the zipper down.
  3. Close the zipper and make sure the first side is sewn correctly.
  4. With the zipper closed, wrap the other side of the fabric around and place one pin in the other side so you can see where to begin sewing the other side. The pin is there just to make sure you don't twist the zipper when you sew the other side.
  5. Now with that one pin in place, open the zipper completely. Finish pinning the zipper to this remaining side, aligning zipper tape with edge of fabric. Also align the top of the zipper with the edge of the fabric so that it matches the other top of zipper.
  6. With the zipper foot still on machine, stitch the second side of the zipper in place. Close zipper and admire your work. There is still a long tail of excess zipper hanging off one end. Don't trim yet.
  7. Turn zipper to the wrong side and, using the zipper foot still, top stitch on the outside about 1/4 inch away. You may need to change the zipper foot to the other side. Zipper teeth will be exposed. 
  8. Your bag is now a tube. With the wrong side on the outside, flatten out the tube so that the zipper is in the center. Pin the open ends of the tube in place. Open the zipper just a little.
  9. If you want the little tabs on the end, cut the belting into two 5 inch pieces, fold in half, and insert them into each end, centered under the zipper. Make sure the raw edges of the belting is aligned with the raw edges of the bag. That is the folds should be hidden from view.
  10. Sew the ends together with about a 1/2 inch seam allowance.
  11. Make sure the zipper is still partially open.
  12. With the bag still wrong-side-out, pinch each corner, creating a boxed effect. See red stitching line in Figure 1. Stitch this red line - it is about 3 inches long. Repeat for each of the four corners.
  13. Turn bag right-side-out and make sure that everything is complete. 
  14. Inside of box bag
  15. Now you may turn the bag wrong side out and trim off the triangles of each of the 4 boxed corners. You may also trim off any excess zipper now.
  16. Thread a small ribbon through the opening in the zipper pull and tie in a knot.
Finished box is about 3 inches high, 9 inches wide, and 5 inches deep.


Camp Sew N Sew - portfolio project

It's that time again. This is year 4 for Camp Sew N Sew at my church. This year we are going to make one simple project per day, rather than a week-long project, and here is one: a simple porfolio.

Materials
one 13x10 piece of fabric
one 13x10 piece of coordinating fabric for inside
two 13x10 pieces of medium wt interfacing
one 13x14 piece of fabric for inside pocket
one 13x14 piece of medium wt interfacing
one 3x12 piece of fabric for outside pocket
one 3x12 piece of interfacing
remants or bias binding to finish outside pocket & lower edge


Directions:
  1. Apply interfacing to outside-fabric, inside-fabric, inside-pocket and outside-pocket, according to interfacing instructions.
  2. Fold outside-pocket in half lengthwise, wrong sides together and press. It is now 3x6.
  3. Sew outside-pocket to outside-fabric aligning it about 2 inches from the right edge of the outside-fabric. You need to sew only the long sides down.
  4. Sew binding to the long raw edges of the outside-pocket. Note that the bottom of this pocket is still open.
  5. Fold the inside-pocket wrong sides together so that it becomes 13x7. Press.
  6. Align the 13 inch raw edge of the inside pocket with the 13 inch edge of the inside fabric. Sew along the two outer edges using about 1/4 inch seam allowance. 
  7. Place outside-fabric and inside-fabric wrong sides together and sew along the top and two sides using 1/2 inch seam allowances. Trim corners, turn and press. The lower edge is still unfinished. 
  8. Measure 5.75 inches from each 8.5 inch side and draw two parallel lines with chalk. Top-stitch on the chalked lines. This creates a way to easily close and open the portfolio. See Figure 1 below where this stitching shows as vertical lines.
  9. Now stitch bias binding or remnants to the lower edge of the portfolio: With portfolio open, outside up, align binding with unfinished lower edge, wrong sides together. Stitch binding to portfolio, close to the edge, around 1/4 inch seam allowance. Turn and press the binding into place on the inside, turning under the raw edge. Now either top-stitch or hand-stitch the binding to the inside of the portfolio. A zigzag or decorative stitch works great here too.
Figure 1
Finished size: 8.75 x 5.5 inches when closed. Fits 5x8 pad of paper. I added a little sashiko to the pocket trim on the outside.


Wednesday, June 6, 2012

Channeling Coffin

Some years ago, while I was still in academia, I conducted a workshop and I was paid in books. This means there was no real money to pay me, but I could buy books to support my research or teaching.

But any book was fine. So I ordered, among other things, David Coffin's book on shirt-making. No relationship to teaching or research. Oh well.

Truthfully I was attracted to the cover, which included this woman's shirt. Just look how elegant she must be with her pleats, tucks, off-center collar, and of course the lovely fresh-cut flowers. I assumed the keys to this magical shirt would be within the covers of my new book.

Now I may have missed something, but I think that's the one shirt he never references in this book.

Recently I have been practicing my sleeve plackets (a.k.a. tower plackets) and so finally I realized that the *cuffs* were really cuff-less sleeves with the placket, pleats, an angular finish to the tower pleat, and one sweet button with possibly a loop.

So I set out to try to make a similar cuff-less cuff on my version of TSW Zen top. The sleeves on this top are plain and quite wide at the bottom. Perfect pallet for my experiment.

As usual I created a number of learning opportunities by screwing things up, but I won't detail those here.

I completed the placket as usual and added 3 pleats around it. Then I cut a self-fabric bias strip 2.5 inches wide, folded wrong sides together, and created a modified facing for the sleeve edge.

I noticed that no stitching shows on the right side of his sleeve cuff. How did he do that??? The fabric appears to be a light-weight, semi-sheer linen. So there cannot be any lining providing hidden support. I decided to simply turn and press the bias facing in place. Then I tacked it to the shirt everywhere I could do so without any surface stitch showing.

TSW Zen Double Collar

And it seems to have worked!

I'm thinking that clever double collar on the Zen top would make a clever cuff too.