Saturday, May 28, 2022

Deep Dive into Bias

Some months ago I volunteered to teach a class on sewing with bias to my ASG neighborhood group, City Wide Couture. I've been clipping articles and pictures and noting websites ever since.

Then I finally took the deep dive into my Threads magazines. Yep, I have physical magazines. Searching for articles on bias can be tricky, as all searching engines are limited. I did find a good one though. Using titles containing *bias* was too limiting. So I searched for the word *bias* and manually eliminated all those that simply contained the word, bias.

Charles Kleibacker Bias-cut Design

I do not have every issue but my filtering yielded plenty. So I began to read and make notes. There were a few articles about Charles Kleibacker and Madeline Vionnet. And Marcy Tilton wrote a number of articles with excellent how-to advice. Other authors touched on it here and there.

Madeline Vionnet Design

In addition I found some amazing videos from the 70's and 80's of Charles Kleibacker such as this one on cutting bias garments. What a treasure. The quality of the film is not what we're used to today and so it took me multiple viewings to understand his approach. Here are some interesting ideas that I had not considered:

  • light drapey fabrics provide *drip* and stable fabrics provide *lift* when cut on the bias. He used this idea strategically in design. Coffin notes that drip fabrics cling to curves and lift fabrics skim the curves. 
  • Avoid cutting until you absolutely must. Some seams can be basted together while the traced pattern is still a part of the yardage.
  • Pattern pieces should be mirrored as you work your way around the body.
  • Through careful thread-tracing and basting, one should *stretch like crazy* while using the sewing machine. 
  • CF and CB seams can be used to create symmetry, if desired.
Very few of the patterns available to home sewers are bias cut. Many contain bias portions. Some even involve cutting and sewing on grain, and then wearing on the bias. But these are not bias cut. Here is an example from Fashion in Harmony.


The Emerald Dress and Top from Made by Rae is one that I have purchased and used. There are very few others that are bias cut, sewn and worn. I blogged on that pattern a while back. The seam allowances for that pattern are only 0.5" but I had no difficulty, and I still love the fit and drape of both garments.


Marcy Tilton maintains that many garments can be cut and sewn on the bias, even though not designed that way. She even shows how to take a basic one-seam pant pattern and do just that in this article: Tilton, Marcy, “Bias Pants,” Threads, Number 116, Dec 2004/Jan 2005, p. 44.

In order to better understand the techniques and ideas I read, I decided to try a simple one on my own. I chose the Eureka Top from the Sewing Workshop. I have made this over and over again size M but it has always run large, so I decided to try a size XS. I decided from the get-go that I would strive to follow the advice given by the gurus but remain practical and true to my own desire for joy.

First I traced the XS pattern from the original tissue and removed the 5/8" seam allowances. Then I used a grid to mark both bias grainlines on the front and back tissues. I wanted a balanced design and so I planned a center front and center back seam on each. I also chose to redraw the neckline so that a V cut fell along the straight-of-grain. It was just too tempting to avoid. As you'll see, I used the selvedge as my neckline edge. I also lengthened the pattern by 4+ inches.

I further reduced the complexity by selecting a piece of yarn-dyed striped cotton that is identical on both sides. Charles Kleibacker recommends that every fabric be cut with nap, and that the right side be marked carefully so as to be consistent in the cutting and sewing. I did not think I needed those extra hurdles here.

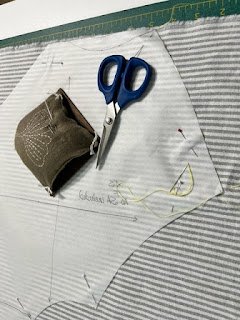
Laying the fabric out single layer, I pinned the pattern tissue for 1st front piece and thread-traced on the sewing lines. Then I rough cut it with generous one-inch seam allowances.

Moving the first piece very carefully, I used it to lay out the 2nd front piece on my yardage, again carefully aligning the neckline with the selvedge. Instead of thread-tracing the stitching lines on the 2nd piece, I used transfer paper and traced the seam lines using the 1st front piece as my guide. This is similar to what CK does in his video.

Then, before cutting the 2nd front piece, I basted the center-fronts together at the stitching line. I used the Charles Kleibacker (CK) technique for basting that is also referenced on this blog for Folkwear patterns. I did have to carefully pick up both pieces as I basted to make sure the basted seam lines on the 1st front aligned with the marked seamlines on the 2nd front.

Note that the two fronts must be mirror images of each other. The same is true of the two back pieces. This is due to the fact that there are two bias grains. The two biases will hang differently depending on where the warp and weft threads are located, and will twist as you sew if the pieces are not mirrored. Continue to mirror the grain as you work your way around the body. If there are not CF or CB seams, then be sure that the front piece mirrors the back piece in terms of the bias chosen.

I rough-cut the 2nd front piece, generally following my rough-cut on the 1st front piece. I was anxious to try the CK method of machine sewing bias cut seams. He said over and over again, "Stretch like mad!"

The cool basting technique created enough give in the basted seam to allow me to do just that, stretch like mad. It was fun! I was sure it would fail but I pressed pedal to the metal with wild abandon and sewed with a typical 2.4 mm length straight stitch. 

Next I carefully cut and sewed the two back pieces in the same manner. I must confess that at this point my patience was just barely in check, but I persisted.

After sewing the center-front and center-back seams, I basted first one side seam, and then the next. Again I used the CK method for basting seams so that I could *stretch like mad* at the machine. I followed the same technique for the shoulder seams though I probably did not need to do so.

Then I tried it on. Ta-da! It fit. I could not believe my eyes. It totally fit. And the stripes even matched up creating satisfying chevrons.

At this point, I happily finished all seams with a 3-thread serger. I finished the hemline by simply folding it up an inch and using a running stitch and light gray pearl cotton thread. I finished the armholes by folding under 5/8" and stitching with a contrast pearl cotton thread. I added a bit of that to the neckline, as well as along the CF and CB seams. 

And I have worn it and washed it. No torqueing or stretching occurred.

I made another Eureka after this, using thrifted men's shirts with yarn-dyed designs. I want to make a straight-of-grain version that would be very close to this XS one on the bias for comparison. I blogged about this second experimental shirt here

Too bad I did not carefully record the original length of the bias version, but I am convinced that the process did not distort the pattern in any significant way. Here they are aligned on my cutting table. Both have been worn and washed.

How cool is that!

Thursday, May 19, 2022

Edgewater Dress

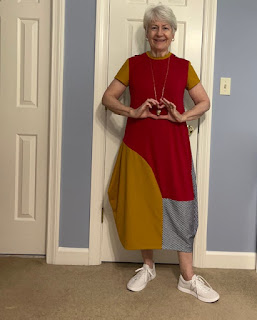
This one is a winner, I think. It is the latest pattern published by the Sewing Workshop, the Edgewater dress and skirt. I think I wear dresses more than skirts so I made the dress. I might make the skirt later.

The pattern calls for knits, except for the lower bands. I had enough of these three knits to make the dress with color-blocking, but not enough of any one of them to make an entire dress. So that decision was easy. I was not in the mood to buy more fabric. And, I'm delighted with this result.

The knits are not entirely compatible. The red, as well as the navy-and-white stripe are rayon + lycra, whereas the cheddar color is cotton + lycra. I think it works anyway. Knits are so forgiving. 

I took measurements and decided on the size S. Though I measure a size M, I chose size S. I don't like too much ease through the shoulders and bust and there is plenty of ease through the hips in a size S. I also made my usual forward shoulder adjustment. And I removed 1.5" out of the lower circumference of the short sleeve. This was to prevent the sleeves from *winging out*.

It is very easy construction, so I jumped right in after reading the instructions. I was almost ready to sew the bottom panels when I spotted a FB post showing a customer's finished dress. Amy, the poster, is 6' tall and her size M finished plenty long for her. I checked and the length difference between the S and the M is miniscule. I am 5'5". 

The pattern contains lengthen/shorten lines in two horizontal lines on the dress. I shortened the dress by 3" by spreading that over the lines (1.5" each). This created quite the jump along some seamlines, somewhat worrisome on the curved seams.

Luckily I had not sewn any side seams. I was able to lay out the pieces one at a time and recut with the adjusted pattern tissue. 

As for the curved seam, I held my mouth just right and did my best. Because these are knits, I knew that I could smoosh things pretty easily.

I thought that this dress pattern was quite similar to TSW's Memphis dress. It is similar, but it is also quite different. And I believe I like it better than the Memphis.

What a fun pattern to make. I hope I wear it a lot.


Monday, May 16, 2022

Eureka Top Hack

When the Eureka pattern first published, I purchased it, of course. But I wondered if I would ever really use it. The pattern envelope contains a simple boxy top with cuffs on the cap sleeves, plus a skirt with a V design in the front and back. Both call for knit fabrics.

Here is the shirt line drawing:

I made my first Eureka top out of a knit I purchased at the Sewing Workshop while attending Sew Kansas. I believe I made a size M based on my measurements. I never wore it much, mostly because the armholes were too large and revealed too much of my bra. 

Eureka top with Helix pants

Since then I believe I must have made it a dozen different times with woven fabrics. I've changed the neckline, lengthened it, pieced fabric, and, this time, I added sleeves.

Eureka top size M made as is from pattern with woven cotton

Today's make is part of my preparation for a presentation at my local ASG neighborhood group in late May. The presentation is on cutting, sewing, and wearing garments on the bias. This shirt is part of my *control group* because it is constructed completely on grain, as recommended by the pattern instructions.

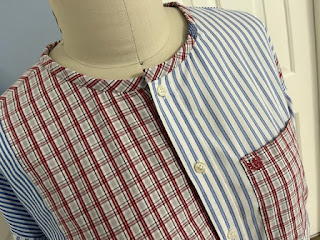
This time I started with a size XS and lengthened it three inches. I had 3 thrifted men's shirts to use, all with woven in designs, stripes and plaid. This makes the grain aspect highly visible.

I've worked with men's shirts before and have learned some things that help me. I start with a seam ripper and open up and as many seams as possible. But I do not stress over this. For one thing, working on removing the stitches often leaves little holes and lots of weak spots in the remaining fabric. Men's shirts are sewn with tiny stitches and these old shirts have the stitches embedded in them. 

So after a little work with the seam ripper, I switched to scissors. I simply cut off the seams, preserving as much fabric as possible. 

The arm pit area of the shirt pattern is a place that can be challenging when salvaging men's shirts. The curve is way too low. Also I wanted the resulting design to be vertical lines, in keeping with the stripes and plaid. In addition, I did not want it to look like a patch-work quilt top. Not sure I was totally successful though.

To keep the vertical lines, I used one front with buttonholes and another with buttons. Men's shirts are cut and sewn in remarkably consistent ways! Because of the way I cut things out, I actually had to reposition the buttons, leading to some weak spots. These, I mended just a little.

Flat-felled seams were used for all the piecing, as well as most construction. The armholes are serged to form a faux flat-felled seam. 

When I completed the bodice, I realized that the fabric on one side was slightly frayed where I had removed its pocket.  So I attached a breast pocket from another shirt, placing it more to my liking. My hope is that the result is balanced as well as hiding and protecting the weak fabric.

I wanted to see how much I could use existing sleeves, so I cut the sleeves from the shirt, then cut off the cuffs, and cut off the vertical seam. This allowed me to open and press the sleeves flat, retaining the placket with its single button.

The Eureka comes with sleeve cuffs designed to be sewn to the armholes one-to-one. So I placed the cuff pattern over the salvaged sleeve, snugging it up as much as possible to the upper sleeve. The cuff pattern piece from the envelope is on straight-of-grain, so I cut my new sleeve straight across the top of the sleeve. That is, there is no curve at all in the sleeve head. Frankly I've never seen any reason for a curve in the sleeve head for a dropped shoulder, at least not for my shirts.

Then I connected the point of the sleeve cuff pattern to the bottom edge of the sleeve, removing only a small wedge from each side. The resulting sleeve was a simple shape and fit nicely into the armhole.

I cut 3" bias strips from one of the salvaged pieces of men's shirting and used these for the neckband and the sleeve cuffs. I discovered a slightly frayed area in the neckband after completing the shirt, and so had to add a little patch by hand.

The sleeves were gathered onto the folded bias strips. I learned from Marla Kazell that gathering can be easier to control if the stitch length is shorter. I believe my gathering stitch-length was about 3.5 cm. The fabric gathered easily and smoothly. 

With bulk of the bias binding for cuffs, I was sure I did not want to try a machined buttonhole. Instead I sewed a thread loop on the end. I had small buttons left over from the collar buttons. I can slip my hands through without using the buttons, but it is possible to open it up and roll up the sleeves.

Hemming involved stay-stitching 0.5" from the edge, then folding twice and edge-stitching. I added just a little sashiko to the back neckline.


Saturday, May 14, 2022

Slow Quilting for My Sweet Niece

My 35 year old niece Jessica bought her first home last summer, I think. At the time, I asked her about her planned decorating scheme. She sent me a picture of her family room rug and I began to think about a quilt for her.


It did not take me long to organize stash and purchase the additional fabrics I needed. Then I began to think about pattern. I do love circles and so settled on a kind-of quarter circle theme. It was fun to construct the blocks.

I do not enjoy making identical blocks and so I knew that would never happen. The quarter circles created a loose theme for the quilt but I didn't let that get in the way of working in the moment. Or running out of fabric. There is always more fabric.

The top came together finally. I purchased the batting, and added a back in a fairly loose-weave cotton.

I basted it all together and began a very, very slow quilting process. 

At first there was a little structure. I traced circles with chalk from kitchen objects and then echo stitched around and around. But that got boring. 

So I switched gears and chose to go with curved loopy stitching to simply fill the spaces. That appeals to me - no tracing of stitching lines, just free motion, slow stitching. I used pearl cotton thread, primarily in 12 weight.

It still took months and months, because I kept working on other projects, you know, like clothes. That's what I really love making. 

Once finished, I photographed it and then washed it. That way, if everything goes south in the washer or dryer, I have evidence of a finished project. It washed and dried beautifully. It has a soft hand.

Now it's finished and winging its way to Jessica. I hope she hasn't changed her color scheme by now.