Showing posts with label collar. Show all posts

Tuesday, March 7, 2023

17th Birthday Gift

I've not been sewing as much in the last few months as I wish. Too much in the non-sewing part of life going on and demanding attention. Sewing keeps me sane, so this is not something to mess around with.

After my fun with bricolage, I found the sew-jo to finish a shirt I cut out maybe 3 months ago. It was dicey because it has all the classic shirt details that I love. I just assumed I would ruin one or more of these details.

But, surprise! It all went great. I took my time and enjoyed the entire process. 

Luckily the pattern I chose was The Blouse Perfected from Cutting Line Designs. I have blogged about that in the past. It is just such a great pattern - really a small book on professional techniques for completing classic shirt details.

First up was the collar and collar stand. CLD approaches this process in a manner that is quite different from others, I think. The collar stands are attached first, sandwiching the neckline in between the two stands. Then the ends of the collar stand are completed, leaving a gap for the collar. The collar is finished on three sides and top-stitched. Then the collar is dropped inside the gap in the collar stand. It is machine stitched to the right side of the stand and invisibly stitched to the inside of the collar stand.

I thought I'd screw that up, for sure. But indeed, it worked out perfectly. CLD patterns are nothing if not meticulously drafted. And the explanations are detailed with clear illustrations. Everything fits together as it should.

I also took my time on the sleeve plackets. There are so many ways to mess those up! 

The stars were aligned and it too worked!

And then I found perfect buttons in stash. This is when sewing is totally satisfying, right?


Saturday, January 7, 2017

Zen again

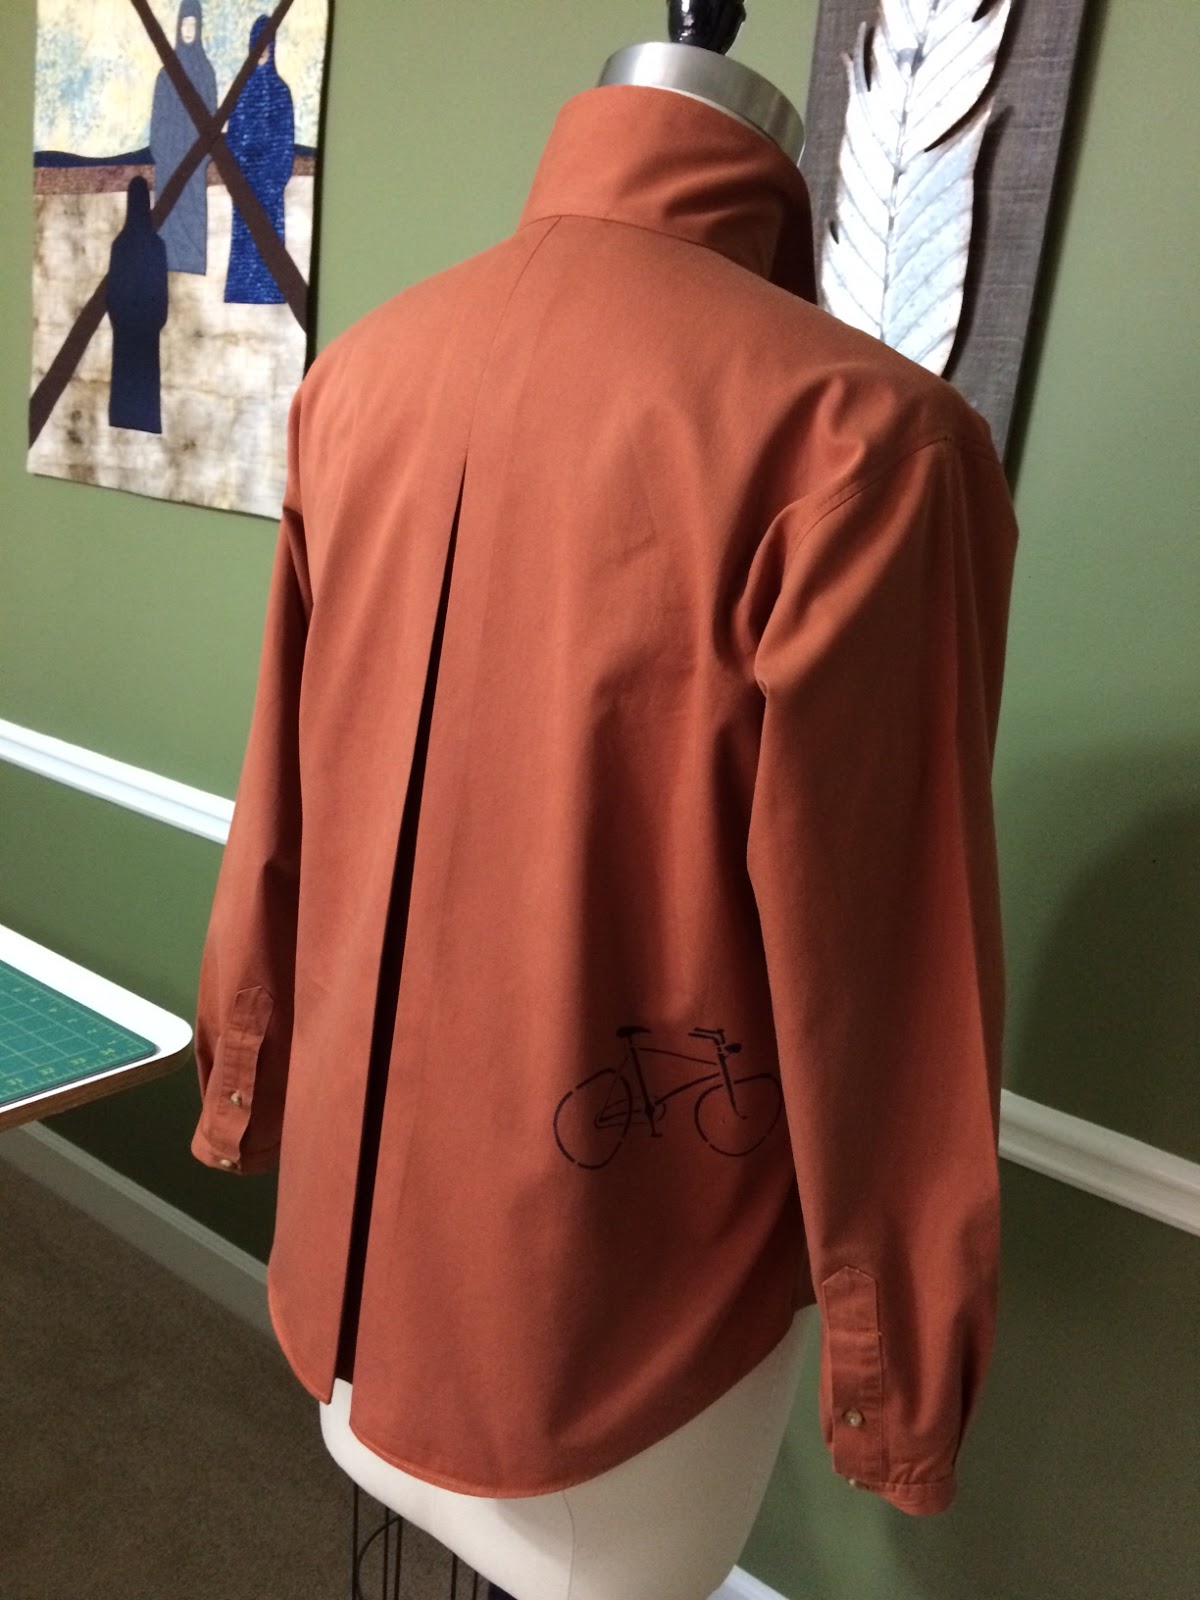
For the past 36 hours I have been experimenting, off and on, with shirts I purchased for $2 each from my local thrift store. And what have I achieved? I have converted a shirt into, yes, a shirt.


It's hard to look at the result and see how much work went into it. That's what we do as sewers though, isn't it? And enjoy (almost) every minute.

This started as a man's shirt size XL. I was able to reuse the button band and buttons on the front, the plackets on the sleeves, portions of the hem, and the chest pocket. I'm convinced that I could have made this from scratch more quickly. But, of course, that was never the goal.

Here you can see the original shirt, second from the left - a classic man's shirt.


First I removed the collar and the cuffs. Then I removed the yoke. By keeping the shirt tail hem, I was able to cut the back from the back and the fronts from the fronts. For the fronts, I simply aligned CF with the buttons and buttonholes. The hem had to be reshaped in the final sewing, but I did not lose any fabric to hem allowances.


The yokes provided enough fabric for the final collar, and the side seam excess provided fabric for my narrow cuffs. It looks like I don't have enough space to cut out the sleeves, but by adding a narrow cuff, it all worked out just right.


You can see that I moved the chest pocket to hip level, much more useful IMO. And I added a little screen printing and stenciling on various pieces.


And here it is on me.


Friday, September 11, 2015

The Florence Shirt

The Florence Shirt may be the most recent pattern released by The Sewing Workshop (TSW). After having such fun with the Cortona Shirt pattern, I have been looking forward to trying my hand with the Florence.

The Cortona shirt has some unusual lines to it and it is a distinctive make. The Florence, on the other hand, seems to be a classic with some contemporary details.

I omitted the buttons on the button band attached to the back, but kept the band. It was a fun place to play with the stripey effect of this fabric but I was not sure I would like sitting on buttons or even leaning on them while seated.

On the classic side, there is the standard collar band and collar, as well as cuffed sleeves and a separate band for buttons and buttonholes down the front. The sleeve is set in and sits nicely right at the shoulder line. The back yoke places the shoulder seam slightly forward. It is really a nice women's shirt pattern with lots of options.


The contemporary details include its tunic length and front hem tucks. It also has a band down the center back with buttons. It does not actually button and in fact is a separate piece that is top-stitched on. I chose to omit these back buttons - could not see myself sitting on them. It is an interesting idea though.

And then there is this cute pleated breast pocket. You gotta love a pocket detail!


The overall silhouette is very appealing to me. The side seams curve very slightly into a lantern shape and the tucks in the front further define that shape.  The proportion is pretty.


Things I changed: 
  • The back yoke is single layer. Easy to fix, of course, by simply cutting a second layer. Otherwise there would have been all those raw edges that get eliminated with the *burrito* method of attaching a yoke lining..
  • The sleeve vents are made with continuous bias strips. Though I've been making tower plackets on my shirts lately, I decided to go ahead and try this out. The technique described in the pattern produced a lumpy edge on the vent. The described technique starts with folding bias strips wrong sides together and pressing lengthwise. Then the double bias strips are attached to the stay-stitched slash. By the time you wrap the double bias around the raw edges and top-stitch, it involves lots of layers and not much room. Now this could have been my fabric, but I strongly suggest testing a sample with your fabric before using the technique in this pattern. I ended up using a standard continuous bias strip as described by Sandra Betzina in her Power Sewing book (what a great reference). 


I finished my sleeve cuffs and my collar stand in a different way, but I think the directions would have yielded the same result. The directions call for the *burrito* technique in these two finishes but I felt more comfortable with hand-finishing.

My fabric came from Gail K here in Atlanta. It is a wonderful indigo blue cotton shirting - one of those pieces that responds to pressing but really does not need it. It is soft to the touch and was a pleasure to sew. It is a kind of Ikat I believe with a striped effect. The stripes ran crosswise so I rotated the main pattern pieces so that the stripes would run vertically on me. The stripes are random in appearance but, like most stripes, it was fun to rotate for some of the minor pattern pieces like the cuffs and the button bands. It was a great piece of fabric to sew.

The buttons are some of those old-fashioned ball buttons. I am not so sure about them. So I welcome your input! Do you think dark blue buttons would be better?

All in all, a fun make. Linda and Erin at The Sewing Workshop have made their versions with border prints and they are fabulous! I am already day-dreaming about my next version.

Wednesday, June 6, 2012

Channeling Coffin

Some years ago, while I was still in academia, I conducted a workshop and I was paid in books. This means there was no real money to pay me, but I could buy books to support my research or teaching.

But any book was fine. So I ordered, among other things, David Coffin's book on shirt-making. No relationship to teaching or research. Oh well.

Truthfully I was attracted to the cover, which included this woman's shirt. Just look how elegant she must be with her pleats, tucks, off-center collar, and of course the lovely fresh-cut flowers. I assumed the keys to this magical shirt would be within the covers of my new book.

Now I may have missed something, but I think that's the one shirt he never references in this book.

Recently I have been practicing my sleeve plackets (a.k.a. tower plackets) and so finally I realized that the *cuffs* were really cuff-less sleeves with the placket, pleats, an angular finish to the tower pleat, and one sweet button with possibly a loop.

So I set out to try to make a similar cuff-less cuff on my version of TSW Zen top. The sleeves on this top are plain and quite wide at the bottom. Perfect pallet for my experiment.

As usual I created a number of learning opportunities by screwing things up, but I won't detail those here.

I completed the placket as usual and added 3 pleats around it. Then I cut a self-fabric bias strip 2.5 inches wide, folded wrong sides together, and created a modified facing for the sleeve edge.

I noticed that no stitching shows on the right side of his sleeve cuff. How did he do that??? The fabric appears to be a light-weight, semi-sheer linen. So there cannot be any lining providing hidden support. I decided to simply turn and press the bias facing in place. Then I tacked it to the shirt everywhere I could do so without any surface stitch showing.

TSW Zen Double Collar

And it seems to have worked!

I'm thinking that clever double collar on the Zen top would make a clever cuff too.

Thursday, February 23, 2012

Vogue 8746 - a basic white shirt

Vogue 8746 is a quiet little shirt pattern with nice lines, I think. I like the pleats at the shoulder, as well as the collar. The collar reminds me of collars I've seen on the BBC series "The House of Elliott." And I wanted an excuse to try out the tower placket from another Vogue pattern - 1204.

Issey Miyake cuff
My last shirt, Vogue 1215, was a bit challenging to fit because I did what I usually do as a slightly pear-shaped person - make the size matching my bust measurement and then make sure the hips are big enough. And the shoulders were too large. That's not overly easy to fix.

sleeve gusset
So with Vogue 8746, I decided to do what Louise Cutting recommends - a kind of slash and spread approach. I started with a muslin of only the shoulder area to get that right. Then I split the front piece as well as the back piece and spread them enough to provide adequate hip room. The fit was really pretty close.

Except for the sleeves. The upper sleeves were too tight. I compared the measurements to other shirts I've made and this one is much more close-fitting. So I inserted a gusset in the underarm seam of each sleeve.

The result is a pretty basic white blouse - a go to item, not too exciting on its own, but definitely a nice filler in my wardrobe.

Saturday, February 4, 2012

Classic Shirt Details

Pam in one of her divine shirts
Just completed Pam Howard's class on the classic shirt. I am barely functioning on sensory-information-inspiration overload. Wow. Great class.

She started with a mouth-watering trunk show. My favorite fabrics were softened linen and also silk dupionni. Both show her fabulous top-stitching beautifully. She covered all the gorgeous classic details and I left with the definite impression that I can do that too! I made some head-way on Vogue 1215, but mostly took notes and tried to absorb everything.
Tower placket

 Some of the details include tower plackets, traditional shirt patch pockets, continuous bias plackets, collars with collar bands, flat-felled seams, rolled hem, and lots and lots of lovely top-stitching. My favorite item that I simply must try next would have to be the traditional tower placket. She demonstrated it but there was no time to practice it, plus no one had a pattern with that detail.

First task when returning home was to (1) dig through the pattern stash to see if I had a pattern with the tower placket, and (2) read some more of David Coffin's book, especially on the tower placket.

Now back to Vogue 1215.
Collar with band
Pam's perfect top-stitching
Continuous bias placket

Friday, September 16, 2011

Shirt for DGS4

Finished Shirt
Nearly a year ago, I found this shirt-weight cotton football fabric at a quilt shop (Sew 'N' Sew, I think) in Summerville SC. DGS4's parents are Clemson fans.  DGS4 is playing football this fall. He's about to have a birthday. And I just had a lesson on collars and collar stands at City-wide Couture. The stars aligned and I made this shirt.

Thought I had found a good pattern in my stack of Ottobre magazines. I wanted to practice Lorraine's techniques. I was only a little disappointed when I realized the collar and collar stand were a single shaped piece. This was a good-news-bad-news situation. On the one hand, I really wanted to try the cool techniques; on the other hand, maybe my first-run would be better on a larger garment. A larger garment for me.


Clean finish on yoke
Hot-dog method for yoke
Ottobre instructions are terse but, in this case, they had a fairly good description of how to make sure the yoke has a clean finish on the inside and outside. It's just like the method described for making pillow cases for ConKerr Cancer, I think. I just love little details like this.
Neckline before attaching buttons

Gotta clip the neck before attaching collar
The rest of the instructions were more typical of Ottobre. Fine, if you know what you are doing.

DGS4 lives in a warm climate so I made the sleeves short. That took a bit of guess work, trying to figure correct proportions from DH's shirt. In fact, it was fun to keep DH's shirt in the sewing room with me to try to duplicate as many of the details as possible.

I'm pleased with the resulting shirt. Hope DGS4 is too, but I'm going to a big box store to buy a Lego set just in case ;)

So now I'm dreaming of the Hibiscus shirt from Sewing Workshop for me. Maybe it has a real collar with separate collar stand. And a real placket, and...