Thursday, December 31, 2020

Goodbye to 2020

Just a quick post to wrap up this strange year. I've been dreaming of sewing more than actually sewing, but I now have several projects all ready to start in the new year. Instead of sewing, I've made a few Christmas cards. 


This is something fun for me. I don't stress about making a million of them and getting organized. Instead I make one or two as the spirit moves me. So a few (maybe most) recipients are receiving these late.

Here is a recap of the very small amount of sewing I've managed in the last couple of weeks: 

I used a remnant from my last pair of black ponte pants to make a layering shell. I like to have these on hand during the winter. It's nice to wear like a camisole.

I also made just a couple of Christmas gifts, again making sure these were no stress gifts. I made two rice bags for my son using some pretty royal blue silk twill. He has reached the age where he injures himself in his workouts from time to time. I'm not sure how he got to be that old. I thought he might appreciate these lavender sacheted bags that can be heated or frozen. I did not manage to take a picture but they were not all that interesting anyway.

Lastly I made my daughter an apron to match mine using Tessuti's free apron pattern. She is quite petite, so I made some adjustments in hopes it would fit her proportions better. 

I think that this is a fabulous pattern given its price. I might have even paid for it, as it is similar to some I spotted in France summer 2019. It has the feel of a European kitchen to me - simple, crisp, functional. I used some lovely linen purchased in Paris.

And I added a tag that reads "My mom made this."

Happy New Year, fellow creatives! I hope 2021 greets you with lots of fun sewing projects.

Wednesday, December 16, 2020

Monroe and Helix


The Monroe Turtleneck pattern is a freebie from Tessuti, very similar to their also-free Mandy boat tee. It came out in (my) spring 2018 and I downloaded it almost immediately. I even traced off a size 3. Then I tucked it away to wait for cooler weather in the northern hemisphere. And of course, I forgot about it.


As is often the case during these COVID times, I find myself most inspired by online sources of eye candy. I routinely visit Pattern Review and Instagram for ideas. The Monroe was recently reviewed on PR and I loved what I saw. She rates it 5 stars. Then I read the rest of the reviews of the Monroe. Wow. Not complimentary.


Having made the Mandy, I was familiar with one potential problem. The sleeves on these Tessuti patterns are often too danged tight on me. That is why I had traced the largest size initially. Here are their suggested body measurements for the largest size, 3:

Bust 40-44”
Waist 35-43”
Hip 44-48”

Not close to my measurements, especially now that I've lost weight. Working off their measurements, I belong in a size 1. Of course, the Monroe's problems have nothing to do with bust, waist, or hip measurements, as there is no fit in those places. Rather, the problems are with the neckline, as well as the sleeves. Several disgusted reviewers rated it as a wadder from the get-go.

I decided to give it a go.

SEWING KNITS: I know from sewing knits for years that every knit has a different amount of stretch, vertically and horizontally, as well as differing amounts of recovery. I also know that I do not like negative ease, something that is almost a given in a pattern designed for knits. I'm OK with zero ease in some cases but I'm happiest with a little positive ease.


SLEEVES: Working from my previously traced tissue of size 3, I first pinned the sleeve tissue together along the seam allowance. Then I slipped it over my bicep. That was fine, good news because I really did not want to mess with the armscye.


NECKLINE: Next I took the edge of my knit fabric and wrapped it around my head to see how large the circumference needed to be. That was revealing. I needed 6 more inches than allotted in the size 3! And I will say that my head is not unusually big either. The drafters of this pattern must have assumed a knit with an enormous amount of stretch. They suggest that even a ponte knit would work. May I politely say, no way, José?

Adjusting the turtle neck pattern piece was easy because it's just a rectangle.

The neckline took a bit more work, because it is not linear. First I trimmed about 1/4" off from the front and back necklines. Then I measured with a 12" Curve Runner similar to this one, to see how close I was to the planned size of my turtleneck collar.


After 2-3 more iterations, I was pretty close to the size of the planned turtleneck collar. So finally I scooped out the front a bit, leaving the circumference of the neckline just a smidge larger than the circumference of the collar.


You've probably noticed that mine is not a turtleneck. That is because my knit fabric is quite drapey and so it produced more of a cowl neckline which, frankly, is my preference. I mostly wanted something soft and warm around my cold neck during these winter months.


My fabric is a cooperative jersey knit, 100% polyester. This makes me sad because I never ebd up actually wearing tops made from 100% polyester. Polyester fabrics tend to have static cling in the winter and they are hot in the summer. The days that fall between are days I'd rather wear cotton or linen or silk. It was a good toile and sort of wearable (DH likes it). 


TIP: It had one of those very wide selvages that distorted the fabric. After removing the selvage though, it was a breeze to cut and sew. I used a ball point needle and polyester thread. I also used a leading patch and trailing patch while sewing. This is a quilting trick that I've found prevents light weight fabrics from being sucked into the stitch plate.


Here I'm combining the Monroe top with some new black ponte Helix pants, modified to include a waistband. I seem to always need new black pants!


Happy holidays and happy creating to you!

Tuesday, December 15, 2020

Picasso knit pants

This project fits me to a T right now. My broken knee cap has healed enough to hobble around without the brace or the crutches. Hooray!

The Picasso pants from the Sewing Workshop are a favorite of mine. I've had this nice light weight rayon knit sitting around my sewing room for a while. I imagined it as a jacket, then a top, but finally Picasso pants. And I'm so glad I did.

During these COVID times, I do like comfort clothes, don't you? It fits with my COVID hair. Honestly I'm not into highly fitted clothes anytime, but especially now, I want soft clothes that make me feel good.  These do not disappoint.


I made a size M and probably could have gone down to a size S as there's not much to fit in these pants. But in order for them to look the way I imagined them, I wanted them to drape and flow. 

These pants have Linda Lee's signature waistband that is flat in the front. The instructions are to use elastic on only the gathered part of the waistband. I think the center front waistband needs more support than that, so I always insert elastic into the complete circumference, anchoring with vertical stitching between the two front pleats. 

Because I've made these so many times, it was a quick project. I did change the pocket. In my most recent versions of the Picasso pants, I've added a pocket in the side panel by piecing it vertically and sewing a pocket bag to the wrong side before attaching to the front and back panels.


As you may know, Linda Lee of the Sewing Workshop does these free FB live presentations each Tuesday. During one, she mentioned adding patch pockets to the side panels of the Picasso. Well, duh. Mine with the pocket bag on the inside does not look any better and it's certainly more work. So these have the patch pockets incorporated into the side seams of the side panels. 

Because this is a fairly light weight knit, I had to work to avoid sucking the fabric into the stitch plate at the beginning. I used a ball point needle and polyester thread, as is usual for me with knits. I could have changed the stitch plate to a straight stitch plate, but this quilting trick worked just great.


If you quilt, you are probably familiar with the idea of a leader patch and trailer patch. This saves (a very small amount of) thread but it also allows you to keep the foot lowered as you transition from one seam to the next. And it worked like a charm to keep the knit from being sucked under.


As a plus, you end up with all these fun little squares that should become part of a fiber art project.


I now live in these pants, worn here with another comfort piece, the Bristol top in Alabama Chanin cotton knit. 


Happy holidays to you!


Thursday, December 10, 2020

Egyptian Night(gown)

This is a classic pattern from Folkwear. It's called the Egyptian shirt and is shown on the cover as a shirt or tunic with much embellishment. The pattern illustrations also show a caftan length, something worn traditionally by men in the middle east, I think. I added 22" to the standard one to make it close to floor length on me. 

I've made this several times in each length, and I've used the neckline facing technique more times than I can count. It's a nice finish for any otherwise plain neckline. The facing is shaped and sewn to the inside of the garment instead of right-sides-together. Then the facing is flipped to the outside and edge-stitched in place. This facing is the place for much of the suggested embellishment.


I shortened the front vent in order to simplify things. I did not want to mess with buttons or other closures. The front vent is just long enough to allow it to slip over my head. 


As I was sewing this one, it occurred to me how very similar it is to the Fit for Art Tabula Rasa jacket pattern. The front and back pieces are long and narrow. There are side panels, and T-shaped sleeves that are first attached to the side panels and then sewn to the Front/Back in one long continuous seam.


In the original Egyptian shirt pattern, there is actually a seam down the middle of the side panels. This allows for an opening to a nice little pocket. The pocket bag is simply stitched behind the panel and part of the side seam is left open. Super simple.


And super dangerous in the kitchen. I'm constantly catching the pocket opening on the drawer and cabinet hardware. So, for this version, I just made patch pockets on the side panels. Not as elegant, but much safer. For me.

I used some aged silk noil that I dipped in indigo once upon a time for the front, back and side panels. I did not have enough for the sleeves and so used another eco-dyed (or eco-splotched) piece of silk noil. I made no notes and so I'm guessing it was dyed with iron, vinegar and maybe yard debris. It's a bit odd.

You know, there are those who wear nightgowns, and those who wear pajamas, and those who don't. I am really a PJ gal, but have had to change my thinking of late. Three weeks ago, I went airborne in my kitchen, trying to dodge a poorly placed laundry basket and broke my knee cap. Yes, it hurt. A lot.


Since my little tumble, I've been in a full leg brace 24x7 and PJs are not practical. I've even switched to 100% dresses for day wear. I found myself wearing an older version of the Egyptian caftan and decided to make a back-up. 


Easier said than done in this leg brace, but I managed to finish it somehow. I used a combination of my Bernina and my mother's 1950 Singer. The Singer is lovely, and has one of those knee pedals. I managed flat-felled seams on that long seam that connects the Front/Back to the Sleeve/SidePanel. And I enjoyed wearing it last night. Just right.


Since I enjoy eco-dyeing, I'm now wondering if it would be possible to dip those sleeves in something without disturbing the indigo body of the garment. 


Thursday, December 3, 2020

Eco Printing


During Fall 2020 I've spent time trying to learn more about eco-printing. I've done a fair amount of eco dyeing but have long wanted to go deeper with the prints one can achieve from organic or natural dyes.


In the last few months, I've taken two workshops, one from the local fiber art collective, and another from India Flint in Australia. Both were remote or virtual, of course, because this is the year of staying home and avoiding germs. 

The local one was fun but not really focused on printing, at least not what I had visualized. The focus was on purchased natural dyes like marigolds, chamomile, rosebuds and annatto powder. The splotchy colors were vibrant and the results were quick on our silk handkerchiefs. 

But I had hoped for more emphasis on printing. My workshop with India Flint has really given me much to practice in this arena. I love that we are encouraged to use what is easily available, instead of ordering natural dye stuffs online. Ordering stuff online is totally fine, but I enjoy the surprise of what can happen with debris I collect in the back yard. 


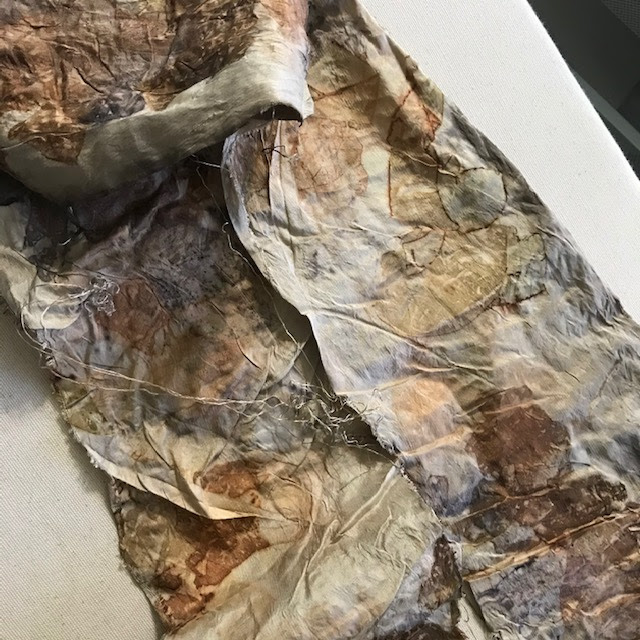
Silk produces the best prints. I've had mixed results printing on cotton, or linen, or rayon, but the prints are more 2-dimentional (flat). With silk, there is depth and shimmer, as if the leaves were still attached. This is an off-white silk shantung. This dyeing process softens it a bit.


I've also learned that it helps to mordant with iron and vinegar. I usually leave the cloth soaking in the iron/vinegar bath overnight, then partially dry the item, prior to rolling it tightly around something and securing with twine or elastic.


For me the key ingredients are time, mordanting, and silk. The organic substances chosen to make the prints do matter, but I've been amazed how much the leaves all over my yard produce prints. The leaves and other yard debris used are not uniformly ready to yield lovely stains. For example, the leaves from my Japanese maple and other maples produce pretty detailed prints, but gingko does not produce anything. I understand it can be used as a resist though. Magnolia which is all over my neighborhood, also fails to provide a print. 


Time is also important. First I simmer my bundle for a couple of days, off and on. In one case, I tucked it into the freezer for more than a month after a little simmering. DH now knows that items in the freezer are not necessarily edible!


Mordanting with the iron/vinegar bath produced interesting results with a piece of silk that started out already a light brown. No prints emerged, as the mordant dyed the entire piece dark rich brown. 


Additionally I collect the skins from onions - these make lovely distinctive stains/prints. Also I occasionally buy eucalyptus in the floral section of my grocery store. It doesn't really like to grow in Atlanta as it is too damp here, but it definitely produces pretty prints and pretty colors.


Above, you can see some interesting printing from the twine used to secure the bundle tightly.


Next I'm going to work (harder) on printing on paper. These cannot simmer the way the silk does without crumbling apart, so I'm hoping I can produce something with a quick mordanting in the iron/vinegar bath, Then after rolling the leaves into the paper, I will try steaming it.


I now have enough to make something, maybe a jacket, or a top, out of these silks.