Showing posts with label wool. Show all posts

Friday, June 28, 2024

What I am making now

Whoa. June is almost gone and just what have I been making?!? I've been traveling quite a lot and have only bits and pieces to share.

I was so excited to visit the lowlands in Scotland, building the trip around an opportunity to spend one night on the very special island of Iona. I do hope to return.

While on that side of the lowlands, we stayed 3 nights in the port city of Oban where I happened on a sweet little fabric and textile crafts store. The main attraction for me was all the Harris Tweed. I guess I could've gone home then, from a sewing perspective. But not really - the rest of the trip was focused on family and fun, all good.

After Scotland, we met up with family at Lake Garda in northere Italy. No sewing related items to share, except that I did not include clothing appropriate to such high heat and humidity there. I thought I had covered that, but not really. I should've brought something in lighter colors. All my layering pieces in dark colors failed me.

me and my BSF!

After a few days at home, I was off to one of my Very Happy Places - Shakerag Workshops in Sewanee TN. This year, I took "Imagined Landscapes" with Arounna Khounnoraj, of Bookhou. She is a lovely person and an enthusiastic teacher. She also is open to learning from her students and sharing knowledge. Luckily for her and her family, she appears to be a good marketer too!

Left is a piece from the free table, Right is after a marigold dip!

We played with natural dyes - indigo, madder, marigold, onion skins, avocado, as well as an iron pot that I avoided. We also painted with thickened soy milk, as well as fabric screen printing ink. 

Each of us worked on one central piece around the title - imagined landscapes. It was fascinating to see all the different takes on the theme. For mine, I used pieces of indigo dyed and madder dyed cotton. I also had a piece of dark blue batiste with me that I incorporated into my piece, using free-form applique and reverse applique.

I came home with lots of yellow from the marigold. I'm not big on yellows but I'll use those pieces somewhere. I used an old table cloth I picked up at a thrift store. Those old textiles really love the dyes!

an early sketch

This was an early, warm-up piece for me, using a piece that was first painted with the black screen printing ink. Then I added some thickened soy milk paint, before dipping it all in the marigold. Super interesting results but it will probably just go into my *parts department*, as Diane Ericson calls it.

the brownish parts are from painting with thickened soy milk

Toward the end of the week, Arounna walked us through the construction of a triangular pouch. This is also a free tutorial on her youtube channel. I have not finished mine yet, partially because I like it in this state. It reminds me of a tiny soft shoe.

I'm so excited about attending Shakerag next year when I hope to attend a class with Merill Comeau. I've longed to take a class with her. Fingers crossed it all works hope.

When I returned from Shakerag, where it was also a bit hot, I took to modifying some dresses. I wore each of these at Shakerag and realized I wanted to change the necklines. For the Tessuti dress, the Eva in silk noil (thank you, BSF!) I simply added some embroidery. It was too plain.

For the Sewing Workshop dress, the Memphis, I lowered the neckline and added a striped binding, instead of the previous mustard binding. Now I may go and add a side seam pocket. It really needs a pocket. Sandra Betzina's description of adding such pockets in her Power Sewing is easy-peasy.

I'm also working to finish the hand-stitching on my Imagined Landscape. And I've started a new-to-me pattern from Diane Ericson, the River Tunic, which is designed to be one size fits all and nearly zero waste. Already scratching my head but lots of play left.


Friday, March 8, 2024

Siberian Parka


Continuing with my New Year's theme, the Siberian Parka from Folkwear Patterns has been in stash a while. I've been wanting something with a hood. I think I must have purchased it at a resale, probably our local ASG chapter's annual sale. Honestly, I don't think I would have purchased it otherwise. But it has some appeal to me right now.


The fabric is 100% wool boucle, probably purchased at a fun store that used to be in Massachussetts. I cannot find evidence of it now and I cannot remember the name. It was almost exclusively mail/phone order, back in the day, but they had a smallish shop that was open to the public during limited hours. I used to connect with them while visiting my son in NH and visit them. I believe I purchased it soon after I finished my first, and last, Coco's jacket. I guess I thought I would make another. I will not do so.


The fabric is soft and it was easy to stitch. It did ravel quite a lot, so I serged all the edges. I could not bring myself to apply Hong Kong finishes. There are way too many seams that are way too long. And the serging thread tends to sink into it, so it is not too offensive.


After I finished the poncho, I was curious about how it would behave if washed. Not that I really intend the machine wash it on a regular basis - probably never. Unless I am extremely sloppy, I'll be OK with dry cleaning, which I know is neither dry nor clean. I serged two same-size scraps, machine washed them both, machine dried one of them. They remained similar, shrinking about 10% in both directions. And it is still soft and lovely to touch.


I checked Pattern Review for this pattern, of course. Although I had this piece in stash for years and never touched it other than to pet it, I still wanted to be a little careful. Many people commented on its size. Yep, it's huge. But then it is a parka. I made size Small.


I found the instructions for the area of the front neckline to be difficult to follow. In the line drawing above, it looks as if lots of seams come together in a V.  The shoulder area of the garment has multiple pieces as you can see in the picture. In the front, it needed to connect with the hood opening without a bunch of lumps. Ultimately, I simply played with the pieces coming together until they behaved. I'm quite happy with the result.


I also struggled just a little with finishing the edge of the hood opening. Instructions are to simply fold the fabric back about an inch total, and top-stitch in place. Because the opening widens as it moves away from the raw edges, there was no way that would work. 


My first try was to pull out a remnant of black silk dupioni and just finish the edge with a bias binding. I did not like the look of that and it enclosed my face too snugly. I cut the hem off. Next I applied a bias piece of another remnant as a facing. That worked and it is snug enough around my face though I removed more than an inch from the raw edge.

The first time I tried on the parka, I knew I would want the option of rolling up the sleeves without looking at serger thread. They are a bit long, but I like having options on this outer wear garment. I think there will be some occasions when I will want the sleeves rolled all the way down to stay warm. I finished the sleeve hems with a facing, using another remnant of blackish fabric. I traced a facing shape by pin-stitching the two piece sleeve tissues together. 


The pocket instructions were a little iffy. They are in-seam pockets with a single layer - the single layer is top-stitched to the front of the garment. The instructions were to wait to finish edges until the pocket was installed. That made no sense at all to me, unless I was planning to finish the visible raw edges with a hand-overcast stitch. I serged around each raw edge before beginning assembly of the pockets. I am glad I did so.

I used a remnant of some black tencil fabric for the pockets to avoid too much bulk.

All in all, I consider this project a success. Mr. Now Sewing thinks I look a bit gothic in it, but that's OK with me. If I cannot be a little goth now, then when can I be?

Wearing the parka with gray polyester Helex pants

Recently I've also made several pairs of basic pants - Sewing Workshop Helex pants in black ponte (my go to for black pants), as well as a gray polyester knit. The gray was well-aged, enough so that I have no idea how it came to be in stash. It would never be my first pick for pants. I also made a pair of Sewing Workshop Quincy pants in the wool suiting used for facing on this parka. The Quincy pants are still undergoing revisions to get the fit right.


The temperature today rose to 75 F (24 C), so it may be a few months before I need this parka. 


Sunday, February 25, 2024

E-Vest Re-Make

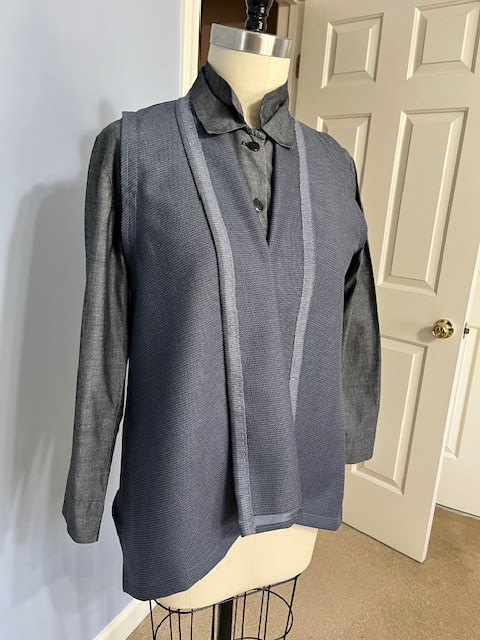
This is a make from last year that I never used as the subject of a blog post. It was perhaps because I wasn't sure I liked it that much. In fact, when I came across it recently I could not remember which pattern I used. At first I thought I had used the Valencia jacket and omitted the sleeves. But, indeed, it was from the Sewing Workshop eVest pattern. And here is why I thought it was the Valencia.


Online description: The easy-to-make eVest is an adaptation of our popular Valencia Jacket pattern. The loose-fitting vest has soft fold-back lapels and angled front drape. The wrong side of the fabric shows. Options for hemming or binding edges are included in the pattern download.

I think that the adaptation is just that the sleeves were omitted. Maybe. The Sewing Workshop folks are champs at reworking a pattern, I think.

I remember it as an easy make, probably from a short cut of fabric I had acquired - too little to make much of anything but a vest. But I like the fabric and NOW I think I really like the vest.

Version 1:


The selvedge was nice looking so I thought I would just fold it back and stitch in place with a running stitch. I used a silk tafeta remnant to finish the armholes and the lower hem.


The result was OK:


Version 2:


Next, I cut off the selvedge down the front and used more of the silk tafeta to finish the front lapels. I also added a patch pocket to the right side front.


Last week I fished it out of the closet and wore it. I love vests when it's cold here. We don't turn the indoor temps particularly high so I like the extra layer. This light weight wool drapes nicely. Also it is not itchy and so I can wear it with almost anything.

I felt like it needed another re-make, so here is the maybe-final...

Version 3:


I removed the silk tafeta binding from the lapels and the front hemline. It is not soft and does not roll nicely even on the bias. I also *improved* some sloppy finishing on the armholes. And I replaced the binding with this rough weave silk piece from stash. 


I have no idea where and when I acquired this piece of silk. It is only 14" wide so probably a kimono remnant I picked up at Sewing Expo years ago. I really like the way the stripes in the bias binding work with the colors of the wool in the vest. Now it is in my rotation of favorite vests.


It goes with a lot of things in my closet. Here I am wearing it with my very old gray silk charmeuse Plaza pants (another Sewing Workshop pattern from years past). 


I think those Plaza pants may have come back into style. Or (more likely), I am just in the mood for loose silk pants.


I did not resist the urge to add a patch to the back neckline.


I am pretty crazy about this eVest pattern now. Maybe I want to make a long version next. It's still chilly here, especially in the mornings.


Wednesday, February 10, 2021

Vestments - One more new stole


This one is for my petite deacon friend. Deacons in the Episcopal Church are directed by the Bishop who manages multiple churches or parishes. Deacons are sent to a church for a few years and then sent to another church. Their assignments are very unlike those of priests who are selected by the parishioners. 

Often they are unpaid. Ours is unpaid. Another deacon friend is quick to remind that deacons are not required to work for free. But, in my experience, they do. So it is a real commitment, often accompanied by a paid *day job,* to keep the family afloat.

A bias tube from the blue wool creates a way to connect the two halves of the stole at the deacon's hip.

When a deacon arrives at a new church, she (or he) may have her own vestments, but given that abysmal pay situation, they typically rely on the vestments on hand at the assigned church. Those vestments have to serve a variety of shapes and sizes over the years. So a very petite deacon faces a challenge.

Our stoles dragged on the ground. Initially I tried to take them up for her. But I decided that this was more difficult than making her one to keep. It is not easy to make such a fine piece convertible from one size to another. And our next deacon may be 6 foot 6!

She already had her own stole for *ordinary* times, a green one worn for most of the liturgical year, as well as a white one for special holidays like Christmas, Easter and baptisms. I offered to make her one for advent, traditionally a beautiful clear blue worn during the month of December.


The easy part was the pattern. I just traced one of her existing stoles onto pattern tissue and added seam allowances. There were 3 challenges for me: finding the right fabric in the right color, creating the motif(s) on the stole, and matching fringe at the bottom.

Gail K in Atlanta is my go-to store for most planned projects. I imagined I could find some beautiful blue silk to use, maybe dupioni. Of course they had a zillion silks in shades of blue but nothing in a clear true blue.

I found a very expensive wool fabric in the perfect shade. I kept circling the store avoiding it until finally, I picked it up and took it to the cutting table. After all, I only needed a yard. The guy cutting it loudly called out the price TWICE before he cut into it. I know, I know. As I think about it though, the fine silk brocade and embroidered fabrics I've used in years past for church vestments were way more expensive.


With beautiful blue fabric in hand, I was ready to design, my favorite part. There was just one request. The dove is a very important symbol to her. There is one on her white stole and she wanted another on the blue one, if possible. 

finished applique with embroidered leaves.

I fretted about the dove a bit. The one on her white stole looks like a professional embroidery system produced it. But I did not want to farm out this part of the project, and did not know where to do so anyway. I wanted a way to create an applique using off-white silk shantung.

First I spent some time sketching doves until I was satisfied with two simple shapes to reproduce in fabric. I am enamored of the kind of sketching that simplifies realistic sketches until they just barely communicate the item depicted. Picasso was a master at this kind of abstraction or simplification.

Sewing friends suggested a variety of techniques for the dove applique. I've done a fair amount of needle-turn applique in quilt cottons, but I was not up to needle-turn applique with my silk shantung. I knew it would never make me happy.

One possibility was to apply fusible web to the back of the white silk, cut out the dove, and use my machine to stitch around it with a satin stitch. But I've never enjoyed working with that fusible stuff. The result can be lovely but the process has no lure to me.

Another possible technique was to use a light weight fusible interfacing, sewing it right-sides-together on the dove shapes. Then a small hole is cut in the interfacing and it is turned right-side-out so that the glue ends up inside the dove pieces. Then it is pressed to hold the edges down. This was a failure for me. The interfacing fell apart as I struggled to neatly turn and press the edges.

Next I tried the same technique with cotton batiste backing. After a few tries, this worked! I used a smaller stitch-length (2.0), trimmed the seams allowances to 1/8 inch, and used lots of steam when turning it right-side-out.

Then I realized that my dove was facing backwards, or it seemed so to me. Flipping it proved to be more challenging that I imagined, so I have a couple of backwards doves now in stash!

My next challenge was fringe. Where, oh where, would I ever find matching fringe? And then I realized that I could make my own with the blue wool. Really, duh.

I did learn that fringing the wool produced very different looks depending on whether the weft or the warp was removed. I cannot say which one actually worked but I knew it when I saw it!

I constructed this stole quite differently from the previous one I made. The outer fabric is the blue wool and the lining is a lighter blue rayon lining. I sewed one long edge of the wool to the lining fabric. Then I used a stiff cotton canvas to interface it, sewing it inside the long seam allowance. 

Next I pressed the other long seam allowance down and hand-stitched the canvas to it. Lastly, I hand-stitched the lining to the wool. I was once again amazed by how much control you have with hand-stitching. And it was a time to spend thinking about my deacon friend and her calling. A very sweet time, indeed.

I hand stitched the fringe to each end and pressed it carefully. Then I invisibly stitched the dove parts to the stole, as well as a small cross to the shoulder. Joy, for me. And isn't she lovely?