Wednesday, August 31, 2016

A Shirt with No Name


One of the fun things about going to a workshop with Linda Lee or Louise Cutting is that you often get a peek into what's cooking in the kitchen. During Sew Kansas last month, we got to see samples of 3 different tops for future patterns. One of these was this shirt:


I understand that this one might become an e-pattern, as it is pretty simple. It would probably be ideal for that as it has just a few pieces and the fitting is minimal. I really like that they used a cross-dyed linen for the main fabric and a coordinating solid for the little inserts at the side. Towards the end of the workshop, I was allowed to trace it onto pattern tissue.


This shirt or tunic has dropped shoulders, bateau neckline, wide 3/4 length sleeves, and narrow side panels instead of side seams. And it runs big, as you can see in my picture above. I understand that I was trying out the size Medium.

Let's call it the Marseille.


Yesterday I sewed my own version of the Marseille, out of a rough cotton fabric.

I made a few changes and one of those was intentional. Since making the Egyptian shirt from Folkwear recently, I've wanted to try that exposed shaped facing again. So I created a similar external facing for the Marseille pattern, roughly following the shape of the Folkwear shirt.


I forgot that the hem was uneven, so I evened it up. Darn! That would have been cute. So now I need to make another.


Tuesday, August 30, 2016

Eureka, Again


I'm preparing for a trip and it's going to be warm, so I'm adding a few hot-weather items to my closet. The Eureka seemed a natural as I really like my most recent rendition in a navy rayon pin-stripe.


The new one may be just a little too plain. I started out with some ideas for changing it up a bit. First I added 3 inches to the length, thinking it might work as a tunic. It didn't.

A little *pocket* bag just finished too.
I tried it on before attaching the cuffs and instantly thought, oh, no, scrubs. Definitely not the look I was after. It had to be shortened. But I also think that the green cotton pique is just a little too flat. The texture of the rayon pin-stripe is much prettier.


Then I created a V-neck but my idea was not totally successful. I realized that, it there is a sharp turn across the shoulders, then it is nearly impossible to force the bias binding to hug the neck. The neckline in the Eureka is a narrow oval, rather than a more rounded jewel neckline.


In sum, the garment is just OK. I think that, mid-trip, I may be very happy to have it on hand.


I am ready to sew for cooler weather now. I am certainly ready to put hot weather behind me. What about you? Are you sewing for the coming season?

Wednesday, August 24, 2016

Egyptian Shirt - one more picture, by request!


Here is the Egyptian shirt on me. See previous post for the details. Thanks for the kind comments.

Monday, August 22, 2016

Revisiting the Egyptian Shirt

Folkwear pattern #104 Egyptian shirt

This is one of those folkwear patterns that is mostly composed of rectangles. It is fun to make something like that from time to time especially with a fabric that has a distinctive weave.


The fabric is a yummy linen I purchased from a local custom clothier who was cleaning out the stash in her studio a few years ago. It is very soft, not at all stiff like some linens. I don't know how to describe the weave, but perhaps you can tell from the pictures. It would be too sheer to use in this fashion if not for the geometric shapes in the weave. It is still a little sheer, but the front facing distracts. And I think it works on this BIG garment.


The facing on this is shaped for traditional applique and then lots of embroidery. One day I'll have to try that! The first two times I made this (years ago), I reversed the facing, stitching it to the outside. This time I wanted to focus on the weave of the semi-sheer fabric and so placed the facing on the inside. Also the facing is made from plain cotton batiste so that the linen weave is undisturbed.


The instructions are to press the edges of the facing 1/4 inch before attaching. Then you are to attach the facing, trim, clip, flip, press and top-stitch in place. I think they missed a step. I prefer to stitch 1/4 inch from the edge and then press inside. I think it would be very difficult to get a pretty curve otherwise. Other that this change, I constructed the facing in the same way.


I tried a few experiments with this. The first one was to add some white pearl cotton stitching to the front bib area, similar to that on the pattern. It was easy to take out, luckily.

Before

After
I also tried a few closures before settling on these loops made from bias tubes. Now I'm wondering if the buttons are not quite white enough. 


Seams were/are a little worrisome with this fabric. I am hoping it does not fray with use and washing. I might consider dry-cleaning or hand-washing. I used a combination of faux flat felled seams and French seams, so everything is tidy inside and out. I hope it stays that way!


These side seam pockets are easy to construct.

Looking back over these pictures, I'm realizing that my favorite aspect of the pattern may be the shape of the front facing. That would be easy to adapt to other more fitted garments.

Saturday, August 20, 2016

A-line Hems

Recently I was asked to describe my approach to hemming an A-line garment. It is the one I used to finish my Soho coat, blogged in the previous post.


It is that situation where the raw hem edge is wider than its final location. This happens often with an A-line skirt or dress. The upper edge of the hem wants to pleat or tuck if pressed into position.

One approach I see in pattern instructions is to run a gathering line along the raw edge and ease it into position. I think that will work and might even end up looking pretty good. But my preference is to hem it with a bias strip.

This approach is similar to creating a facing for the hem. With a true facing you would need to create the same curve in the facing as in the hem edge. No need for this with bias. Bias will re-shape itself as needed with just a little steam.

Cut a bias strip of fashion fabric at least as long as the hem edge. I like to cut it 1.25 inches wide. Much easier than drafting a facing, as you only need to know how long to cut the bias strip.  Cut it the length or circumference of the hem plus an inch or two. It's usually easy to piece the bias pieces if your remnants of fashion fabric are too narrow. Or you can choose a contrasting fabric.

My fashion fabric is solid black on the right side, striped on the wrong side, hence the obvious bias stripe on the wrong side of the bias strip.
First trim the raw edge of the garment to within a 1/4 inch of the desired finished length. Then place the bias strip and raw hem edge right sides together(*). Stitch these together at 1/4 inch. It helps a lot to place the bias strip next to the feed dogs while sewing. Otherwise it will stretch and may cause the hem edge to gather.

*In this instance, I placed the wrong side of the bias strip next to the right side of the garment hem edge so that the bias stripes would be visible on the inside of my garment. In most cases though, you would place right sides together.
Note that the bias strip is next to the feed dogs, garment is on top.

Once these are sewn together, press the seam allowance toward the bias strip. Then fold the bias strip to the wrong side of the garment, and press again. The fold should favor the garment side in order to keep the bias strip from showing on the outside.

Wrong side of garment just after sewing bias strip to hem

1/4 inch hem pressed toward bias strip


right side of garment, pressed to favor the solid black side

wrong side of garment, pressed to favor the solid black side. looks like a tiny piping here

Next I pin the bias strip into its final position with pins on the outside of the garment. I prefer to sew the final top stitch from the right side. Unless the fabric is thick, sew 7/8 inch from the hem fold. If the fabric is thick then you may need to reduce the depth of the hem to 3/4 inch or even 5/8 inch.

Finished hem in sample (wrong side of garment)

Finished hem in coat (wrong side). (I love the Linda Lee approach to mitering.)
This is also a great way to hem something that is too short. The hem take-up is only 1/4 inch.

HTH! Happy sewing.


Friday, August 19, 2016

Raincoat Making

On this, my first raincoat make, the fabric was both friend and foe.

The Soho Coat from The Sewing Workshop


First, it is just a fun and interesting piece of fabric. I probably bought it from Marcy Tilton though it's been a while and she has nothing like it on her web site right now. It is a double-face fabric with black on one side and a black and cream stripe on the reverse. I think that the black side is nylon or maybe even rip-stop. The striped side appears to be a rayon knit.


The double-face feature was great for this pattern since the wrong side shows. I decided early on that the solid black would be the right side. However I had to constantly remind myself of this as I sewed. My reptilian brain wanted the striped side to be the right side. More that once I pinned it incorrectly and caught myself right before bringing the presser foot down.


I was cautious about sewing this piece because it is so different from anything else I've sewn. I even made samples! The samples showed that it would be easy to sew - no need for special feet or thread. But it does have a tendency to get sucked into the presser plate hole. That was pretty easy to manage though.

I love these deep pockets.


As usual I did not have enough fabric to make the coat as shown, but after reviewing some images online I decided that it was really a lot longer than I wanted anyway. And I'm not crazy about that high-low hem business. Just not my cup of tea. So I cut off 15 inches and reshaped the hem. It is a 3/4 length coat and would fall just above my hem if I wore a dress. But I don't wear dresses much.

In this picture you can see that the side seam is forward a couple of inches, making the in-seam pockets so much more useful than a regular in-seam pocket.
Because of the nylon I was hoping to severely limit my pinning, or at least keep it inside the seam allowance. I was afraid I'd end up with holes. Luckily I had some of this handy-dandy repositionable tape on hand. That was a great way to eliminate some of the pinning. If you don't have this on hand, I highly recommend it. Wonderful stuff.


I also had to be careful with the iron. A couple of layers of silk organza created enough of a barrier to avoid melting the nylon. And I was surprised at at how beautifully it presses.

A little Darth-Vader?
The neckline on this gave me fits. In the end, it looks fine, I think. The fabric is super stable, almost like sewing on paper except it doesn't tear. The shoulder and back neckline are attached to the cut-on hood like so:


Check out the front pattern piece. Looks like a dart, yes? But it becomes the place where the shoulder seam and the hood attach to the back. Yikes.

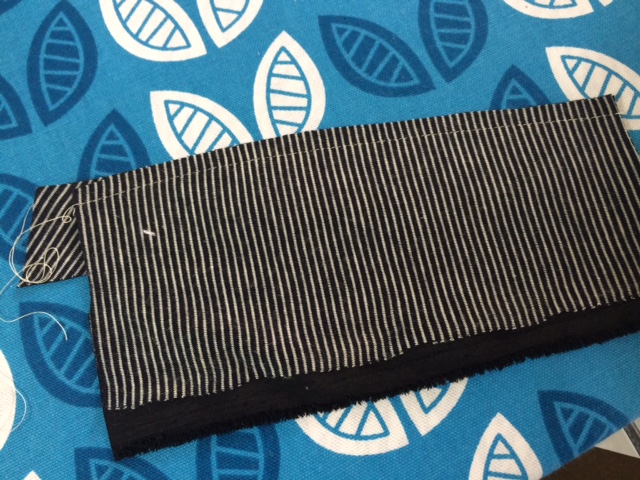
Here I am adding a tailor's tack, going only through the wrong side (the knit side).

The Soho Coat from the Sewing Workshop runs large as people on Pattern Review have pointed out, but I'm thinking that's a good thing. It is a coat, after all, and I might wear it with something bulky underneath. If so, I'll have plenty of room.

In sum, I am really pleased with this coat and I think I'll enjoy it for a long time to come. It was fun but challenging to make. It will be especially good for travel as it folds down to nothing.

There is a little more on Pattern Review.

Tuesday, August 16, 2016

I'm-With-Her Bag

Thanks to Linda Fasules over at I Finally Have Time, for this almost irresistible pattern.


I know some can resist this, but I cannot.


It finished at about 8 x 10 inches with boxed corners.


Sunday, August 14, 2016

Simple Eureka Top

Nothing could be much simpler. As is often the case, I found joy in simplicity.


The Eureka top did not impress me when it first came out. But it has definitely grown on me.


This is my second one. I used the recommended jersey knit for my first version. This is a non-stretch woven, a navy pin-stripe rayon. Cool and light weight. Super easy to sew.

Now I'm thinking that this would be pretty in tunic length.


Friday, August 12, 2016

Peony Done


This peony vest is complete, more or less. It is the one I started with remnants from my nice basic boring gray linen pants completed at Sew Kansas.


It may be just a little snake-bit, given the goofs I made in its construction. Luckily the hand-stitch was pure relaxation. I mostly followed the geometric shapes of the Marcia Derse print I used for the front lining and back facing.


It is barely noticeable.


I almost had a suit of sorts - pants and matching vest. I say almost because I managed to plant some bleach on the front of the pants before completing the vest. So now I'm considering creative coverage of that goof.


It's not a big deal, of course. I have so many other pairs of pants that will go with this vest and I probably would feel a bit nerdy wearing it as a suit. And I may like the new version of these basic pants more anyway.


A sewing buddy suggested I just wear these pants as is. Each time I'm with other people, I can exclaim, "oops. I must've spilled something here." I won't but it's tempting.


Now considering various options - grey fabric marker, oddly place pocket, boro treatment. Lots of good options really.


The Peony is a pretty flower too.