Wednesday, March 29, 2017

Memphis Fun


A new pattern is almost always a salivating experience for me. It must be that way for some people who enjoy jigsaw puzzles. It's never quite as much fun the second time around though.


The new Memphis dress from the Sewing Workshop was intriguing and a fun make. This one is a sort of wearable muslin. Since knit is required, muslin cannot be used, of course. So I used remnants of ponte in my stash.


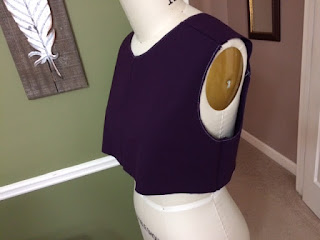
I started with this purple remnant. I had just enough to test the bodice of the Medium. I could see that I'd need to take it in at the shoulders just a smidge. The pattern does not really fit anywhere else so I proceeded with the wearable version.


As with so many of these assymetrical patterns, almost every piece required cutting in a single layer. The exceptions were the sleeves and the back yoke. As you can see, I did not have enough of my remnants to cut out full length sleeves. That's OK anyway because warm weather is headed my way.

The pattern is designed with a forward shoulder.
The pieces came together flawlessly. This is no surprise - Sewing Workshop patterns are always beautifully drafted and the instructions are thorough. There was one grain line missing from one of the lower bands but it was easy to determine, based on the suggested pattern layout.


I tested it as a tunic before attaching the lower bands. Not too bad.


My two fabrics are both ponte knit but the black one is slightly heavier and more stable. I think this will cause the dress to grow. That may be a problem. I can always remove the lower bands and go with the tunic idea.


I have enough of a poly knit that may be worth trying next. But then I don't wear dresses. Much. Each time I make a dress, I think, maybe this time. I am the eternal optimist when it comes to sewing. Are you too?


Tuesday, March 28, 2017

MixIt Top Kludge


Men's shirts continue to provide fun and inexpensive fabric for making my shirts. It's not a radical remake but it is satisfying.


This man's shirt was purchased from a local thrift store primarily because of the color. I was looking for a light neutral, not exactly white.  It seems to me that men's shirts come in so many wonderful solid colors! This fabric is end-on-end broad cloth with white threads in the weft and light brown in the warp.

I love being able to re-apply the breast pocket from the original shirt
The MixIt top from the Sewing Workshop is one of my all-time favorite summer top patterns. I have made it many times. This time I thought I'd try for a different sleeve. Using the original shirt sleeves, I cut the cap sleeves as long as I could:


This retained the tower button placket of the original sleeve and resulted in a sleeve that is just below my elbows. I added a narrow cuff with self bias binding.


I am gradually learning some of the characteristics of men's shirts in terms of how I can use them for myself. One is that the fabric tends to be tightly woven and super stable, making a set-in sleeve difficult. Luckily I remembered the technique described in Palmer/Pletsch Couture The Art of Fine Sewing. It contains great instructions for successful set-in sleeves.

Surprisingly, these 3 rows of easing stitch are sewn with a standard length stitch (2.5 mm). It is easy to gather and ease the cap with no tucks or awkward pulling. The book also describes the exact location for  easing, resulting in the prettiest sleeve cap.
Not bad, eh?


I made one other slight change in the pattern. The pattern includes a facing for the front neckline slit. I've never liked that so this time, I used Sandra Betzina's instructions for simple bias welt (see Power Sewing Step-by-Step page 156). It is not as formal as a man-tailored sleeve placket and it is a bit more feminine.

As usual, there are other things I'll change in the future. The location of the sleeve cuff is a tad awkward. Perhaps I should have made a deeper cuff, though there was not any extra fabric really.

As it happened I had already cut off the sleeve front containing button holes. That made for a tight squeeze and a bit of a kludge in the back (not shown). Next time I'll take advantage of the existing button holes and maybe even the existing buttons. Those things are sewn on securely! That is, it is sometimes difficult to remove the buttons without damaging the fabric.

In sum this is a great top for knocking around the house, as well as a plain under layer with a jacket. It was fun to give new life to an old shirt.

Thursday, March 23, 2017

Wednesday, March 22, 2017

Peony remake


Sometimes I make something and it just hangs out in my closet. I reach for it, put it on, and then return it to the hanger. This version of the Peony was one of those. I decided that the problem was that it was too flimsy.


So I took it apart in order to insert a middle layer of cotton batiste. I had hand understitched it around every.single.edge and those had to be removed one stitch at a time. And I had added some sashiko, so that had to be taken out too. Lastly, my comfy 5/8 seam allowance was gone.

Several times I considered tossing it. But I just love a good linen. And this is one of those linens. It is lined with a pretty Marcia Derse cotton print in the front and cotton/silk solid rust in the back.

So I kept at it. I left the shoulder seams in the face fabric, as well as the lining. Using the original pattern, I cut each main piece from the batiste and attached it to the face fabric using Jude Hill's invisible or glue stitch. I find that stitch so handy. Thanks, Jude!


Above you cannot really see the glue stitch, but below you can see the long stitches on the batiste that holds it all together. It really functions like a single piece of cloth with this stitch. And I find it easy to remove here and there, as needed.


I returned to the Peony written instructions, having forgotten that it has a bagged lining, cleverly pulled through the side vents. That was great fun to execute.


To make it a little different, I added an un-square pocket and a button closure, as well as my beloved sashiko.


It feels almost like a new garment.

Monday, March 20, 2017

Le Deuxième Château


For my second Château jacket, I chose a two-sided medium weight cotton purchased from Louise Cutting at the recent Atlanta Expo.


It's an interesting Japanese fabric that I initially thought was double cloth. I see now that it is simply printed differently on each side. It has a slightly painterly effect, with streaks and slubs. Even though the patterns are printed rather than woven into the design, the patterns are printed very precisely with the same repeat.


The Chateau has a simple but pretty shape that lends itself to great fabric - just right for this fabric. I got myself all twisted up, trying to make it reversible with functioning pockets on each side. I was almost successful.


My thought was to install a single welt pocket on one side without the pocket bag. Then, in my mind, I would create a patch pocket on the other side that would be stitched over the welt. I was unable to fully execute the idea, primarily because I failed to make samples.


Now would not that have been a good and fun idea?


Stubborn as I am, I finished the welt on one side and then realized that it really needed the pocket bag for support. Stitching the patch pocket on top was insufficient to support it. I found I had to stitch the top of the patch pocket closed in order to create enough support for the welt.


I could have created a kind-of facing for the welt to give it support, but decided against that as the fabric thicknesses would have been overwhelming.


It looks fairly reversible, though when I reverse it, the pockets are on the inside. The seams are faux felled to reduce the focus on the seams. Felled seams produce a very similar look on both sides of the garment.


The taupe side created a lovely binding, I think. This pattern is made for fabric that does not ravel and so there are no hem allowances on the sleeve hems, the jacket hem or neckline. It was well-suited for a bias binding of self-fabric.

Now don't you think this pattern is clever? Simple but interesting.

Thursday, March 16, 2017

red pants

Some days I need red pants. Literally and metaphorically.

The shirt here is a Very Easy Vogue, I think, and the fabric is two pieces of Thai silk from Linda Lee (TSW)

So I made these - Cutting Line Designs one-seam pants in medium weight wool, lined with rayon Ambiance. Just right for our recent return to winter.

The shirt is a pattern from Cutting Line Designs. Looking at this picture, I'm thinking of taking some length off the back. The fabric is a lovely Japanese cotton in a very interesting weave.
Wool is a great fabric, can be almost a 4 season fabric. These are not though. They are thick enough to feel good when there is a cold wind. And there is.


.
The one-seam elastic waistline is always fun to finish. After stitching, you hit it with some steam and watch it relax into folds.

So are you in need of some red pants? You might be.

Sunday, March 12, 2017

Station 4. Jesus Meets His Mother


This piece is a quilt composed of cotton fabric, appliqued and machine quilted. Embroidery with perl cotton thread was used to create the facial features, as well as to emphasize key components. The two figures overlap and yet are intended to be viewed as distinct characters. 


Developing this piece caused me to wonder what this period must have meant for Mary. Was this to be her last meeting with her beloved child? Perhaps she was remembering her little boy - a toddler, later a teen-ager, and even a young adult prior to beginning his mission. Was she thinking about the horrible death he would experience?Or was she thinking about him as Son of Man? Son of God?


As I considered this important encounter, and my desire to illustrate it, I struggled. I nearly completed it three times before I felt it captured my vision of the moment. In the piece, they share physical features as well as emotion. There is a single tear. Who is crying? Is it Mary? Jesus? Both of them? My own son is struggling at this time and I find myself feeling the pain with him and for him.  In the end, I realized that the process and my struggle were prayers for Mary, for Jesus, for me and for my son.


John 19:

25 Near the cross of Jesus stood his mother, his mother’s sister, Mary the wife of Clopas, and Mary Magdalene. 26 When Jesus saw his motherthere, and the disciple whom he loved standing nearby, he said to her, “Woman,[b] here is your son,” 27 and to the disciple, “Here is your mother.” From that time on, this disciple took her into his home.