Friday, September 24, 2021

Alabama Chanin No 2

When I attended an Alabama Chanin workshop in April, I purchased a second kit. The first kit was included in the class price and the second was discounted, so I had to buy it, right? And I am glad I did. I finished the jacket a while back (blogged here) and I'm just waiting for the weather to turn a bit cooler to start wearing it. This tee shirt has been fun to work on, with only the tiniest of challenges. 

The Pattern:

The pattern is labeled the Alabama Sweater. You can make it in 3 lengths. I chose the middle ground with the top. I shortened the sleeves to 3/4 length and raised the neckline about an inch all the way around, maybe more. At this point I'm not sure. The sample I tried on felt way too open in the front. I'm quite bony in that area and more than a little self-conscious. I now think it could have been a little more open, but this is just fine. 

The physical pattern is not included in the kit, but the instructions are. There is not much that is challenging about the construction. It is slow-going and portable. And I love that it is entirely made by hand.

The sleeves are sewn in flat rather than in the round. This resulted in a remarkably high armscye - great range of motion and no bunching in the armpit.

I mostly needed the instructions to use in adding their signature binding to this V-neck. Their method is fabulous for these cotton knits! The binding is single layer on both sides, simply wrapped around the raw edge. I basted it on and then worked the cretan (creten?) stitch to secure it. And their method for the V? That is quite fabulous too. I'll be using that technique elsewhere.

The Fabric and Stencil:

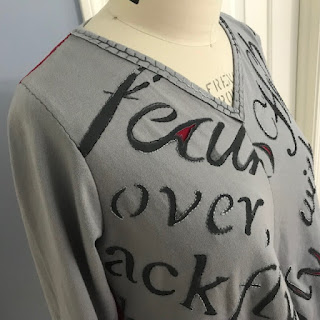
The fabric is of course two layers of their organic cotton jersey. The top layer is light gray and the bottom layer is a beautiful red, *my* red with blue undertones. 

The stencil is a darker gray or silver, random words and lettering in a variety of fonts and sizes.  I asked them to print it diagonally on the fronts and backs, with lots less on the back. In fact, I omitted stenciling entirely on one side of the back. I asked them to print the sleeves partially, as you can see. 

Honestly I don't think I would select that stencil again as it does not lend itself to the standard AC technique of sewing around the shapes and cutting away some of the fabric inside the stencil or around it. Some of the shapes were too thin to sew around, so I sewed on top of them. I did sew around most of the letters using a simple running stitch. 

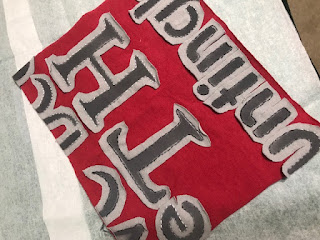
Each kit includes an 8x10 double-layer sample with stenciling so that you can determine which of their techniques works best. I tried cutting away the foreground on my sample and learned what I did NOT want to do. To me it looked like a flannel board with letters stuck on.

After completing the outlining of the letters, I slit open the larger letters and even removed miniscule slices of the interior of a few letters. Others I slit, thinking that these will open a bit more when I wash it. I had to leave the smaller ones alone.

When I had completed the construction, except for the hems and neckline, I tried it on. It felt like that blanket I wear at the dentist when they x-ray my teeth, only nicely fitted through the shoulders, bust and arms. I put it away for a while and worked on other projects.

After reassurance from one of you, kind readers, I cut away the bottom layer (the red) from around the lettering. This did not change the appearance at all, but it made it much lighter and quite comfortable to wear. And that plain back just had to change - too much flat gray after the business in the front. So, for now, it is solid red. 

I took a class on printing with botanical dyes this past weekend - such fun! I learned some new things about printing, so I now have an idea about a way to keep the red half of the back more in line with the overall design. Just waiting for a few supplies to arrive.

I turned the bottom hem up and stitched it in place with a running stitch which gives it some weight. I had enough red left over from my cutting away the bottom layer to make red binding for the sleeves.


This piece is finished. For now. I may or may not add to the red back half. What do you think? Is it too jarring as is? 

Thanks for reading. I hope you are happily making something today.

Friday, September 17, 2021

Tahoe Pants

The out-of-print Tahoe Pants (from the Sewing Workshop) looks like a skirt but is really pants - sort of culottes, but way more interesting. The pattern was first published in the early 2000's. I made it once from light gray linen and was not impressed. It looked great hanging in my closet but I felt huge wearing it. I doubt I ever wore it outside my house. It's long gone from the closet.

Then Linda Lee, the sewing sorcerer, wore another oldie but goodie on her regular FB live program a month or so ago. Hers was the origami skirt, similar shape but an entirely different garment. This origami skirt was made in a drapey, brightly colored rayon. And she rolled the waistline up, shortening it considerably. These two changes made all the difference in the success of the pattern!

There is a new fabric store in town, called Melanated Fabrics. Yay! Sewing buddies and I visited and I found the perfect piece of flowy rayon for the Tahoe pants. And it matches an eTee I finished a month ago.

The Fabric: I have a love-hate relationship with rayon.  It is slippery and unstable. It hates steam. Top-stitching is nearly impossible. It is not easy to wash as it holds so much more water than the other things in the wash and throws off the balance. I hope that I won't need to wash it often since it's a loose bottom piece.

The back looks pretty much like the front, mirrored.

I think recent versions of rayon are more colorfast than older ones and the colors are rich. It is less expensive than silk with some of the same qualities. It feels nice against the skin and it has beautiful flow.

The Pattern: There is a mistake I failed to notice or document on my first time with the Tahoe pants. The pocket dots are marked too low on the side seams of the pant legs. So there is a raw edge of pocket at the top when the waistband is finished. I added a patch and it is not that pretty. But it will not fray.

At 5'5" I am glad to have removed 3" in length. I also deepened the hem a bit to give it more weight. I'm happy with the finished length.

The instructions are great and it's important to follow them in the order presented. I thought I might baste the pleats before sewing side seams. This led to much confusion, but I sorted it out finally.

One leg of the pants is much more narrow than the other. Both are wide but one is about twice as wide. It is a super interesting design, I think. The Sewing Workshop produced some wonderful puzzle patterns back in the day and this is one of them. There is no zipper - the waistband is large and is snugged up by overlapping and creating a final deep pleat. 


These feel great on. Now I'm trying to figure out what exactly will look best with them. I think the top needs to be short. I've tried on some tops and determined that short and wide looks good, as does short and fitted.

I was wearing this dark green eTee (also TSW) the day I bought the fabric. I hoped it would work with this fabric. When I tried them on together, the overall shape was not right. I felt quite dumpy. So I shortened the tee and I'm now quite happy with the result.

My white Odette tee shirt looks OK with it, too, but doesn't do anything for it. Now I want to make the Origami skirt. The older TSW patterns are wonderful!

Monday, September 6, 2021

Nomad Hobo Bag and a WIP

This pattern has been in stash forever but never actually used. The Nomad Hobo is a free download from fabric.com. I think I downloaded it as a possible pattern to use during Camp Sew 'n' Sew. 

I thought using free patterns would keep the costs down. But, really, not worth the effort to make the instructions beginner friendly. This one is labeled Advanced Beginner, appropriately I think.

I do really like the shape for a large tote. For me, it will not be a purse. I like small purses - they cannot get too heavy. But this will be a great project bag for travel, I think. And, from time to time, I feel the urge to make a bag. Now I'm thinking I want this in leather!

Like some other free patterns I've used, this one is lacking in a few areas. Most of the areas are quite minor and can be worked out easily by an experienced sewist. 

The exterior fabric is probably a cotton-linen blend, almost canvas-like. The interior fabric is a Japanese cotton, a little nicer than ordinary quilt cotton. I used some of the striped canvas fabric for parts of the interior.

The pattern pieces are not numbered and the descriptions in the accompanying instructions are not always clear. The seam allowance is 5/8" except around the zipper where it is 3/4" - this, in the fine print. 

My magnetic snap is fairly strong and I felt like it needed more reinforcement than the suggested interfacing. Also you are instructed to place the snap on the sides with the long handle. I would have liked it better on the short sides.

The pockets are not lined. This is not a big deal except interfacing is recommended and I don't like the look or feel of that stuff on the inside of a pocket.

In general, the pockets are overly complex and the diagrams do not support the complexity. Some real beginner opportunities for in-seam pockets were ignored. One pocket is zippered - this one definitely benefits from lining, as it's easier to line a zippered pocket, enclosing the zipper tape and raw edges nicely.

The bag and its lining are constructed with 4 vertical seams each. The four seams meet at the bottom of the bag. I think it's hard to make this neat if construction does not include stopping each seam 5/8" before the bottom raw edge. 


Attaching the handle after dropping the lining into the bag is quite clever. I followed those instructions blindly and was pleasantly surprised! It is a tiny bit lumpy but not enough to fret over. I did add a little patch to make sure that area is strong. 

Here it is with my current Alabama Chanin project. I made some poor choices on this - it is heavy. Wearing it feels a little like getting my teeth x-rayed. The stencil I chose contains random words in a variety of fonts and sizes. I outlined the letters with a 3-ply back stitch.

The lettering is not large enough to cut away much of the top layer inside the letters. 

One alternative is to cut away the outer layer by cutting around the letters. I tried that on my sample and it was not good. To me, it looks like letters stuck to a flannel board.

All of this adds up to a heavy top that stands away from my body. I have not attached the neck binding, so I'm thinking of some *fixes.* Currently at the top of my list of fixes is to cut away the back layer around the letters. It won't change the look at all but it should make it lighter allowing it to drape in a more attractive way.


It won't take long to deconstruct and I think I'll be much happier. Fingers crossed. Still thinking about this. Ideas?