Thursday, June 28, 2012

Muslin Musings and the West End

Front view
Recently one of my neighborhood groups had a hearty online discussion about the making of wearable muslins. Who would have known that there would be so many opinions on this subject?

Well, it made me wonder. There are opinions and then there are facts. As a former survey-wielding-academic, I decided to do an in-depth study. I ask all the sewers in my studio what they thought of wearable muslins.

And the results are in: it depends.

Back view
As one responder said, sometimes you just know you don't need a muslin, wearable or otherwise. For a Coco jacket, you need a muslin. For other pieces, maybe, maybe not.

Take two days ago, for example. TSW urban pants pattern is my favorite pants pattern for comfortable hot-weather wear. It would be fabulous as a skirt. And, heck, I've made it 4 or 5 times now. It's a TNT. So straight away, I cut into this fabulous striped linen - you know, the kind that starts out soft and wears beautifully.

I had to tweak it a little here. Whack. And there. Had to remove the crotch. Whack, whack. Now the stripes are off a little. Whack, whack, whack.

Humongous. Really.
Well, you get the picture. Soon, I had two rectangles plus two other more-narrow rectangles. Rectangles. Not on its way to becoming my go-to skirt. So I carefully rolled that fabric up and stuffed in the back of the closet.

I think the problem with making muslins is that we sewers are just a naturally optimistic lot. Why waste all that sewing mojo on ugly muslin when we have the perfect fabric in our stash? Or in the store. Or online.

Luckily my newest pattern from TSW was waiting out in the mailbox - the West End top and pants. No point in fretting over a little mistake with the striped linen. The West End pants are perfect for my upcoming vacation in Texas. The perfect combination of om and yeehaw.

This time, I was more cautious. I cut it out of light weight denim, Louise Cutting's suggested *muslin* fabric, especially since it's going to be wearable. Denim - perfect for Tejas.


And, in the case of TSW, I know my size, right? I've been successfully making patterns from this company for years - size M for tops; size L for bottoms with a few bust-to-hip transitions as needed.
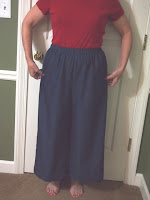
removing 2-4 inches, easy.
The size L of the West End pants are large, as in too large. Sure, they are comfortable. Big clothes are always comfortable.

But I don't look like the model on the front and I don't look the way I visualized myself. Head cocked to the side in my cowboy hat, scuffed Lucchese's peeking out from under the carefully top-stitched hem. No, not at all.

You can see in a couple of these pictures how it would look if I pinched out about 1-2 inches over each hip. Much better.

Cute pocket though, right?
I just checked the pattern tissue. This puts me squarely into size Medium. Hmmm...is The Sewing Workshop engaged in vanity sizing?

I'm thinking back to the last Sewing Workshop pattern I made - the Icon Shirt. It was way too large, and I made my usual size Medium for a top from the TSW. Well, I thought, maybe this is just the style - a big shirt style.

I am also working on the Lotus Skirt, an old Sewing Workshop pattern. It has a fitted yoke, so I did know to make a muslin of the yoke, at the least. And I learned that I need a size 18. Gulp.

So size 18 in the old pattern; size Medium in the new. You decide.
Top tucked in only to show you.

I don't wear tops tucked in. Ever.

TNT Urban pants, for comparison

Yuck.


Tuesday, June 26, 2012

Welcome, West End

There is nothing like a new pattern from The Sewing Workshop to get my sewing muse going.I just received email telling me that it is being auto-shipped to me.

And this one looks to be a goodie. It is called the West End Top and Pants. How cool is this? Way cool. Some interesting design details and a different overall look for TSW. It will be fun to make.

Saturday, June 23, 2012

Camp Sew N Sew, Verse 4

Our fourth year is now complete. Nine girls and one boy, ages spanning 12-16, participated and seemed to have a great time. I had (mostly) two other adults helping out each day. We ended with a recital :)

I'm hoping to remember what worked and what didn't so that we can improve (again) in 2013. As usual, many lessons were learned:

This year, for the first time, we created one item each of the 5 days we met. In previous years, we've made more complicated pieces requiring the whole week. They run low on enthusiasm about mid-week in that mode. They loved the one-project-a-day approach. And, really, who doesn't love instant gratification?

This year's projects:
  • smart phone case with strap, button, and hair-elastic-button loop
  • box bag with zipper and boxed corners
  • jewelry bag - sewing in circles, threading in a channel, and stuffing the bottom
  • portfolio - straight sewing with some careful turning and pressing; problematic finish
  • choice of stuffed monster or a skirt or finish/repeat one of the above
The down side of this approach is that it steers into craft sewing almost exclusively. And that involves lots of interfacing and thick fabric that is hard to sew over. The phone case was pretty manageable, but the portfolio became a little thick across the bottom. I need to rethink the use of ribbon there.
I'd like to find a way to encourage them to see the beauty in the hand-made elements and not strive for perfect sewing.

Sewing a straight line is hard at first. It's hard to control the speed on some of the machines we borrow, and even if the machine were perfect, it takes a little practice to control speed and maintain accuracy. Plus it's more fun to press the pedal to the metal.

Zippers were not too challenging this year. We took the exposed zipper approach with our box bag. In fact on the last day, several of the girls started skirts and just sewed the entire zipper to the outside of the garment, which is of course still a big trend in RTW right now. Great for new sewers!

Have them bring in some supplies next year. They need to supply

  • scissors
  • pin cushion
  • seam ripper
  • 6 inch ruler
  • chalk to mark
  • zippers of all sizes
  • pre-quilted fabric OR $10 supply fee
  • OR all of the above for $20
Here are some ideas for 2013:

  • Start with stuffed monsters out of quilting cotton - easy, precision unneeded. Then they can use the left-over fiber fill for whatever little stuffed objects they want as the week progresses. They love that stuff. I on the other hand wish that it could be eliminated from the planet. BUT it does encourage creativity and allows them to let go of unrealistic expectations for first-timers, especially.
  • They really liked the jewelry case (the girls, at least) - we should repeat that.
  • PJ shorts or pants for boys or girls. These are easy to draft if loose.
  • Make another zipper-bag project, maybe the pyramid bag with a zipper.
  • Mid-way, make the portfolios again but with an easier finish - maybe decorative knots to finish off the ends of the lower binding, maybe a little hand-sewing.
  • Or maybe a tote with wonky pockets and interestingly applied zippers.
  • End with the tablecloth skirt, for the girls, from Shams at Communing with Fabric. Maybe. I need to make one and think about any challenges. The waistband is the obvious one.

Friday, June 22, 2012

Natural Fiber Contest at PR

TBP - my entry in PR contest
What a week!

This is my fourth year of Camp Sew N Sew at my church where several of us sewing enthusiasts introduce middle and high school kids to sewing. Today was the last day of camp for 2012. I am totally jazzed and also exhausted. More on that in a future post though...

I actually tied for second place in the Pattern Review natural fiber project contest! Wahoo! I am so excited!!! Can you tell by all the exclamation marks?!!

I entered my version of the Cutting Line Design *The Blouse Perfected.* It was already my favorite shirt. Now it's my BFF. More pictures are here. Thanks to Louise Cutting for what is truly The Blouse Perfected. I learned so much making it.

1st Place: Burda Design with Color Block
First place was won by Marina of Frabjous Couture. Wow - what a beautiful dress she made for the contest. Hers is a Burda design with added color blocks (curved, no less!) made in linen. Lovely.

I tied for second place with hpsauce (PR moniker) of Island Couture. She used a McCalls pattern to make this very hip leather jacket. I would not have thought of using leather for this contest. But it sure is natural, isn't it? Fab, right?

Tied for 2nd place: McCalls pattern
And there were so many other wonderful garments made of natural fibers submitted for this contest. Follow the PR link to see more.

My prize is a new iron. Maybe I'll donate my old iron to Camp Sew N Sew. And the sewing circle continues.

Thanks to all who supported me. Aren't sewing friends the best?

Saturday, June 16, 2012

Camp Sew N Sew - Smart Phone Case Project

The smart phone case will hold the standard size smart phone or a mobile phone with a bit of space left over for a bit of money or a credit card. Straps are optional.

Materials:
  • 10 x 10 inch square for outer fabric
  • 10 x 10 inch square for inner fabric
  • two 10 x 10 inch med wt interfacing squares
  • one small hair elastic for the closure
  • OPTIONAL:
  • about 30 inches of cord or ribbon for strap
  • one button
  • Finished size:  3.75 inches wide, 6 inches high when buttoned, 8 inches high when open
Figure 1

Directions:
  1. Prepare a pattern: cut a piece of tissue that is 9 x 9 inches. Cut off two triangles - 4.5 inches on each side from two sides to create a *house* with a *roof*. The house is 9 inches high in the center, with 4.5 inch walls, and a 9 inch floor. It should look like Figure 1.
  2. Interface each of the 10x10 squares using the interfacing instructions.
  3. Place the pattern on the interfaced squares and cut each into the *house* shape.
  4. Place right sides together and sew the walls and the roof together using a 1/4 inch seam allowance. Do NOT sew the floor. OPTIONAL: Before sewing this, insert a small hair elastic in the tip before sewing. Also you may insert small loops on either side for straps. These should be 3 inches down from the top.
  5. Trim corners, turn and press, gently pulling out hair elastic and strap loops.
  6. Fold down the center of the house with the outer fabric on the inside. It should look like Figure 2. The yellow print is the lining for this sample.
  7. Stitch the two short sides together using a 1/4 inch SA.
  8. Figure 3
  9. Refold so that this last seam is in the center. See Figure 3.
  10. Stitch across the bottom using 1/4 inch SA. 
  11. Turn to outside. Press.
  12. Figure 2
  13. OPTIONAL: Add strap and button.


Variations
  • This bag can be resized for larger or smaller electronic devices. 
  • You may want to add a small credit card pocket to the back (outside). 
  • Also I used quilt cotton. If you use anything heavier, you may not need to interface both pieces. 

Friday, June 15, 2012

Camp Sew N Sew - Box Bag project


This project for Camp Sew N Sew 2012 is based on several tutorials I have read online, blending the techniques and adding a few of my own to keep it simple. Here is a PDF of slightly modified instructions for easy printing.

Materials:

  • One 12.5 x 17.5 inch piece of quilted fabric (outisde fabric, batting, inside fabric), available at most chain sewing stores. You may want to cut this with pinking sheers or zigzag the edge so it won't fray.
  • One zipper - must be at least 12 inches long. I prefer a 22 inch zipper even though it finishes at 12 inches.
  • 10 inches cotton twill belting about 1 inch wide for the tabs.
  • 5-6 inches of narrow ribbon for zipper pull
Directions:
Figure 1
  1. Open zipper completely and place one side of it, face down on one short side of the fabric, aligning raw edge of fabric with zipper tape. Align the top of the zipper with the raw edge of the fabric. Excess zipper will hang off the other end.
  2. Put the zipper foot on your machine and position it so that you can sew closely to the zipper teeth. Double-check that the zipper tape, not the zipper teeth, is next to the fabric edge. Sew this side of the zipper down.
  3. Close the zipper and make sure the first side is sewn correctly.
  4. With the zipper closed, wrap the other side of the fabric around and place one pin in the other side so you can see where to begin sewing the other side. The pin is there just to make sure you don't twist the zipper when you sew the other side.
  5. Now with that one pin in place, open the zipper completely. Finish pinning the zipper to this remaining side, aligning zipper tape with edge of fabric. Also align the top of the zipper with the edge of the fabric so that it matches the other top of zipper.
  6. With the zipper foot still on machine, stitch the second side of the zipper in place. Close zipper and admire your work. There is still a long tail of excess zipper hanging off one end. Don't trim yet.
  7. Turn zipper to the wrong side and, using the zipper foot still, top stitch on the outside about 1/4 inch away. You may need to change the zipper foot to the other side. Zipper teeth will be exposed. 
  8. Your bag is now a tube. With the wrong side on the outside, flatten out the tube so that the zipper is in the center. Pin the open ends of the tube in place. Open the zipper just a little.
  9. If you want the little tabs on the end, cut the belting into two 5 inch pieces, fold in half, and insert them into each end, centered under the zipper. Make sure the raw edges of the belting is aligned with the raw edges of the bag. That is the folds should be hidden from view.
  10. Sew the ends together with about a 1/2 inch seam allowance.
  11. Make sure the zipper is still partially open.
  12. With the bag still wrong-side-out, pinch each corner, creating a boxed effect. See red stitching line in Figure 1. Stitch this red line - it is about 3 inches long. Repeat for each of the four corners.
  13. Turn bag right-side-out and make sure that everything is complete. 
  14. Inside of box bag
  15. Now you may turn the bag wrong side out and trim off the triangles of each of the 4 boxed corners. You may also trim off any excess zipper now.
  16. Thread a small ribbon through the opening in the zipper pull and tie in a knot.
Finished box is about 3 inches high, 9 inches wide, and 5 inches deep.


Camp Sew N Sew - portfolio project

It's that time again. This is year 4 for Camp Sew N Sew at my church. This year we are going to make one simple project per day, rather than a week-long project, and here is one: a simple porfolio.

Materials
one 13x10 piece of fabric
one 13x10 piece of coordinating fabric for inside
two 13x10 pieces of medium wt interfacing
one 13x14 piece of fabric for inside pocket
one 13x14 piece of medium wt interfacing
one 3x12 piece of fabric for outside pocket
one 3x12 piece of interfacing
remants or bias binding to finish outside pocket & lower edge


Directions:
  1. Apply interfacing to outside-fabric, inside-fabric, inside-pocket and outside-pocket, according to interfacing instructions.
  2. Fold outside-pocket in half lengthwise, wrong sides together and press. It is now 3x6.
  3. Sew outside-pocket to outside-fabric aligning it about 2 inches from the right edge of the outside-fabric. You need to sew only the long sides down.
  4. Sew binding to the long raw edges of the outside-pocket. Note that the bottom of this pocket is still open.
  5. Fold the inside-pocket wrong sides together so that it becomes 13x7. Press.
  6. Align the 13 inch raw edge of the inside pocket with the 13 inch edge of the inside fabric. Sew along the two outer edges using about 1/4 inch seam allowance. 
  7. Place outside-fabric and inside-fabric wrong sides together and sew along the top and two sides using 1/2 inch seam allowances. Trim corners, turn and press. The lower edge is still unfinished. 
  8. Measure 5.75 inches from each 8.5 inch side and draw two parallel lines with chalk. Top-stitch on the chalked lines. This creates a way to easily close and open the portfolio. See Figure 1 below where this stitching shows as vertical lines.
  9. Now stitch bias binding or remnants to the lower edge of the portfolio: With portfolio open, outside up, align binding with unfinished lower edge, wrong sides together. Stitch binding to portfolio, close to the edge, around 1/4 inch seam allowance. Turn and press the binding into place on the inside, turning under the raw edge. Now either top-stitch or hand-stitch the binding to the inside of the portfolio. A zigzag or decorative stitch works great here too.
Figure 1
Finished size: 8.75 x 5.5 inches when closed. Fits 5x8 pad of paper. I added a little sashiko to the pocket trim on the outside.


Wednesday, June 13, 2012

Men's Shirt Details

This shirt is a little different. Look closely and see if you can see it.

From the designer, Steven Alan, it is called the *reverse seam shirt inside pocket.* Yes this designer's signature includes a chest pocket on the inside. The inside. Handy when one is dressing or undressing. Otherwise, maybe, not.

DS showed me two shirts DDIL purchased for him at a discount mall. He asked me - is this defective? He wore it once and tried to put his sunglasses in the pocket, only to discover this signature detail. I was 99.9% certain DS was right and offered to *fix* it for him.

First, though, I googled variations on this defect/concept. And that's how I learned that the twisted placket was deliberate too. And reverse seam? I haven't spotted that yet.

I know it must be hard to come up with variations - shall we say, twists - on the traditional man's shirt without going feminine. I just don't know about these particular details. Of course, I am not a member of the target market either.

So now I'm off to *fix* his two shirts of this variety.

What say you - creative? interesting? weird? documented features?

Wednesday, June 6, 2012

Channeling Coffin

Some years ago, while I was still in academia, I conducted a workshop and I was paid in books. This means there was no real money to pay me, but I could buy books to support my research or teaching.

But any book was fine. So I ordered, among other things, David Coffin's book on shirt-making. No relationship to teaching or research. Oh well.

Truthfully I was attracted to the cover, which included this woman's shirt. Just look how elegant she must be with her pleats, tucks, off-center collar, and of course the lovely fresh-cut flowers. I assumed the keys to this magical shirt would be within the covers of my new book.

Now I may have missed something, but I think that's the one shirt he never references in this book.

Recently I have been practicing my sleeve plackets (a.k.a. tower plackets) and so finally I realized that the *cuffs* were really cuff-less sleeves with the placket, pleats, an angular finish to the tower pleat, and one sweet button with possibly a loop.

So I set out to try to make a similar cuff-less cuff on my version of TSW Zen top. The sleeves on this top are plain and quite wide at the bottom. Perfect pallet for my experiment.

As usual I created a number of learning opportunities by screwing things up, but I won't detail those here.

I completed the placket as usual and added 3 pleats around it. Then I cut a self-fabric bias strip 2.5 inches wide, folded wrong sides together, and created a modified facing for the sleeve edge.

I noticed that no stitching shows on the right side of his sleeve cuff. How did he do that??? The fabric appears to be a light-weight, semi-sheer linen. So there cannot be any lining providing hidden support. I decided to simply turn and press the bias facing in place. Then I tacked it to the shirt everywhere I could do so without any surface stitch showing.

TSW Zen Double Collar

And it seems to have worked!

I'm thinking that clever double collar on the Zen top would make a clever cuff too.

Saturday, June 2, 2012

Shameless Request

Pattern Review recently ran a *natural fabrics* contest. I entered my newest favorite shirt - The Blouse Perfected, a Cutting Line Designs pattern. I made it in a striped shirt cotton.

So would you consider voting for me? I am (almost) shameless. Here is the link.

Thanks!

Martha

Friday, June 1, 2012

Plackets in Pictures

Here is my basic process for making shirt plackets:

Step 1: Cut out a standard placket piece such the one shown below. Mark the rectangle to be stitched and slashed. Press along the fold lines, shown in red below. A little spray starch helps. Once pressed, it looks like a church with a steeple. The steeple looks a little off at this point because only one side of it is pressed.

Step 2: Place the placket piece in the marked position on the shirt sleeve. The wrong side of each is face up. Check that it is closer to the back of the sleeve than to the front. Also check that the short leg of the placket is closest to the back side seam. I've trimmed bulk from my steeple but it's not necessary.


Step 3: Using a short stitch length (e.g. 1.5) stitch around the placket opening pivoting around the top. Then slash this opening open creating a Y shape at the top. Clip close to the stitching in the corners. Here is how it looks from the right side now. I haven't turned the placket to the right side yet.


Step 4: Turn the placket to the right side and press. There is a gap of about 3/4 inch in the opening right now.


Step 5: Fold the short leg under covering the raw edge. This is a second fold because you made the first fold in step 1. At the same time, shift it to cover the 3/4 inch opening. Press in place.


Step 6. Edge stitch the short leg covering the length-wise raw edge. Note that there are still raw edges at the top of the short leg right now. 


Step 7. Now fold the long leg into its final position, accordion style. Press. It covers the short leg, but has not been stitched into this final position yet.


Step 8. It should *look* like a finished placket now even though it is not stitched yet. Notice how the raw edges of the short leg get covered. Magic, right?


Step 9. Edge stitch the long leg into position, making a *P* shape (see note below). Start this stitching at the raw edge of the sleeve (the leg of the P), being careful to keep the short leg of the placket free. As you approach the top of the placket (the church steeple), raise the presser foot with the needle down. Now smooth the top of the placket into position with the top of the short leg sitting comfortably under the steeple. Finish edge stitching the steeple (the top of the P) of the placket to the shirt.


Step 10. As dear Shannon Gifford would have said at this point, stand back and admire your work! Way to go!

Note on the *P* shape. This shape is a minimum to catch all the remaining raw edges. Most shirts will have a decorative *X* in the upper part of the P, as well.

Design options are endless.