Saturday, April 12, 2014

Welcoming Spring with B6026


Another really good pattern from Katherine Tilton for Butterick. And a good color to wake up my wardrobe to spring. I think it is a classic and so will become a TNT for me.

Spring in the southeastern US comes in color waves. It seems that each week there are new shades of spring.


This green shirt-weight linen is from Sawyer Brook, probably purchased a year or so ago. As is always the case with a good linen, it was a delight to sew. With linen, I find I can easily finger press little spots needing it without actually steam pressing. Then when it was complete, the steam iron performed its magic to show off a crisp summer green. And, of course, I'm good with linen wrinkles - rather fond of them, actually.


And this pattern is just so sweet. I love the use of the pin-tucks in the side seam (creating the illusion of a waistline) and in the neckline (framing the face). And there are pin-tucks on the elbow length sleeves, giving the sleeve some shape and style.

The pin-tucks are to be 1/16 inch wide. Now, I don't know about you, but I don't even have a way to accurately measure 1/16 inch. So of course I worried a little. I think mine range from 1/16 to 1/8 inch but it seems to have worked out OK.

The next time I make it - oh, yes, I definitely want to make it again - I will not make tucks. Instead I'll use a double needle to create channels, much as I did on a Chado Ralph Rucci shirt two years ago. I should have made some samples to see if it drew the fabric in enough. I'm betting it would.

This pattern is fitted including fish eye darts in the back. This is refreshing after sewing so many loose-fitting tops. There is enough ease, I think, but I will see if I actually reach for it regularly, or if I retreat to those other tops.


I sewed a size 12 through the shoulders, grading out to a 14 through the bust and then to a 16 through the hips. And I ended up using 3/8 inch SAs in the side seams. So in reality, this is probably size 12-16-18.

Here it is on me. I'm even including a back picture. Normally I would not. But I really like all aspects of this classic sweet summer shirt.


Wednesday, April 9, 2014

Cas Holmes Workshop

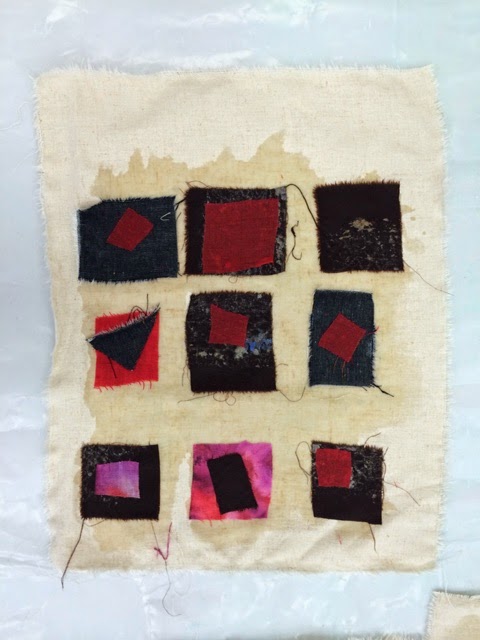
Unfinished piece - needs lots of stitching
Cas Holmes, UK Textile Artist and Teacher
Paper, Cloth, Text and Image Workshop
April 4-7, 2014 at SEFAA
Fabric collage wet with paste 

Wow. Cloth and Paper. I have wanted to learn about this for such a long time. And I learned so much more than I anticipated.

Day 1 - Introductions to each other and to our media. Preliminary creation of components for our samples. Great creative exploration. Sketching homework. Some pieces left to dry.

Day 2 - Assembly of components to produce samples. Also some deconstruction. Stitching and sketching too. Sketching and stitching homework. Tried a little free motion stitching. Oh my goodness, so much easier that it ever was before when I tried.

Day 3 - Challenges for each of us, based on our particular interests and passions. My challenge - to incorporate one of my samples into a garment.

As it happened, of my many samples, only the one above was composed entirely of fabric. All the others contained paper and so would not be appropriate for a garment. This one sample started out as a collaged 9 patch. In order to actually use it, I tore it into three strips.

Well, actually let me back up. When Cas first suggested that I make a garment on day 3, my reaction was - what? you don't mean now, do you? Sure, she says, you can do it.

So next I suggested that I probably would not have enough fabric. But when I held it up, well, there was no denying that it might be just enough.

It is a soft fabric of unknown fiber content, maybe cotton or linen or a combination, something that has aged in my stash for a while. Almost surely a natural fiber. Lovely to work with, to stitch, to press, to manipulate. The selvage is pretty, I think, with one red and one navy thread running through this wheat colored fabric.

It tears easily so I was able to tear 4 rectangles - the front and the back (torn strategically to place the pretty selvage at the hem), and the two sleeves.

I used Cas's sweater to roughly trace a neckline. She suggested the slit opening to make it easier to slip on and off. Sewing friend and Cas's host, Lucretia, contributed a pretty button.

The sample's base was the same fabric, so I backed it in order to create a frame with denim-like shirting. After assembling the tunic pieces, and while it was still flat (before the side seams), I experimented with placement of the three strips. Finally I pinned it all together and Cas slipped it on.

I did take it home incomplete. Cas gave a lecture to a larger group the very next evening and I bravely (foolishly?) promised her that she could wear it for her lecture. She offered me one of her gorgeous pieces of art in return! Mostly the work at home was finishing the seam edges and securing the collage pieces with more stitch. I could not bear to think that this delightful artist's trade would involve a garment subject to coming apart.
I was so very thrilled with this transaction that nothing could stop me. And, truthfully, it was a blast from start to finish. So energizing. And now I'm ready to do more. 

I am thinking that Cas is a very gifted teacher. Yes, she is definitely the best kind of teacher - the kind that can pull something very unexpected from an old student.


Tea and Friendship by Cas Holmes
Cas models the final tunic!

I am planning to stitch and perhaps disassemble/reassemble my many other samples to create art pieces. And I'm anxious to assemble more samples with just fabric.

I love the idea of using these in garments.

Many, many thanks to Cas Holmes, artist and teacher extraordinaire!

Also thanks to my classmates for offering encouragement, as well as inspiration while sharing your talents and work with me. What a gift.

Tuesday, April 1, 2014

Thai Wrap Save Continues


In my previous post, I asked for advice on this the Thai wrap top by folkwear minus the sleeves. Thanks to those of you who offered me advice on this, Each suggestion was valuable, and tested.

So, to recap, here is how muslin 1 finished:
It is too short, especially in the back. I really like the fit through the shoulders and the bust. It wraps in a modest and pleasing manner, I think.


Next I cut a muslin from an old sheet. I added 4 inches to the length and gave my high hip fluff a little more room in the back. I also created (straight) shoulder seams in case I wanted to clip the shoulder wings. Making muslin 2 taught me some important characteristics of this pattern:
muslin 2

Muslin 1 was not only too long but too narrow. As it happens, this requires no change because a natural place for the closures falls along the princess lines created by the triangular center front piece. The side seam hangs correctly, even with this change.

The back is actually on the bias and has a tendency to hike up at the lower hem particularly as it stretches out. So, note to self - cut wide SAs in the back to allow the bias to grow and reshape itself. And I'll need to let it hang before completing the center back or the side seams.

And, yes, the shoulder wings needed to be clipped.

Here is iteration 3:
muslin 3

With muslin 3, I clipped the wings over my hips. That is, I stitched the side seam following the grainline, rather than winging out, as the original pattern does.

Muslin 4 incorporates more of the same, with adjustments in the sleeve width.
muslin 4
I think this may be ready for something truly wearable. Now I have to decide whether to use the muslin as a pattern, or do something more interesting with it. It might be fun to dye, stamp, paint...

Meanwhile, just for fun, I talked DD1 into modeling muslin 1 for me.


Unsurprisingly, it looks so, so much better on her. She is quite a bit shorter than I am and has slim hips. And she is a tad younger than I am. Well, ok, more than a tad.

She tells me that the wrap thing is out of style.


Here is the way she prefers it, but I still did not talk her into putting it in her closet.