Monday, August 28, 2017

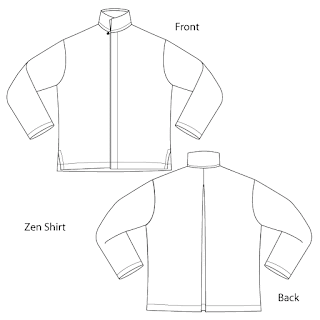
Zen Jacket


This one is all about the fabric. It is a medium weight Japanese cotton I purchased from Louise Cutting at the Atlanta Expo in March. I purchased 1.5 yards and it is 45 inches wide. What was I thinking?! I just barely squeezed out this version of the Zen jacket pattern from the Sewing Workshop.

(It looks like the left front curves down but that is just a shadow. The front hem is even on both sides.)
Truthfully, this is a not-unusual predicament for me. In my personal private postmortems I see it as a source of inspiration. But in the moment, I wonder why I'm so cheap.


So I had to choose my pattern carefully and manage the fabric as efficiently as I could without sacrificing the distinctive print. The Zen jacket has an inverted pleat in the back. That was the first thing to go. I also narrowed the fronts by creating plackets down the center fronts. For this I used a cotton-linen in black and gray check. I also cut off the sleeve hems and created facings using the same black and gray check.


The Zen jacket includes a two-layer collar. There was enough left after cutting the main pieces to cut one collar piece, so I cut a second one from the black and gray check. I tested this arrangement and decided it was just too much. I felt that the fabric demanded a less cluttered pattern, so I omitted the collar and finished it with a bias binding in the black and great check instead.


The front plackets created an opportunity for in-seam button holes, a little bit of a kluge but I like the result.


The sleeve hem facings I created were about 5 inches deep so that I could roll up the sleeves and see the contrasting piece. As I began to assemble it, I decided to take advantage of the depth of the facings and created a vent in each sleeve. These too can be rolled up or left down.


But my facing assembly created a weak spot in the construction right where the facing intersects the vertical sleeve seam. That's right at the top of the vent. So I appliqued a small square of the black and gray check to the weak spot.


I am not sure if this will be a shirt or a jacket, so I used a Hong Kong finish on (most of) the interior seams.


Initially I machine hemmed the sleeves and the garment hem. The result was not pretty. It was OK but it spoiled the pattern. So I pulled it out and hemmed with sashiko.


Just a little more sashiko and it is now finished.


Thursday, August 17, 2017

Wicking

For a long time now, I have admired sun prints, especially the botanical ones. But I always thought it required special paint, or special fabric, or special something. I have recently learned that it does not require anything special at all. How fun is that!?

Episode 1711 - Print and Paint - of Quilting Arts included a segment on this. Artist Lisa Chin demonstrated that these prints can even be accomplished by the impatient artist using an iron (no sun at all)! I did not have much luck with an iron but everything else I tried worked great.


First I soaked a piece of thrifted white cotton shirt in plain water and wrung it out. Then I placed it on the bottom of a plastic bin. I diluted some fabric paint with water and painted the color on with a wide brush. Lisa Chin says you can do this with ordinary acrylic craft paint too. Next I placed a *fresh* weed on top of it and placed it in the direct sunlight for a couple of hours, just until it was completely dry. I have lots of these fresh weeds on hand, should you need any for your project. LMK.


For comparison purposes, I wet another scrap from that thrifted shirt, painted it with diluted paint, added a couple of dried leaves I had on hand, and left it to dry under an ordinary desk lamp. That one turned out even better.


So yesterday I tried it again, this time with very ordinary objects:


And since I've long admired fern prints, I had to do one of those too. I had some buttons on hand from deconstructing the shirt so I threw them on too. I have a small collection of found objects so I added a couple of those too.


Today is a new day and I believe I'll make a few more fern prints. These are not really sun prints anymore. In fact I'll bet this just requires time so that the placed objects can wick away the paint. There's probably some chemistry lesson here.

Friday, August 11, 2017

Improv Stripes


For a while now, I've been an admirer of modern quilts and especially those that are improvisational. I have been following Debbie of A Quilter's Table via her blog, as well as Flickr and Instagram. When she issued a challenge a few weeks ago, I decided to give it a try. The challenge is called Improv Stripes and you can see the description here.

My first attempt involved two coordinating fabrics. I made one block with some pretty skinny stripes first:

Back of block with skinny stripes

Front of block with skinny blocks

After this block I tried more chunky blocks and found those to be more fun for me. It is lots easier to make the blocks flat if the stripes don't overlap one another. And I like the look of the more chunky blocks.


I arranged the blocks free-form, layering the raw edges until it pleased me. Then I added a cotton flannel batting and a striped linen piece for the back. The striped linen piece came from a thrifted shirt. My quilting is simply more-or-less straight lines that are 1/8 to 1/2 inches apart.

The quilting stitch runs across the linen stripe, creating a wavy look.

I was enjoying the freedom of overlapping the oddly shaped blocks and so left the edge of the quilt raw too. I simply top-stitched it densely along the edge. The resulting 23x25 inch quilt had great body, just right for a bag of some sort.


I'm pretty pleased with the duffle and think I'll use it quite a lot. It has a good feel to it. Also I have fond memories of previous sewing projects in all those stripes.


It is not finely finished and I am happy with that. The entire project was a good exercise in letting go of my need to strive for perfection.


I used the block with skinny stripes to make another small bag but it is not nearly so satisfying as the larger one.


If you are interested in seeing more responses to this quilt-along, check them out here on instagram. There are so many pretty and inspiring quilters out there! And thanks to Debbie for her inspiration and leadership in this fun activity.


Monday, August 7, 2017

Jeans Vest


This project was inspired by a recent article in Threads magazine - Jeans to Jacket by Mary Ray (July 2017 Number 191. I love almost everything that Mary designs. And I've been wanting to play with the Tabula Rasa jacket pattern again. Also I found a pair of DH's jeans in the trash. He thought they were too worn to even give to charity. But they were just right for a remake.


First I took the jeans apart, as much as I could. DH helped me remove the rivets. As mentioned in a previous post, this created fabric with all sorts of interesting resist patterns from the years (and years and years) of wear. I took one belt loop apart but tossed the rest. I kind of wish I had kept those too. They would have made such interesting closures for the front. I used the one on the back:

Stitching added to one shoulder area where the knee was extra worn.

Because of the fairly narrow pattern pieces in the Tabula Rasa, I was able to cut most parts with a minimum of piecing. Of course, I wanted some piecing to show the interesting patterns. But, I was unable to cut out the sleeves from this one pair of jeans.


I purchased another pair of cotton jeans from the thrift store and tested the sleeves but they were so much heavier than the other denim that I had to remove them. I'm glad I did.


I'm guessing that even thrift stores don't want jeans as well worn as DH's. After removing the sleeves, I rearranged some pieces and did the finishing work. I cut a front band facing from a light weight denim remnant in stash. I cut bias binding from a piece of cotton shirting and used that for some of the seam finishing, as well as the hem. I added the small ticket pocket to the front at the chest level. It is the only functioning pocket. So far.


This vest is surprisingly light weight but obviously there are a number of worn places. These are great opportunities for boro stitch, patch and sashiko. So that's next.


I am particularly fond of the Lee leather patch. That must be used somewhere. And I have just discovered another pair of pants that really need to be recycled, don't you think? But I do not have permission. Yet.


This was a fun project and, as usual, I learned some things. Denim is not so easy to sew, but it's easier when it's old. It's surprisingly easy to disassemble with a good seam ripper. And I think I will actually wear this. It will be another work-in-progress that can be worn in the meantime.


This worked out just like those stash-busting contests. I have more jeans parts now than I did at the beginning.