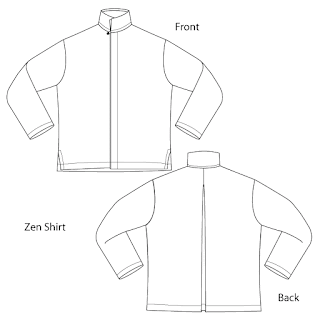
This one is all about the fabric. It is a medium weight Japanese cotton I purchased from Louise Cutting at the Atlanta Expo in March. I purchased 1.5 yards and it is 45 inches wide. What was I thinking?! I just barely squeezed out this version of the Zen jacket pattern from the Sewing Workshop.
 |
| (It looks like the left front curves down but that is just a shadow. The front hem is even on both sides.) |
So I had to choose my pattern carefully and manage the fabric as efficiently as I could without sacrificing the distinctive print. The Zen jacket has an inverted pleat in the back. That was the first thing to go. I also narrowed the fronts by creating plackets down the center fronts. For this I used a cotton-linen in black and gray check. I also cut off the sleeve hems and created facings using the same black and gray check.
The Zen jacket includes a two-layer collar. There was enough left after cutting the main pieces to cut one collar piece, so I cut a second one from the black and gray check. I tested this arrangement and decided it was just too much. I felt that the fabric demanded a less cluttered pattern, so I omitted the collar and finished it with a bias binding in the black and great check instead.
The front plackets created an opportunity for in-seam button holes, a little bit of a kluge but I like the result.
The sleeve hem facings I created were about 5 inches deep so that I could roll up the sleeves and see the contrasting piece. As I began to assemble it, I decided to take advantage of the depth of the facings and created a vent in each sleeve. These too can be rolled up or left down.
But my facing assembly created a weak spot in the construction right where the facing intersects the vertical sleeve seam. That's right at the top of the vent. So I appliqued a small square of the black and gray check to the weak spot.
I am not sure if this will be a shirt or a jacket, so I used a Hong Kong finish on (most of) the interior seams.
Initially I machine hemmed the sleeves and the garment hem. The result was not pretty. It was OK but it spoiled the pattern. So I pulled it out and hemmed with sashiko.
Just a little more sashiko and it is now finished.


I love the way you worked your way out of each and every trouble--to a beautiful result!
ReplyDeleteThis is lovely! Better hide it when I'm around!!
ReplyDeleteSo creative and pretty. I love your fabric choice - cannot believe you managed this jacket in so little yardage! I'm also happy to see it without the collar, since my thought was that it was too much, too high. And lastly - love those buttonholes! Inspiring...
ReplyDeleteMartha, I had seen that fabric here and there in other color ways. Loved it but didn't know how to use it effectively. I think you've solved that for sure. Beautiful garment!
ReplyDeleteYou made me smile, Martha, as I frequently stinge on the fabric purchases and then spend hours modifying patterns. However, your jacket is simply gorgeous, so well done!
ReplyDeleteWow, that is a knockout!
ReplyDeleteThis is just beautiful, Martha! I love what you create.
ReplyDeleteYour use of sashiko for hemming and details is inspiring! (I think I may need to use it on an indigo print jacket I'm going to sew for early fall...)
ReplyDeleteI smiled when you said you purchased 1.5 yds. When I see 45" fabric, I generally go for 2 yards and STILL have problems sometimes eeking out my pattern! So I give you many gold stars for making such a beautiful shirt/jacket from your fabric. It's a wonderful print!
ReplyDeleteWell done! I get irritated working through these types of restrictions, so I generally walk away. Thank you for showing how to move through the process!
ReplyDeleteWow! When I look at this beautiful piece, not enough fabric is the last thing I would think of. It looks as though you had it all planned in advance. Gorgeous, definitely doing justice to this wonderful print.
ReplyDelete