Tuesday, September 26, 2017

Dyeing

Black walnuts
Lately I've been dyeing. And dying too, I suppose. The process and the results are subtle and unpredictable. I'm enjoying it all.

Rough-cutting some cotton sateen and folding it in preparation for black walnut dips.
Lining for a coat.

Black walnut dyeing has become an annual treat for me. Part of the fun is finding the walnuts near my home. They can easily blend in with their surroundings and I'm only beginning to recognize the trees.


If you look closely, you'll see them dangeling from the way-high-up branches. The recent winds and rain from Florida huricanes have caused many of them to drop. It's such fun to suddenly see them.


Pokeberry is instant gratification.


When I don't find the walnuts, I find pokeberries and goldenrod and lichen. I steamed these on a piece of cotton sateen.


I am learning that slow dyeing may have better results. Many things are like that, aren't they? I am soaking my walnuts and then, very gently, simmering them. I haven't tried to save the actual nuts and feel just a tiny bit guilty about it. The color has me transfixed.


Admittedly I did drop this folded piece in with the soaking and then simmering walnuts. This first piece is satisfying. I also dip-dyed some paper and got quick results - a kind of moonscape.


Here is the steamed pokeberry-goldenrod-lichen piece. Slow stitching is next.


Not every piece is rich is saturated color.

eco-print attempt with leaves from the back yard
But there's always overdyeing to be done.


And steeping.


And waiting.


Friday, September 15, 2017

One white shirt, two pockets


White shirts have a shorter life span than some pieces, I've found. The white becomes dingy and the stains are in a place where no amount of boro design will save them. And so I will cut them up for quilts and other small pieces.

I added a button to an otherwise weak juncture in the construction at each sleeve cuff.
And, as it happens, white shirts are great fun to make. This one is based on a tutorial in Sew Confident from the Sewing Workshop. It is a hybrid of the Liberty shirt and the MixIt shirt. Their version is more of a tunic length but I kept the original length of the Liberty with its deep hems and pretty miters.


If you are familiar with these two patterns, you can probably see that the neckline is from the MixIt and the rest is the Liberty with shorter sleeves. I think the V neckline of the MixIt is sweet, especially when the tiny collar is omitted. And the Liberty hem is always appealing to me. I really like those diagonal seams in the front and top-stitching the facings creates a faux princess line.


The tutorial suggests that you shorten the sleeves at the shorten-lengthen line but I was pretty sure that would make the sleeves too tight on me. So I shortened mine 3" at the hemline and redrew the cuff portion. You may be familiar with this easy formula for redrawing the hem facing/cuff: fold the tissue along the new hem line and trace the side seams.


The fabric is a cotton shirting purchased at Gail K in Atlanta. They have such wonderful men's shirting. This one has a dolby weave so it's not just a plain white shirt.


Of course, Diane Ericson's pocket challenge is on-going so I added a pocket. It's placed too high in the picture at the top but I fixed that. It has an inverted pleat and a flap. The first version was too large so I'll save that for another project. It was fun to just play with a small piece of fabric, folding until it pleased me.


The pocket structure is a little more visible here:


I am enjoying following along with Diane's pocket challenge on Instagram. Hers are always so artful, whereas mine are more utilitarian.


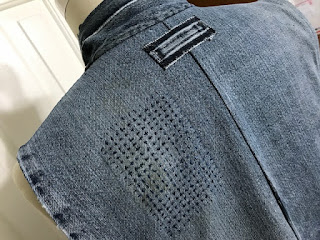
This zippered pocket was added to my jeans vest after I wore it for the first time. Originally I constructed it with only one pocket - the breast pocket. I decided then that I'd enjoy it even more if it had another larger pocket. I was able to harvest a pocket from the scraps remaining from the raggedy jeans, as well as the zipper. The panel above the zipper is from the fly! I simply top-stitched it down, but it does not show much at all on the exterior. I like that it is behind the shadow of a pocket from the original jeans.


Now it's even more fun to wear!


Thursday, September 7, 2017

Columns and Basics and More


If I am honest with myself, I realize that I get a real bang out of making a jacket, much more so than many shirts and certainly more than making pants. I live in pants; they are essential to my wardrobe. But yawn. Of course, the worst day sewing is still very, very good.

Eureka top from TSW; Eureka! pants from Fit for Art
Recently I've tried to rein in my creative juices just a tad to fill some holes. First up was this easy topper made using some yummy indigo-dyed cotton (I think) from Shibori Girl. The pattern is the Eureka from the Sewing Workshop. It is possibly the easiest pattern in my stash. Although designed for knits, the fit is so relaxed that almost anything works. I enjoy the loose fit, especially when it's hot.

Top is CLD's Pure and Simple; Pants are Eureka! from Fit For Art
The pants pictured above are also a recent make in a navy-blue cotton-silk blend purchased at Gail K in Atlanta. It is a great weight from pants and not too heavy for a top. The pattern I used for pants is the Eureka! pants pattern from Fit for Art.

Pure and Simple pattern from Cutting Line Designs
Cutting pants always leaves long narrow remnants so it's satisfying to make a top to match. This creates the column or background for any number of jackets in my closet. The pattern I have often used to create such a column is the OOP Pure and Simple from Cutting Line Designs.

Tabula Rasa jacket from Fit for Art; Pure and Simple top from CLD; Eureka! pants from Fit for Art
While digging in my stash, I came across this bird print, a remnant gifted to me by DD. Every time I see it, I either want to sketch one of the birds and make a jacket. It feels like bark cloth and has a nice weight for our coolish weather.


The brown sleeves and front placket is from a linen remnant. I added a single welt pocket using instructions from an old issue of Sew Confident. I sort of like it with this recently finished brown striped shirt.


How about some red pants? Too much?


I am just about to cut out some much needed black pants and a white shirt. I promise.


Wednesday, September 6, 2017

Artist In Motion, Revisited


Though I love trying out brand new-to-me patterns, it's also satisfying to use a familiar pattern in a new way. Artist In Motion (AIM) was published some years back by Cutting Line Designs. It includes that distinctive *vestie.* Incidentally I had the pleasure of supplying the name for this pattern.


This time around I was interested in creating a basic pull-over with some light-weight pin-striped linen. Using the basic lines of the AIM top, I constructed this piece:


The AIM top is almost rectangular in its shape with slightly dropped shoulders, perfectly straight side seams and a hem that cuts straight across. The pattern includes a hidden front placket. I eliminated that and cut both the front and the back on the fold. I created facings for both the back and the front pieces, with a slit in the front. It slides easily over my head.


I added a minor design feature, inspired by Diane Ericson's pocket challenge. I loved her circular pocket and hoped to create something similar. However, mine evolved into a different pocket.


Pocket constructions: First I cut a pocket facing and identical pocket bag. I added interfacing to the area of the pocket facing where I intended to cut the pocket opening. Then I used chalk to sketch the shape of the opening, sort of an extended kimono shape.


I placed the facing on top of the shirt front, carefully positioning the opening shape. Then, using a shorter stitch length of 2.0, I stitched around the shape. I cut the center of the design and flipped to the inside.


To complete the pocket, placed the pocket bag over the pocket facing on the wrong side of the shirt front. Then I stitched around the perimeter of the pocket. It looks a little like a longhorn. I like that.


The sleeves on this top run a little short on me so I did not turn in the recommended hem. Instead I added a double fold bias strip in the same brown and white gingham as in the pocket and the neck facing. I like the sleeves best folded up anyway.


I love this rich chocolate brown linen. I'm trying it here with my other *neutral,* red. I'm not sure about the brown and red combo, but it's growing on me.


See some of the pockets inspired by or created by Diane Ericson on Instagram.


Monday, September 4, 2017

Julie's Quilt


In a truly shocking turn of events, my eldest turned 40 last week. It's official. She's now older than me. In my head.


To celebrate her birthday, I decided to make her a quilt with all new fabric. Such extravagance but she deserves it. She has 4 children, a husband and a dog. And she lives close by. I'm so lucky.

bias binding for the edge
Recently I've been attracted to modern quilts on social media and it certainly shows in this design. I used Kona solids in colors Julie likes, but mostly white. She loves white. This may be my first and last quilt made exclusively with Kona solids. The fabric comes in yummy colors but it is too dense for me to comfortably apply sashiko. I did add some but there might have been more if it was easier to needle.

Just a little sashiko

Making large quilts is always a challenge for me. I finish the top, and I'm finished but the quilt is not. I could hire out the quilting but I'm too stubborn to do that. This is only 50x60, so sort of at the high end of a large quilt for me.

Backing secured to the table
And somehow I always enjoy the process. It gives me opportunity to think about the last 40 years and how Julie has blossomed.


Batting in place over backing - low loft cotton - so soft
Even the pinning is zen-like, meditative.


I quilted it with mostly vertical lines. I enjoy quilting with a walking foot. I've never worked hard enough to master free-motion quilting. Plus I love regular geometric shapes. The quilting rows range from 1" to 2" apart.


I added a handful of diagonal quilting lines and the quilting was done.


After I attached the binding and a label, I washed and dried it. A wrinkled quilt is soothing to me.


It was a sweet process and I so enjoyed giving it to her. I don't know when or if I'll make another quilt. So many other satisfying projects call to me.