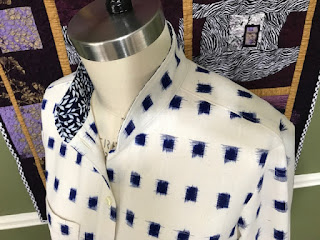
The Grainline Archer shirt is a popular shirt. There are 129 (!) reviews for it on Pattern Review. And I do think it's a shirt pattern I'll make again.
The envelope contains two views. View A is the classic shirt with an inverted pleat off the yoke in the back. I made view B with its "lower back detail," that I would call a peplum. It is a little low for a peplum as I learned from other reviewer. So I raised it by 2 inches. That is, I shortened the back piece by 2 inches and lengthened the lower back piece by 2 inches.
There are many things to like about this pattern, starting with the instructions. They are contained in a convenient 8.5 X 5.5 brochure. I do hope this catches on. It is sooooo much easier to manage than those huge fold-outs I've used for years, decades. Also the instructions are well-written and clearly illustrated.
The seam allowances are 0.5 inch; that worked out fine as soon as I noticed it.
The pattern includes a separate right and left front. The left front has a cut-on button band and the right front has a separate buttonhole band. My fabric is this pretty Ikat cotton purchased from Topstitch in Decatur, GA. Initially I worried about matching the weave of my fabric both vertically and horizontally.
Finding center front seemed important. I searched and searched but found no center front markings on any pattern piece. Now that I've completed the shirt, it's fairly easy to determine CF. It's 2.5 inches from the raw edge on the left front; 0.5 inch on the right front; 1 inch on the buttonhole band.
I don't know why I worried about all of that. In the end, I did my best and I like the result.
The Archer, like a lot of shirt patterns, includes a bias-bound vent in the sleeve, rather than the classic placket. I love plackets on sleeves so pulled out my favorite shirt instructions for that and the yoke. Cutting Line Designs' the Blouse Perfected has the best instructions for these techniques, IMO.
This changed the size of the cuff so I putzed with that a while before adding a 3rd pleat to the sleeve. It's just barely noticeable, but I cut the yoke on the bias:
The next time I use this pattern, I'll make a few changes:
- Shorten the sleeve by 1 inch.
- Decrease the circumference at the wrist by about 2 inches.
- If pattern matching is involved, I'll cut two left fronts. The buttonhole band is only needed if you are creating a contrast there.
- I'll use 0.5 inch seam allowances from the beginning.
In sum, this is a really good pattern. Go ahead and try it. You can be the 130th reviewer on PR if you hurry!


I love the sleeve tabs! So perfect :)
ReplyDeleteLovely shirt. Such nice fabric! And it’s the little details that count, right?
ReplyDeleteBeautiful shirt. Love your fabrics.
ReplyDeleteThis is beautiful work, love the contrasting placket.
ReplyDeleteLovely shirt and lovely fabric. This shirt is on my to do list and I will keep your oh so helpful blog when I am ready to make it. Thank you for the tips
ReplyDeleteSo pretty. Love the raised peplum, placket on the cuff, and your use of the collar band rather than the entire collar.
ReplyDeleteI love all your little twists and details on this shirt.
ReplyDeleteBeautiful shirt! I love the back design and your fabric choice.
ReplyDelete