
My (first) Alabama Chanin School of Making piece is finished! I am so pleased with it that I (almost) wish we were entering late autumn instead of early summer. I started it as soon as I returned from my (first) workshop there in early May.

It took me almost a month to the day to finish it. This, of course, is because it is entirely made by hand, another first for me. In fact, if I had not had some extended car travel, it would not be finished. It is the perfect project for travel.

The peacoat is the shorter version of their fabulous full length trench coat. It has a double breasted front, sort of. The front seams start out at the neckline double-breasted and then angle toward the side seams until it just meets at the front hem. It calls for 3 large snaps, but I've not added them yet. I'm not sure I really want closures.

In retrospect, my first ever AC piece should have been a simple piece, say a shirt or a skirt. But no, I decided to choose one of the most complicated of their options. A smarter person would have started simple and built up to complex. I feel lucky that it all worked out fine in the end. In fact I feel very very lucky for lots of reasons!

The back has 4 pieces - 2 center back pieces with a slightly shaped center back seam, plus 2 side back pieces.

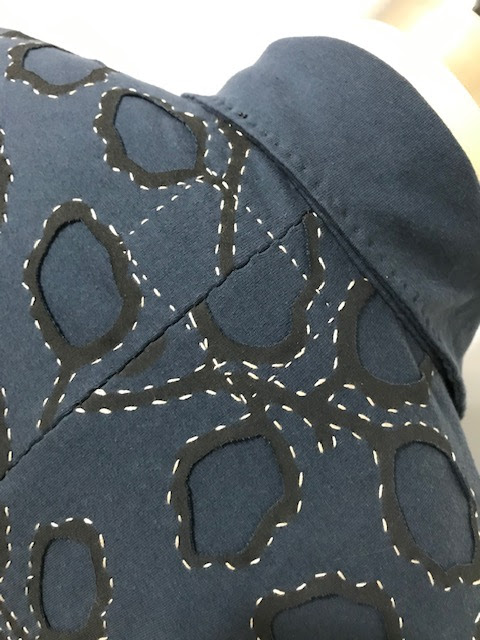
There are two simple front pieces, a left and a right one, shaped as I described above. The sleeves are two-piece, adding some lovely shaping there. There are also side seam pockets. Lastly there is the simple collar. The kit included two sets of collar pieces, one with the stencil and one without. I chose the plain collar.

When you attend one of their workshops, a project is included in the price, hence my greedy choice, I guess. You order it the first morning and it is delivered to you in a lovely cotton pillow case of sorts, with each piece cut to size and labeled. So there is no cutting. Directions from the pattern are photo-copied and given to you to accompany the kit.

The kit does not include the actual pattern, but it is available for purchase. I wish I had purchased it for reasons I describe below.

The kit included enough thread to make 2 or 3 jackets. This worries me a bit. I'm skilled at worry, wondering if it will fall apart when/if I wash it someday. These pieces are not intended for the dry cleaners. Rather they recommend machine washing and just a bit of time in the dryer before air drying it. The dryer time keeps it from stretching out of shape.

I may have extra thread because I used a running stitch to outline the stencils, rather than a stitch that would use more thread, like the back stitch. Naturally, there were other challenges for my worrying mind.

I started work with a center back panel. The right side of the bottom layer is placed next to the wrong side of the stenciled (top) piece. This first step places two layers carefully together, lining up the raw edges by patting it into place. Throughout the project, I kept reminding myself that the right side of this 100% cotton jersey is identified by the fact that horizontal edges roll to the right side.

After carefully aligning the raw edges, I pinned them in place and used my lifetime supply of basting thread to baste the raw edges together. I felt this step was very, very important because seam allowances are only 1/4", giving me almost no room for inaccuracy. All of this went smoothly and I began to stitch around the stencil shapes. It is totally relaxing and meditative. I highly recommend it.

Then I started on the front pieces using the same routine to prepare it for stitching the stencil shapes. The instructions describe finishing the front edges up to the notch where the collar attaches, notch B. This is accomplished by placing the two layers right sides together and stitching along the raw edge at 1/4". Then you are to turn it right side out and begin to stitch around the stencils.

However the neckline for each front piece contains 2 notches and they are not labeled. The two notches are about an inch apart so it was possible they were really a single notch. Or not. I emailed them. No response. So I called them. The sweet young lady who answered said she would research it and get back to me. All of the young associates are polite and sweet and patient in the southern sense. Yes, ma'am!

When she called me back, she said, "The left notch is notch B." Hmmm... There are two fronts, each with two notches. So I said which left notch? The one on the left front or the right front? And is it mirrored on the other front? She said she did not know and that her knowledge of sewing garments was too limited to understand my question.

The next associate was familiar with Alabama Chanin clothing construction. And she opened up the physical pattern to sort it all out. As it happens, one of the notches is for Center Front, and the other is for attaching the collar. I'm thinking that info might have been printed on the physical pattern pieces.

But then there were the notches on the collar pieces. There's a single notch on one long side of the collar and a double notch on the other long side of the collar. The two long sides were not identical in length so I really needed to know which one to attach to the neckline. The second sweet associate I spoke with did not actually know but we surmised that the double notch attached to the back neckline.
Now I'm wondering if anyone else has ever made this. Or maybe the other sewists figured it all out on their own. The lesson for me is that I need to purchase the pattern to go with the kit. The additional cost is marginal ($12) compared to the aggravation of guessing, and the other costs!

My next challenge was attaching the in-seam pockets. This proved to be quite straight-forward. The written instructions were sufficient for any experienced sewist to follow. I considered taking the lazy way out and omitting the pockets. I am so glad I did not. I really like having those.

And I love, love, love the finished piece. As I was stitching, I began to wonder if this project would turn out to be more fun to make than to wear. Sometimes it works that way for me. I love the process. But, in this case, I love the result too.

I hemmed the sleeves rather than leaving them raw-edged. The bottom hem is raw edged, but the sleeves were a bit too long and there was no way I was going to cut them off! Other than that, it is a size Medium with no adjustments. I was able to try on size Medium while there but was still nervous about how mine would fit. I am so pleased.

I purchased a second kit while there, a top called the Alabama sweater. It is an A-lined shirt with a V neckline. The original is sleeveless but I added 3/4 length sleeves, knowing I'd get more wear out of a sleeved garment. And I raised the neckline. Their tees are a little too low-cut for me.

I started it while traveling, but put it away once back home. I want to savor some zen sewing on it during my next trip, a family vacation in July. It is a much simpler make than the peacoat. There are only 6 pieces - two fronts, two backs, two sleeves.

I chose a stencil they call *text.* I asked them to print it diagonally on the two front pieces and a little on one of the back pieces. I also left one sleeve mostly plain. So it will not take nearly as long as the peacoat.

Yep, I'm a School of Making devotee now. It is hand-sewing at its best.
Your coat is gorgeous. I am a fan of Alabama Chanin, have taken classes, and made small samples. Seeing your coat makes me want to start a project. So off I go to their site. Can't wait to see you next project. Jean
ReplyDeleteLooks fabulous. Well done for such a great outcome on your first piece.
ReplyDeleteLooks awesome. I so enjoy your work. You inspire me! And I love your shorter hair.
ReplyDeleteMarcia
WOW! So lovely. Thankyou.
ReplyDeleteAmazingly good work, so beautifully done.
ReplyDeleteAbsolutely beautiful Martha! I am just getting back to blogger and I notice that when I try to read any blog on my reading list I get a redirect message. Are you as well?
ReplyDeleteThanks, Fran. Yes, I get that too. I don't know why, but it seems to get me where I'm going.
DeleteYour jacket is wonderful. I enjoyed every word and image of your post. I can’t wait to see the top completed.
ReplyDeleteLovely and beautifully sewn.
ReplyDeleteBeautiful! I'm close to finishing an AC pea coat now, but I'm having trouble visualizing what to do with the collar once the two pieces are sewn together on three edges. Stitch one of the pieces to the back of the coat, then evert the collar so that right sides are out? Or evert first and sew one piece next? Thanks for any advice.
ReplyDeleteI'll have a look at mine to remind me how I sewed the collar. You may want to email me so I can explain more fully.
DeleteI used a more traditional finish but by hand. I first sewed the lower collar to the neckline, RST, lining up raw edges. Then I turned the remaining collar edge under and invisibly stitched it to the neckline. HTH.
Delete