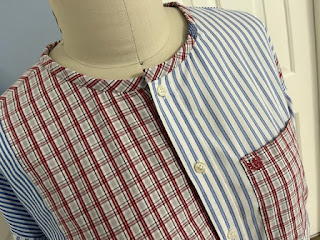
When the Eureka pattern first published, I purchased it, of course. But I wondered if I would ever really use it. The pattern envelope contains a simple boxy top with cuffs on the cap sleeves, plus a skirt with a V design in the front and back. Both call for knit fabrics.
Here is the shirt line drawing:
I made my first Eureka top out of a knit I purchased at the Sewing Workshop while attending Sew Kansas. I believe I made a size M based on my measurements. I never wore it much, mostly because the armholes were too large and revealed too much of my bra.
Since then I believe I must have made it a dozen different times with woven fabrics. I've changed the neckline, lengthened it, pieced fabric, and, this time, I added sleeves.
Today's make is part of my preparation for a presentation at my local ASG neighborhood group in late May. The presentation is on cutting, sewing, and wearing garments on the bias. This shirt is part of my *control group* because it is constructed completely on grain, as recommended by the pattern instructions.
This time I started with a size XS and lengthened it three inches. I had 3 thrifted men's shirts to use, all with woven in designs, stripes and plaid. This makes the grain aspect highly visible.
I've worked with men's shirts before and have learned some things that help me. I start with a seam ripper and open up and as many seams as possible. But I do not stress over this. For one thing, working on removing the stitches often leaves little holes and lots of weak spots in the remaining fabric. Men's shirts are sewn with tiny stitches and these old shirts have the stitches embedded in them.
So after a little work with the seam ripper, I switched to scissors. I simply cut off the seams, preserving as much fabric as possible.
The arm pit area of the shirt pattern is a place that can be challenging when salvaging men's shirts. The curve is way too low. Also I wanted the resulting design to be vertical lines, in keeping with the stripes and plaid. In addition, I did not want it to look like a patch-work quilt top. Not sure I was totally successful though.
To keep the vertical lines, I used one front with buttonholes and another with buttons. Men's shirts are cut and sewn in remarkably consistent ways! Because of the way I cut things out, I actually had to reposition the buttons, leading to some weak spots. These, I mended just a little.
Flat-felled seams were used for all the piecing, as well as most construction. The armholes are serged to form a faux flat-felled seam.
When I completed the bodice, I realized that the fabric on one side was slightly frayed where I had removed its pocket. So I attached a breast pocket from another shirt, placing it more to my liking. My hope is that the result is balanced as well as hiding and protecting the weak fabric.
I wanted to see how much I could use existing sleeves, so I cut the sleeves from the shirt, then cut off the cuffs, and cut off the vertical seam. This allowed me to open and press the sleeves flat, retaining the placket with its single button.
The Eureka comes with sleeve cuffs designed to be sewn to the armholes one-to-one. So I placed the cuff pattern over the salvaged sleeve, snugging it up as much as possible to the upper sleeve. The cuff pattern piece from the envelope is on straight-of-grain, so I cut my new sleeve straight across the top of the sleeve. That is, there is no curve at all in the sleeve head. Frankly I've never seen any reason for a curve in the sleeve head for a dropped shoulder, at least not for my shirts.
Then I connected the point of the sleeve cuff pattern to the bottom edge of the sleeve, removing only a small wedge from each side. The resulting sleeve was a simple shape and fit nicely into the armhole.
I cut 3" bias strips from one of the salvaged pieces of men's shirting and used these for the neckband and the sleeve cuffs. I discovered a slightly frayed area in the neckband after completing the shirt, and so had to add a little patch by hand.
The sleeves were gathered onto the folded bias strips. I learned from Marla Kazell that gathering can be easier to control if the stitch length is shorter. I believe my gathering stitch-length was about 3.5 cm. The fabric gathered easily and smoothly.
With bulk of the bias binding for cuffs, I was sure I did not want to try a machined buttonhole. Instead I sewed a thread loop on the end. I had small buttons left over from the collar buttons. I can slip my hands through without using the buttons, but it is possible to open it up and roll up the sleeves.
Hemming involved stay-stitching 0.5" from the edge, then folding twice and edge-stitching. I added just a little sashiko to the back neckline.


Yours is a really cute and creative shirt, much more interesting than it would have been if made from one fabric.
ReplyDeleteThat a really lovely shirt!
ReplyDeleteThis is the most awesome pattern, so simple yet so inviting of creativity. You did it great justice. I have it on my table as we speak for a fourth iteration.
ReplyDeleteStep into effortless fashion with the Vertical Striped Regular Fit Crop Shirtby fithubfashion. Designed to balance comfort and style, it’s perfect for modern office wear or casual chic looks. This piece redefines classic Formal Shirts for Womenwith a trendy edge. Add it to your wardrobe of must-have stylish tops for women.
ReplyDelete