Pattern: French Fold Shrug from Diane Ericson
This is a super interesting pattern designed by Diane some years ago. It has floated across my consciousness over the years and I finally decided to make it. The overall design is almost zero-waste. The resulting garment is created through folding and strategic cutting.
It starts with a rectangle, so the result also is related to the size of the rectangle which can be varied to create longer/shorter sleeves, as well as longer/shorter overall piece. This could be a small shrug or even a longish coat, I think. So many opportunities for play!
Sizes: S, M, L (easy to adjust up or down)
Seam Allowance: 1/4" or whatever you like.
Inspiration and Help: Diane Ericson (with Gayle Ortiz) and the big sew along by Gini
VERSION ONE: Size S (20.5" long X 54" wide), pieced linen plus a hand-dyed linen/cotton blend. The lining is light weight cotton dobby weave.
The front *flanges* are folded to the back beneath the upper jacket. Likewise the back flanges are brought to the front and placed under the upper portion of the upper front.
I had fun playing with the folds on version 1.
Lessons learned:
- Stay stitch ALL the cut edges, especially the place where three seams come together
- Lining ups the ante for learning. The place where 3 seams meet is not pretty.
- I'm really a size M. Size S is too tight through the shoulders. There is no size chart.
- I want to play with length, width and more folds.
On me:
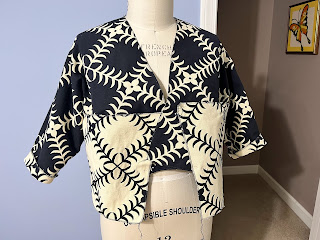
VERSION TWO: Size M (36" X 48"), heavy weight cotton double faced positive-negative weave on a thrifted piece from Goodwill. I omitted the lining.
Lessons learned:
- Stay stitich ALL the cut edges. Serging is challenging given some of the angles.
- That positive-negative weave provides lots of design options.
- Yep, I'm size M, though with different fabric I might even go up to L.
- It can be completely zero-waste by changing the front cut a bit.
- The off-white and black is not great on me. I may dip it in blue dye and see what happens.
VERSION THREE: Size M (36" X 48"), Brussels washers in a beautiful green apple green. No lining.
I chalked in the cutting lines and stay-stitched at 1/4" before actually making any cuts.
After adding the second row of stay-stitching, I decided that I did not want the raw edges.
The sample is a right angle, so easier than my tight acute angles. The sample gave me a start. I'm still working on it.
The neckline has variations too. If the pattern is cut with a T shape up the front, then a slight shawl collar is formed in the front. I've noticed this in some of Gayle's pieces (see the above link to Diane's blog)
On me:
Lessons learned:
- I stay stitched twice around all raw edges, once at 1/4" and again at 1/2", thinking I might leave it raw edged. However, the fabric ravels too much to do so, IMO.
- The drape and weight of Brussels washer is perfect for a summer shrug.
- Still size M.
- Tried the zero waste option by cutting a T shape up the front. This creates a lovely fold-back that I like.
- I'm still playing with the edge finish. For now, I've attached a bias piece of light weight printed linen to the edges and sewed it in place with a running stitch.
NOTE: I have not finished any of these. Finishing is overrated. Honestly this pattern lends itself to never finishing. It is hard to stop playing long enought to finish.


Fascinating pieces!
ReplyDeleteI have made five of these now all a bit different I love lining them and playing with the folds on the back I added ribbon so you can adjust with ties I have made. Size L and with the ribbon it adjusts from S to XXL for me.
ReplyDelete