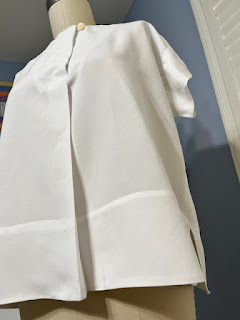
I am ridiculously pleased that I finally came up with a fix for the lump at the bottom of the Hugo Shirt from the Sewing Workshop!
As background, I made the Hugo from linen-rayon white woven fabric about 4 years ago. I liked the finished piece but was never very happy with the finish on the hem at the lower front. I finally wrapped the edge in a self bias strip so that it looked neat, even though it was lumpy IMO.
Recently I brushed up against something black. It appeared for about 4 inches around that lump. I tried every cleaning tool on hand. Nothing worked. That black was permanent.
So I put it away to think about. Today I thought about it. I took apart the two fronts from about the waist to the hem. This, of course, meant removing my little bias piece as described above. I set that little piece aside.
My solution to the black stain problem was to cut the hem allowance off, remove the offending black and sew the hem back on, thus making the front slighly shorter than the back. It also introduced a seam along the hem line. I like that, frankly, because it adds a bit more weight to the hem, making it hang beautifully.
And then I began to wonder if there was another way to avoid said lump. Here is what finally worked. BTW, I worked on a sample in parallel with my actual blouse. That way, I could test each step on the sample, then do it on the real garment. The pictures below are the sample, as it pretty clear, I think.
I unstitched the center front seam from the lower edge until a few inches below the lower end of the placket. Next, I pressed the front ham into each side, keeping the left front separate from the right front.
After that, I re-stitched the side seams I had removed in the process of shortening the fronts.
Finally, I folded the lower hem of each front piece into place, and pressed.
With right sides together, I re-stitched the center front seam starting with the lower end of the placket, and stopping at the hem fold line. That point should be lock-stitched.
Then I re-folded the hem for each front piece. With them folded, but not stitched into final position. I placed the two fronts right sides together, aligning all 4 center front edges. Note that there are now 4 layers stacked.
Then, while holding the 3 top layers of the edges together, I wrapped the 4th layer from the bottom, around and over the top layer, creating a sandwich. There are again 4 layers stacked, but it a new order. Note this only works if
1. the lower hems are folded in place, but not stitched, AND
2. the vertical center front seam is finished down to the fold line for the final horizontal hem on the two fronts.
In this position, I stitched all 4 layers together. Then I unwrapped the layer that I had previously wrapped and pressed it all.
This creates a beautiful enclosed seam from the horizontal hem fold to the top of the hem allowance. Sooooo exciting, right?!?
Finally I had clip the center front seam right at the top of the hem edge. Now it folds back on itself, forming the most beautiful finished front. Hooray.
I went back to the instructions from the Sewing Workshop. There is a chance that what I have described above is exactly what they intended. Here is the language used, which still does not make sense to me. In any case I plan to tuck my little sample into the pattern envelope in order to save myself a headache on the next Hugo shirt.
With right sides together and facings ou of way, sew Right Front and Left Front at center fron seam. Sew from dot to bottom. Bottom of placket is sandwiched in seam below dot. Clip Left Front seam allowance only to dot. FINISH seam together. Press towards Right Front.
The key is the making of the *sandwich.* Now, if only I can remember this next time...


Thank you for this.
ReplyDelete