Thursday, May 30, 2013

Stardust Skirt

This is a vintage style skirt from the 1930's by Decades of Style and is part of my on-going attempt to love skirts. I think it's working, BTW.

My mother graduated from high school in the 30's and so I imagine her in this style, coming into her own, trying to decide what to do with the life ahead of her.

With the very few options available to women at that time, she chose to take some business courses and became a stenographer. Now, there's a job title you don't see much anymore!


Worn with another TNT - CLD's pure and simple shell in African cotton
Anyway, back to the startdust. It's a simple A-line skirt with a few extra details. It has two (what I would call) gores on one side, and it dips slightly in the back. It fit pretty well right out of the envelope, based on my hip measurement. Even the recommended hem placement was right for me, I think.

This is likely to become a TNT pattern. Easy to make, easy to wear. I'm thinking the next one will be made in linen, a soft but slightly beefy one, so it drapes nicely. And I'll use piping on the waist instead of the traditional waistband included in the pattern. And I'll flip the pattern pieces over so that the zip goes on the left side.

the gores are on the right in this picture

I reduced the width of the waistband, but I'd like it even better with no waistband!

Wednesday, May 22, 2013

Sewing with a Four Year Old

Workin' it.
I sew for my grands more than I sew with them. In fact, I have found it to be a bit nerve-racking to sew with them. They want to press all the buttons at once. They want to hold the fabric tight so the machine does not eat it up. The grandboys want to press the pedal to the metal. My evil perfectionist twin rears her ugly head.

This is hyperbole, of course. I think (hope?) that I am really more cheerful, more patient, more helpful than I have implied.

A friend suggested another way to teach to wee ones, one that doesn't require building super structures under the machine to raise the presser foot. One that allows for me to control things a bit.

To start, youngest grandgirl rummaged through my remnant stash and selected a piece that was just big enough for an elastic waist skirt. Then she found a piece for a pocket and a piece of bias binding.

I helped her pin the rectangle into a tube. Then she climbed into my lap and *we* sewed. She was in charge of removing pins and dropping them on the magnetic case. I still had to help (just a little) to keep her from gripping the fabric as it attempted to go under the presser foot.

We added a pocket. We added the little bias piece. We sewed. We serged. We cut elastic and inserted it. She selected lace trim but couldn't wait to try it on.

I attached the eyelet while she rummaged through the remnants and played with ribbons. She takes full credit. I'm glad she does.
One Hour Later

Friday, May 17, 2013

My Swing Set - the Jacket

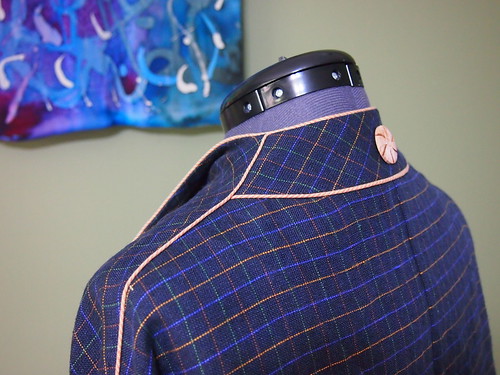
My first version of Cutting Line Design's My Swing Set (MSS) jacket is almost completed. I need to add a snap or two underneath to manage the under layer when it is closed, and I need to move the button loops to allow the buttons to sit more comfortably on the jacket.

And I need to press it. It looks pretty good without even pressing, doesn't it? That's what I love about linen. It wrinkles and then the wrinkles fall out.

CLD-MSS
The fabric is linen from Gail K. When I opened it out, I discovered that it was faded along the fold. So I had to cut the sleeves short to avoid that. I added a bias cuff to each sleeve to make them full length again.

After deciding to go ahead and use this linen, I discovered that another piece of linen in the stash would be fun for piping. This is the good linen - a piece I bought from Louise Cutting a while back. I have plenty to make a column to go with this jacket. My column will probably be the little shirt from By Popular Demand, paired with either the tapered one-seams or the MSS narrow pants.

My favorite aspects of this little jacket are...
  • general shape 
  • asymmetric closure (if desired)
  • shape of the collar
  • cut-on sleeves
  • goes with an existing column
The wooden buttons came from Gail K. And, of course, I bought more linen while there.

This jacket is a little autumnal in its coloring, so perhaps I'll wear to Italy in September. I cannot wait for this very special trip. But I won't wait to wear this little swing jacket.

This lovely little swing jacket may become a TNT for me.


Sunday, May 12, 2013

Kimono as Canvas

Tuesday evening I am teaching a small class on the use of kimono as a canvas for fiber art. We will construct very simple kimono. Then the artists will have their way.

I have long been attracted to the kimono shape. It is easy to wear. It is easy to make. It is perhaps the original zero waste design, though the bog coat probably takes that honor. The kimono has so many more possibilities though.

If you are interested in kimono construction, you'll find an excellent pattern for it from folkwear. It contains two versions of kimono plus the very wonderful, and also zero waste, monpei (pants). I have made and continue to enjoy all three pieces in this pattern grouping called Japanese Field garments.

In preparation for teaching the class, and as part of my participation in the What-If Diaries taught by Jude of Spirit Cloth, I am working on a small white linen kimono.

After completing a pair of white linen pants, I had a nice size remnant, just enough for a child sized kimono. I drafted it proportionally to my available fabric, rather than using a pattern.

I sewed the sleeves to the body, as well as the underarm seams and the front band by machine. Then I finished all the edges, using various techniques, by hand. It is a great travel project.

The first part of the What-If Diaries is a study of white on white - using the shadows, and the slight variations in white to create texture, shape, and artistic composition. So I started the embellishment of my little kimono with a moon from one of its remnants:
Left side is needle-turn applique; right side was first stitched down the straight side, then flipped. Right curve is finished with a back stitch, then ruffled with my finger tip.

One of things that I love about linen is the way it responds to the heat in my fingers. No need to fire up the iron. Just gently fold where I want it, press firmly and stitch. And this particular piece is so soft and yet beefy. A perfect linen.

With spring appearing around every corner, I was simply unable to stay with white on white. You can probably see the vertical green stitching down the right side of the back:


It is a growing reflection of spring. As the yellow green on the flora turns to deep green in my yard, this piece acquires more and more, deeper and deeper color:


Monday, May 6, 2013

B5881 Fini!

B5881 Fini
Just completed my (first?) version of Butterick 5881. I think I'm going to enjoy it. Only time will tell.

Likes:

  • Shape - so easy
  • Proportions - don't normally like shorter skirts on me, but here I think it's necessary
  • Slot openings on the horizontal seams of the tunic
  • Happy accident that led to this neckline.
Dislikes:
  • Not 100% happy with my choice of fabrics. May have a touch of the clown to it. Or Miss Firecracker.
  • A bust dart would be good.
  • It (still) gapes a little under my arm - probably should have made a 10 instead of a 14.

Otherwise, I'm entranced with this design, this pattern, and the whole idea of easy slip-on dresses.

Layers joined only at the armholes

I like the way the back kicks out.

Used a shirring technique with elastic in the bobbin rather than ordinary elastic.
It's OK with white legs too, I'm thinking. Hoping.


Sunday, May 5, 2013

The Many Faces of B5881

Butterick 5881 has many faces, and they are not all views. I wondered why there were 3 views when it really looks like the only differences are trim and choice of fabric.

I have discovered new facets in this unique style.

Um yes, unintended consequences. SNAFUs. Design opportunities.

Here is what I *thought* the underdress would be:
My muslin/underdress
I am making view C - here is the real underdress:
There was another cutting line on the front and the back of the underdress, intended for use with coordinating fabrics (as in View C). Also I cut the denim muslin/underdress with the pattern pieces upside down. No problem, I said to myself. Just have to remember to flip all the others. Ah-hem.

And here is the tunic portion:
I had intended to raise the neckline and lower the hem. Got confused. I'm just going with it.

The dress might look something like this when I finish:

It's a tunic over a dress. How about that?

There are so many more design options than I initially thought. A tunic. A simple dress made from the (full) underdress, and of course many ways to mix colors and textures in a pattern with so many pieces. I think there are 19 pieces. Or were there more?

I cut a size 14 and really should've gone with a 12. I've had to take in the side seams enough to avoid over exposure. 

I'm already visualizing ways to apply these pieces to other patterns I have. I'd really like a bust dart and maybe a V neck. B5881 is turning into a rich source of ideas. 

Give it a go!

Friday, May 3, 2013

B5881 Start-up

Butterick 5881 is a dress designed by Katherine Tilton for Butterick. Blogger Seams Well has made one and it is lovely. So here goes.

As for fitting, I could tell from the reviews it might be a tad short for me. I could tell by a quick measurement that the neckline was too deep for me. I wondered about the armscye too - looked like it might gape. 

So I made these changes:
  • Added about 3/4 inch to the bottom hem. This will likely be the finished length as I plan to bind the hem.
  • Raised the front neckline about 2 inches. Still slides on over my head.
  • Raised the underarm about 1/2 inch. I'll still need to pull it in a bit - maybe with an easing line, maybe by increasing the SA.
Dresses are very appealing. And comfortable. And breathable. Should be perfect during dog days of summer.

Now I'll have to get over my white legs and my mature arms, but my tummy will be camouflaged a bit. I hope. Oh, yeah, it will definitely be fine.

Such an interesting design. It should be fun to make. Got some plaid remnants selected from the stash. 


The muslin should be wearable as the underdress. It's a soft light-weight denim.
This is not too bad as a little slip of a dress.

MMM Day 3

Coolish again today.
Stormy.
A good day for comfort clothes.
Maybe I can avoid comfort food.


MMM 13 - day 3. 

Jacket - Sewing Workshop Ann's Cardigan in double sided fleece (upcycled from a failed jacket).
Pants - Sewing Workshop much modified Mimosa in cotton stretch poplin
Purchased knit shell.

Working on Katherine Tilton's dress for Butterick 5881. A puzzler pattern with possibilities.


MMM Day 2

MMM continues. So far, so good.

Spring is cool this year. It may lead us into a very hot summer.
It is very fall-like right now. Good to have some long-sleeved shirts on hand.

Top: Folkwear Middy as a blouse, handkerchief linen from Gail K, interlined with cotton batiste
Pants: Vogue 7881 (Claire Shaeffer), tapered legs, cotton twill, also from Gail K

Thursday, May 2, 2013

MMM begins!

I love a challenge like Me-Made-May. As other enthusiastic sewers have noted, the biggest challenge is getting the pictures. Sewing is easy - it is so ingrained in my everyday activities.

Almost forgot - have to take the pledge:

 I sign up as a participant of Me-Made-May '13. I endeavor to wear and photograph something I made each day for the duration of May 2013.

Here is what I wore yesterday. I've decided it's OK to take the picture one day late.


This is a column I made last fall and put away without having a chance to wear it before cool weather set it. It is made from Louise Cutting's navy linen. The top is the Pure and Simple shell and the pants are the tapered one-seams, all from Cutting Line Designs.

The jacket is the Metropolitan Jacket from Folkwear. I made it twice when it first came out - once as a jacket and once as a shirt. The red jacket is made from a moderately heavy cotton, sort of a soft canvas. I used bias quilt cotton to trim it and to bind the seams, as it is a one-layer jacket. Also added applique circles to the cute sailor collar.

And here is what I made yesterday - a little bag for my mentee's prayer book. She was confirmed yesterday. Made with love, JHL!