Showing posts with label applique. Show all posts

Friday, June 28, 2024

What I am making now

Whoa. June is almost gone and just what have I been making?!? I've been traveling quite a lot and have only bits and pieces to share.

I was so excited to visit the lowlands in Scotland, building the trip around an opportunity to spend one night on the very special island of Iona. I do hope to return.

While on that side of the lowlands, we stayed 3 nights in the port city of Oban where I happened on a sweet little fabric and textile crafts store. The main attraction for me was all the Harris Tweed. I guess I could've gone home then, from a sewing perspective. But not really - the rest of the trip was focused on family and fun, all good.

After Scotland, we met up with family at Lake Garda in northere Italy. No sewing related items to share, except that I did not include clothing appropriate to such high heat and humidity there. I thought I had covered that, but not really. I should've brought something in lighter colors. All my layering pieces in dark colors failed me.

me and my BSF!

After a few days at home, I was off to one of my Very Happy Places - Shakerag Workshops in Sewanee TN. This year, I took "Imagined Landscapes" with Arounna Khounnoraj, of Bookhou. She is a lovely person and an enthusiastic teacher. She also is open to learning from her students and sharing knowledge. Luckily for her and her family, she appears to be a good marketer too!

Left is a piece from the free table, Right is after a marigold dip!

We played with natural dyes - indigo, madder, marigold, onion skins, avocado, as well as an iron pot that I avoided. We also painted with thickened soy milk, as well as fabric screen printing ink. 

Each of us worked on one central piece around the title - imagined landscapes. It was fascinating to see all the different takes on the theme. For mine, I used pieces of indigo dyed and madder dyed cotton. I also had a piece of dark blue batiste with me that I incorporated into my piece, using free-form applique and reverse applique.

I came home with lots of yellow from the marigold. I'm not big on yellows but I'll use those pieces somewhere. I used an old table cloth I picked up at a thrift store. Those old textiles really love the dyes!

an early sketch

This was an early, warm-up piece for me, using a piece that was first painted with the black screen printing ink. Then I added some thickened soy milk paint, before dipping it all in the marigold. Super interesting results but it will probably just go into my *parts department*, as Diane Ericson calls it.

the brownish parts are from painting with thickened soy milk

Toward the end of the week, Arounna walked us through the construction of a triangular pouch. This is also a free tutorial on her youtube channel. I have not finished mine yet, partially because I like it in this state. It reminds me of a tiny soft shoe.

I'm so excited about attending Shakerag next year when I hope to attend a class with Merill Comeau. I've longed to take a class with her. Fingers crossed it all works hope.

When I returned from Shakerag, where it was also a bit hot, I took to modifying some dresses. I wore each of these at Shakerag and realized I wanted to change the necklines. For the Tessuti dress, the Eva in silk noil (thank you, BSF!) I simply added some embroidery. It was too plain.

For the Sewing Workshop dress, the Memphis, I lowered the neckline and added a striped binding, instead of the previous mustard binding. Now I may go and add a side seam pocket. It really needs a pocket. Sandra Betzina's description of adding such pockets in her Power Sewing is easy-peasy.

I'm also working to finish the hand-stitching on my Imagined Landscape. And I've started a new-to-me pattern from Diane Ericson, the River Tunic, which is designed to be one size fits all and nearly zero waste. Already scratching my head but lots of play left.


Thursday, April 11, 2024

Jesus in the Garden of Gethsemane

Each year, for about the last ten, I have participated in a Lenten practice, creating one of the Stations of the Cross. 

Stations of the Cross are a series of 14 (or more) pictures of Jesus' journey, as represented in Holy Week prior to Easter. Just ahead of Lent, a member of my church puts out a call for volunteers to create the stations, the only restriction being the 24" x 30" size. The series is hung in the church nave during Holy Week and they remain in place until the next year's call for art goes out the the church members.

Various media are used - collage, acrylic paint, oil paint, other inks and paints, photographs, and small scuptural pieces that will fit on a 24x30 frame. With one exception, mine have been fabric pieces, sort of small quilts, though none of mine really fit the strict definition of a quilt. I sew the piece onto a painted canvas.

In progress, after the hollowing out.

Each year, it is a struggle. Yet each year, I sign up again and begin the struggle. I believe this is an important Lenten journey for me, the struggle, the goofs, the final piece.

a test

This year I chose Jesus in the Garden of Gethsemane, an event that appears in all four of the New Testament Gospels. I began with the scriptural stories and also recalled my own visit to the Garden of Gethsemane. I imagined. I sketched. I sewed. I unsewed.

Before he was hollowed out.

Materials: 

During fall 2023, I took an intensive online course from Jane Dunnewold. The title was Color Mastery: from White to Wow. I used unbleached silk noil and Pro MX fiber reactive dyes. I am also working my way through 2024 with a YouTuber, k3n Cloth Tales. I had some eco-prints and dyes inspired by her work.

Process:

I started with the background in three segments - sky, Jerusalem skyline, and the garden itself in the foreground. The sky is raw-edge applique with an invisible stitch, to start. I really like raw-edge work because it avoids the lumps caused by seams. On the other hand, I wanted the *lumps* on standard needle-turn applique for the Jerusalem skyline, in order to articulate buildings. And the ground for the garden is also (mostly) needle-turned applique.

another test.

Creating the foreground was the most challenging for me. The story is complex so there were many ways to go. I tried out pictures of sleeping figures.

Yet another test.

I created a super-sized figure that I placed over the background, a Jesus-figure. After I appliqued the figure on and added decorative embroidery to the edge, I decided it was all wrong. So I next cut out the center. Church friend, Margaret, pointed out that, in the story, Jesus was hallowed out by his anguish. Thank you, Margaret.

Background

Then I created some bias tubes and began to form the olive branch vines and leaves. Gethsame literally translates Olive Press. And today's garden is full of olive trees.

Building up the background on cotton flannel

After that, I added embroidery to highlight and support various aspects of the piece. For example, I outlined the buildings to give them a bit of depth, adding a few details.

I was hand-stitching almost non-stop in the lead-up to Holy Week. It was such a relief to finish and be completely ready for Holy Week. The church held a *Starving Artists* dinner of soup and bread. Each artist described their journey in creating their art piece. It was a beautiful event.

St Patrick's publishes a nice pamphlet with write-ups on each station. Here is a photo of three. The one on the far right is by my wonderful granddaughter, H. This is their second year on this Lenten journey.


If you celebrate, then Happy Easter! Happy spring and Happy sewing!

Thursday, April 6, 2023

Station 5

This year, I chose Station 5, Pilate Judged Jesus, as my contribution to the Stations of the Cross, produced annually by the artists in my church. It is not one of the more traditional 14 stations. Our volunteer coordinator, Margaret, pushed us to produce 28 (!) stations by combining the traditional list with others introduced by a pope, I believe. 

Side note - can you imagine *coordinating* 28 artists?


One of the aspects of this annual ministry that I dearly love is that we acknowledge that everyone is an artist! All ages, all *skill* levels, all who claim they cannot draw, and so on. The only requirement is that it fit on a 24" x 30" canvas with a wire on the back for hanging in our church nave.

As usual, I sketched, fussed, trolled the internet, fussed, and sketched some more. A few days before our presentation at the Starving Artists' soup supper, DH asked me if I was finished. I replied that I was either almost finished or about to start over.


That is because I decided to add some paint. I knew that it would be either done or ruined. Spirit led me to done. Of course, it is always hard to say it's done. Maybe I should add this or that. A deadline has a way of reining me in. 


There are many layers to the story of Pilate judging Jesus. Herod refused to judge Jesus and sent the decision back to Pilate, a local Roman official. Pilate saw the mine field involved in judging this charismatic and spiritual Jesus. So Pilate turned it over to the people. And we all know what the people did. Just like Herod, just like Pilate, they turned their backs on Jesus.


My meditation for this is to wonder when I have turned my back on someone. I still have lots to ponder there. I sat with that thought throughout Lent. And I'm still sitting with it, praying I will be more open to the needs of people I encounter.


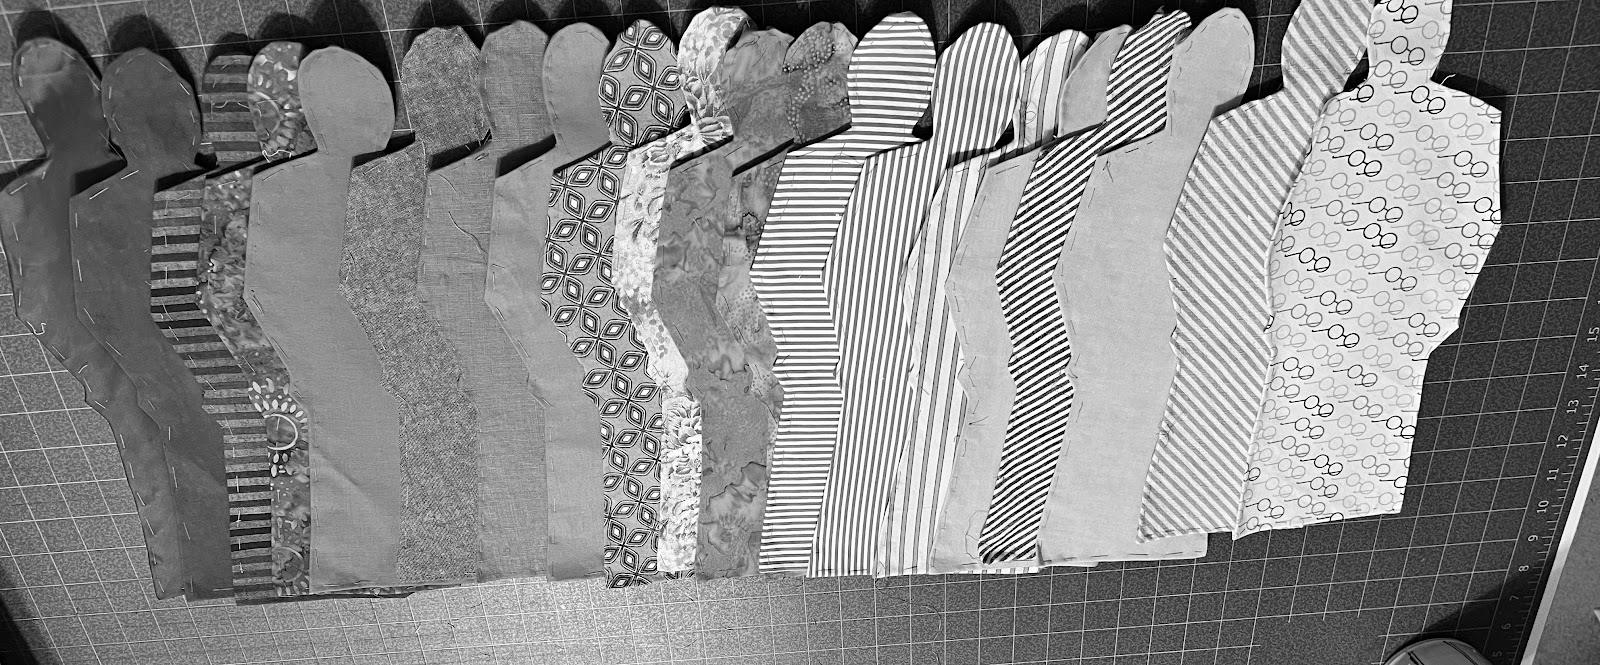
The quilt is composed of appliqued shapes of people from the back, silhouettes, really. I used remnants from various sewing projects and varied the contrast so that the upper figures read as fading into the background. The idea was to show lots of people turning their backs on Jesus.


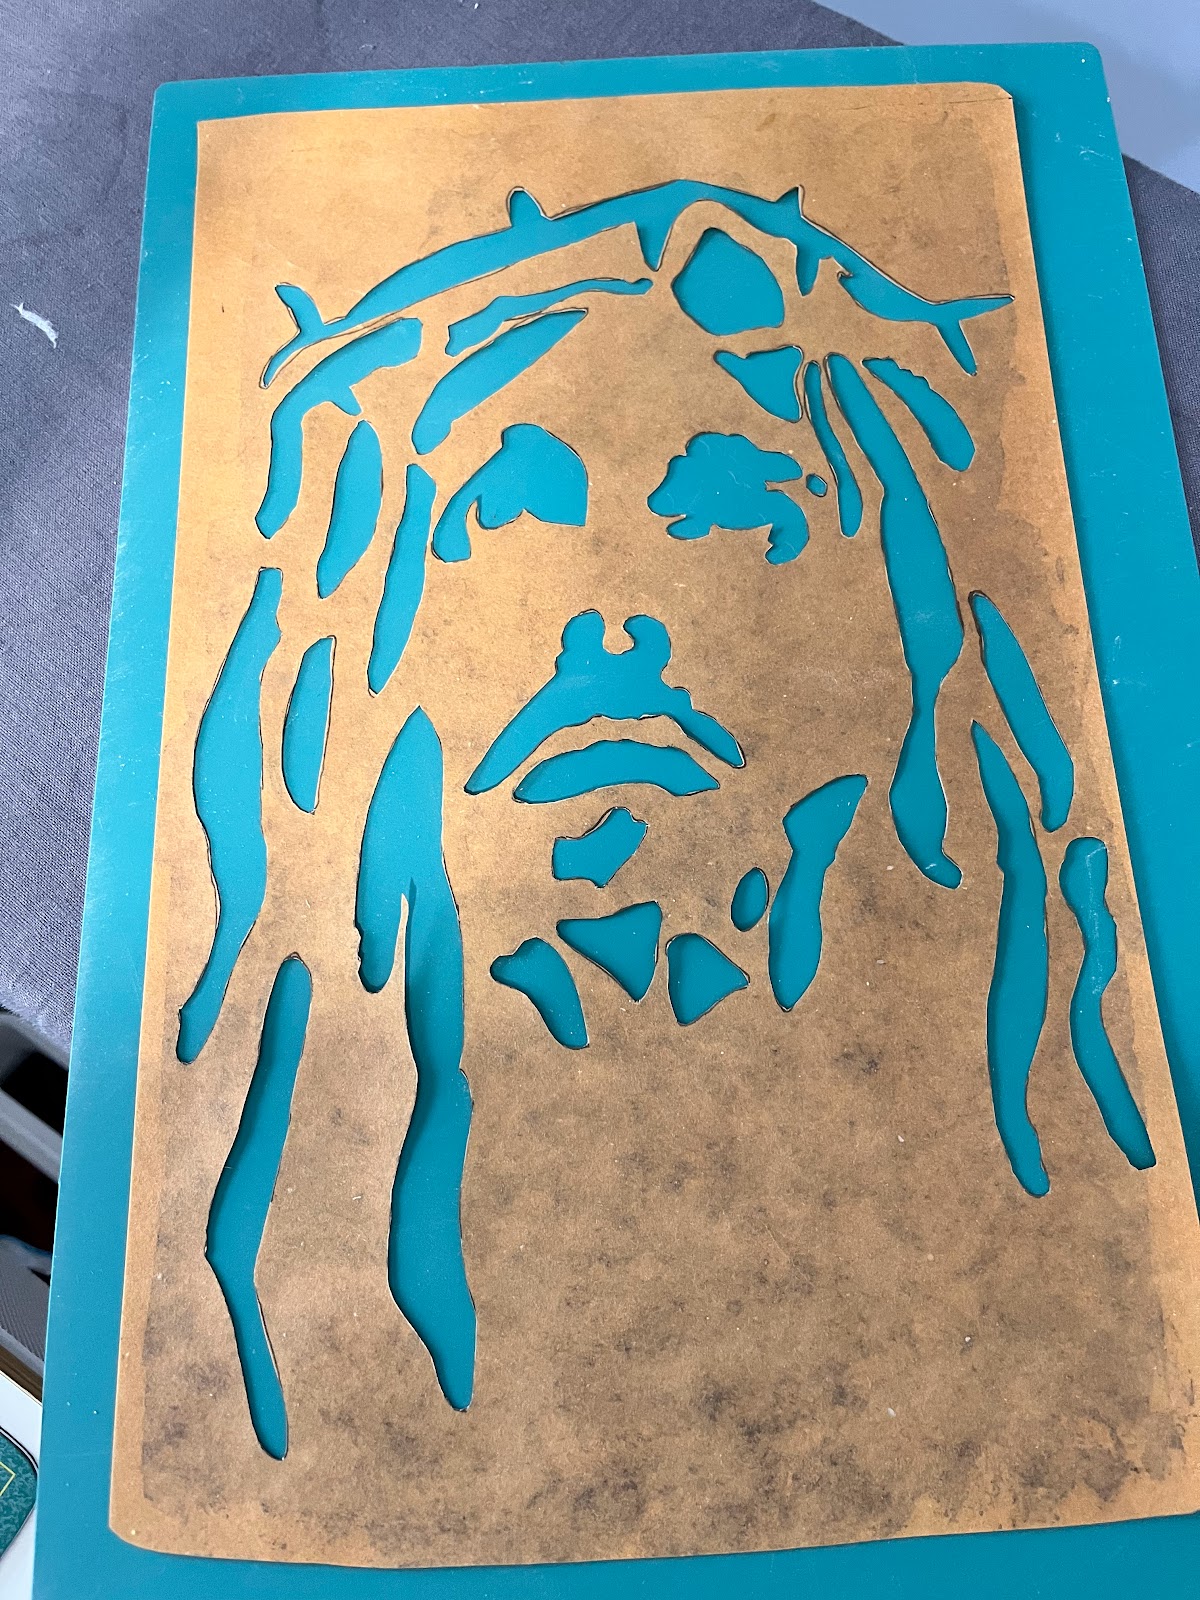
After much gnashing of teeth, I decided to cut a stencil of Jesus based on an image I found online. I never could find a source for the original image, as it only appeared on someone's Pinterest page without a link to the original. It was just right for my idea.


First I printed it on my printer in 8x11 format. Then I enlarged it 175% on the printer in sections. Next I taped the pages together and, using a light box, traced it onto some wonderful stencil paper I purchased from Roland Ricketts. I have no idea what that stencil paper is called, but I enjoyed working with it. It has been sitting in my stash for years. It was nice to finally use it.


The next step was to cut with an exacto knife. That was back-breaking, even using my raised cutting table. Luckily DH has a work table adjusted for his much-taller height. That allowed me to cut the stencil without the awkward curve in my back. It still took a long time but the result was and is very satisfying. I love that stencil.


It occurred to me that the back of my quilt would be a nice test spot for the paint. The fact that the surface is quilted in long fluid lines created a surface not ideal for use of a stencil. I pressed it as flat as I possibly could and taped it to the table. Then I taped the stencil to the quilt. Next I placed my blank screen over it and applied fabric paint to it using an old credit card. It worked.


After the back dried, I did the same to the front. Again the paint sank into the crevices formed by the quilting, but I decided to like the effect. I was done!


This year, I attached the quilt to the canvas with hook-and-loop tape, applying a glue-backed hook strip to the canvas. I attached some sew-in loop tape to a strip of fabric and hand-stitched it to the back of the little quilt. That way, I can remove it and add a sleeve later for hanging in my sewing space.

And I like it quite a lot. And it's done. And it has been hung in the church.

After I finished mine and could relax a bit, I pulled out all my previous pieces. That was another meditation for me. 

With one exception, my pieces are quilts. One is a watercolor painting. It was a good challenge to make but not as much fun as working with fabric.

Most of the other artists use paints - oil, acrylic, pastel. And some add 3-dimensional pieces. But mine are soft and can be rolled for storing. Typically I have sewn them to a canvas that is painted a dark solid color. That tends to destroy the canvas over time. We'll see how I like hook-and-loop tape over time.

Here is a link to the document about all Stations of the Cross for this year. 

And now for a little palate cleanser:


Wednesday, February 10, 2021

Vestments - One more new stole


This one is for my petite deacon friend. Deacons in the Episcopal Church are directed by the Bishop who manages multiple churches or parishes. Deacons are sent to a church for a few years and then sent to another church. Their assignments are very unlike those of priests who are selected by the parishioners. 

Often they are unpaid. Ours is unpaid. Another deacon friend is quick to remind that deacons are not required to work for free. But, in my experience, they do. So it is a real commitment, often accompanied by a paid *day job,* to keep the family afloat.

A bias tube from the blue wool creates a way to connect the two halves of the stole at the deacon's hip.

When a deacon arrives at a new church, she (or he) may have her own vestments, but given that abysmal pay situation, they typically rely on the vestments on hand at the assigned church. Those vestments have to serve a variety of shapes and sizes over the years. So a very petite deacon faces a challenge.

Our stoles dragged on the ground. Initially I tried to take them up for her. But I decided that this was more difficult than making her one to keep. It is not easy to make such a fine piece convertible from one size to another. And our next deacon may be 6 foot 6!

She already had her own stole for *ordinary* times, a green one worn for most of the liturgical year, as well as a white one for special holidays like Christmas, Easter and baptisms. I offered to make her one for advent, traditionally a beautiful clear blue worn during the month of December.


The easy part was the pattern. I just traced one of her existing stoles onto pattern tissue and added seam allowances. There were 3 challenges for me: finding the right fabric in the right color, creating the motif(s) on the stole, and matching fringe at the bottom.

Gail K in Atlanta is my go-to store for most planned projects. I imagined I could find some beautiful blue silk to use, maybe dupioni. Of course they had a zillion silks in shades of blue but nothing in a clear true blue.

I found a very expensive wool fabric in the perfect shade. I kept circling the store avoiding it until finally, I picked it up and took it to the cutting table. After all, I only needed a yard. The guy cutting it loudly called out the price TWICE before he cut into it. I know, I know. As I think about it though, the fine silk brocade and embroidered fabrics I've used in years past for church vestments were way more expensive.


With beautiful blue fabric in hand, I was ready to design, my favorite part. There was just one request. The dove is a very important symbol to her. There is one on her white stole and she wanted another on the blue one, if possible. 

finished applique with embroidered leaves.

I fretted about the dove a bit. The one on her white stole looks like a professional embroidery system produced it. But I did not want to farm out this part of the project, and did not know where to do so anyway. I wanted a way to create an applique using off-white silk shantung.

First I spent some time sketching doves until I was satisfied with two simple shapes to reproduce in fabric. I am enamored of the kind of sketching that simplifies realistic sketches until they just barely communicate the item depicted. Picasso was a master at this kind of abstraction or simplification.

Sewing friends suggested a variety of techniques for the dove applique. I've done a fair amount of needle-turn applique in quilt cottons, but I was not up to needle-turn applique with my silk shantung. I knew it would never make me happy.

One possibility was to apply fusible web to the back of the white silk, cut out the dove, and use my machine to stitch around it with a satin stitch. But I've never enjoyed working with that fusible stuff. The result can be lovely but the process has no lure to me.

Another possible technique was to use a light weight fusible interfacing, sewing it right-sides-together on the dove shapes. Then a small hole is cut in the interfacing and it is turned right-side-out so that the glue ends up inside the dove pieces. Then it is pressed to hold the edges down. This was a failure for me. The interfacing fell apart as I struggled to neatly turn and press the edges.

Next I tried the same technique with cotton batiste backing. After a few tries, this worked! I used a smaller stitch-length (2.0), trimmed the seams allowances to 1/8 inch, and used lots of steam when turning it right-side-out.

Then I realized that my dove was facing backwards, or it seemed so to me. Flipping it proved to be more challenging that I imagined, so I have a couple of backwards doves now in stash!

My next challenge was fringe. Where, oh where, would I ever find matching fringe? And then I realized that I could make my own with the blue wool. Really, duh.

I did learn that fringing the wool produced very different looks depending on whether the weft or the warp was removed. I cannot say which one actually worked but I knew it when I saw it!

I constructed this stole quite differently from the previous one I made. The outer fabric is the blue wool and the lining is a lighter blue rayon lining. I sewed one long edge of the wool to the lining fabric. Then I used a stiff cotton canvas to interface it, sewing it inside the long seam allowance. 

Next I pressed the other long seam allowance down and hand-stitched the canvas to it. Lastly, I hand-stitched the lining to the wool. I was once again amazed by how much control you have with hand-stitching. And it was a time to spend thinking about my deacon friend and her calling. A very sweet time, indeed.

I hand stitched the fringe to each end and pressed it carefully. Then I invisibly stitched the dove parts to the stole, as well as a small cross to the shoulder. Joy, for me. And isn't she lovely?