Saturday, December 16, 2023

Now and Zen Blend

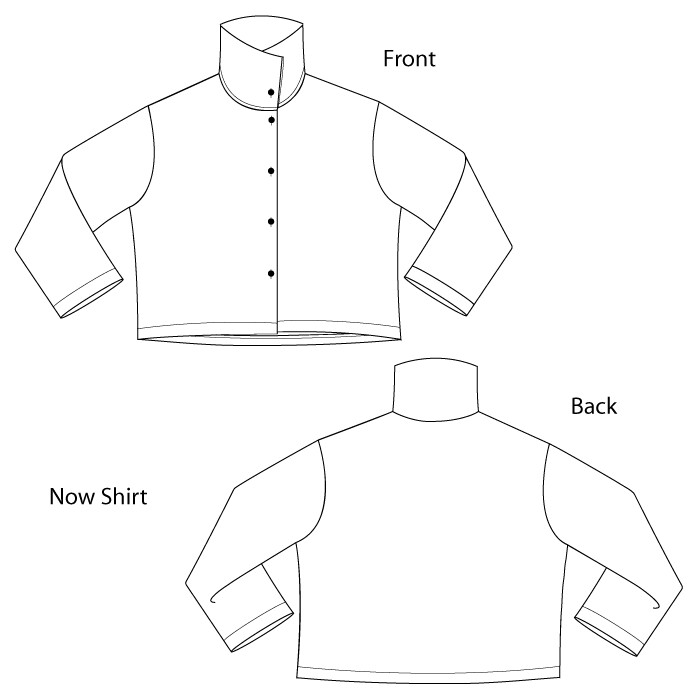
The Now and Zen shirt pattern from the Sewing Workshop is definitely a TnT, or tried and true, pattern. There is almost no fit to it in either view. The Now is shorter and has a *rolled* collar that encloses the raw edges. The Zen is longer, has a center back pleat, as well as a double collar.


While I've made both the Now and the Zen exactly as provided in the pattern, I have more often incorporated aspects of each into a top. 


In this latest make, I used larger of the two collars for the Zen, as well as the center back pleat. But I made it shorter, as I find that is easier to use in layering. I also narrowed the sleeves a bit, and finished them with a bias binding.

The fabric is silk noil, some that I dyed (and overdyed) as part of my wonderful class with Jane Dunnewold, Dye Mastery: From White to Wow. I dyed several lengths of the silk noil, using basically the same approach with each. 

I have learned that dyeing more than a yard is really challenging with this low-water immersion approach to dyeing. In this case, I had a yard, a half yard, and a quarter yard. I only needed the first two pieces, but I kind-of wish I had somehow incorporated the quarter yard. 

The pieces I used tend too much toward yellow, not my best color, especially this warmer yellow. For my next project, I think I'll decide in advance what to make and then rough-cut each piece before dyeing. It will be easier to handle but it does mean the results will have some variety. I think that's OK.

I enjoyed sewing this piece. It is easy to handle in all aspects of sewing. I especially enjoyed the hand-sewing part. I used the running stitch to finish the sleeve hems, the front and back hems, as well as the button bands, and the collar.

Definitely a zen project. And it wears beautifully - very cozy - even if it does make me look a little jaundiced.


Tuesday, December 5, 2023

'Tis the Season

To be frazzled and overwhelmed, yes? I am trying to manage this more deliberately this season by keeping my expectations low. In pursuit of that, I'll start by admitting that a recent project was less than satisfying.

version 2 a.k.a. final version

Diane Ericson's pattern, Fault Lines, has some wonderful details and it's not your everyday ho-hum design. 


As mentioned in several previous blog posts, I am crazy about the sleeves and will most definitely draft that onto the next top I make. By repositioning the underarm seam on the sleeves, and an amazing design for the hemline, the result is elegant. Even though the grainline is similar to most ordinary set-in sleeves, it just seems to hang better.


One front piece and both back pieces are cut on the bias. The other front piece, and the sleeves are cut on the straight-of-grain. I have had some good success with bias but it is not always predictable.


As posted in a previous post, I made the undershirt version of Fault Lines in a light weight linen. Bottom line, it was really too thin to work effectively without something over it. 

I was quite enamored of the trim on the armholes. Sometimes details catch my eye and trip me up. 

that sleeve, oh my.

The main reason this project was faulty was that the fabric was too thin. After talking a bit with Diane about it, I decided to try to retro-fit it with a silk organza lining, similar to one Diane made. The silk organza, really an interlining on hers, gave the shirt just the right amount of weight to work well as a stand-alone top.

version 1 a.k.a. the wadder

Ultimately I gave that idea up. It took me a while to wad it up and put it away, but I'm so glad I finally did so. And then I pulled out a very similar, but heavier linen and remade it with no lining or interlining. I mostly like it.

version 2

The reason for the failure I think emanates from the fact that so much of this piece is bias-cut. Had I started out with it interlined, it might have worked. Or it might have failed in any case.

version 2 worn with matchy-matchy Capitola pants

As I've learned, woven fabrics have two distinct bias grainlines. Depending on the position of the warp thread, it will drape a little differently. Standard advice is to let a partially finished garment hang a day or so to allow the bias to settle into place. I found that helpful, trying to align the two bias pieces - light weight linen and silk organza - sucked the joy out of the project. After way too many hours, I gave up.


Now that I have one wearable top from all the messing around, I am not completely sold on the style. It is different and I have worn it, but...maybe I just wore myself out.


I have to say that I still rate this pattern quite high, and I'll probably make it again. I think it's particularly lovely with both layers, as you can see in my muslin version.

Now, this double layer might have worked with the too-light linen

Meanwhile I am enjoying the colors of the season and have a new project up my sleeve!


Monday, November 20, 2023

High Five

I made something! An actual garment. And I am pretty crazy about it. But it is not for me. It is a gift. Oof. It's hard to let it go. And, of course, I don't have to do so. But I want to. Really, I do.


This super-cool, amazing fabric was a gift from a fellow University of Texas longhorn fan. Actually she's a much more loyal fan than I am. Though I have 3 degrees from the humongo university in Austin, I don't really follow them the way she does. Over the years, when she would visit her sister in Austin, she'd bring me a little momento.


The most recent gift was this very nice cotton piece of fabric. It is not your standard cotton-with-a-logo which is printed on very cheap almost-quilt-quality cotton. This is more of a fine pique. It was a dream to sew.


This lovely friend has developed tremors and cannot sew now. And her sister died. And, yet, she still thought of me when she was cleaning out her stash. I said thank you and gave her a hug.


Then I decided to make something for her, a little jacket for *game day.* I know in my heart of hearts that she will enjoy it more than I ever could. At least, that is my sincere hope. 


The pattern is the High Five, one of the Shapes patterns developed by Louise Cutting of Cutting Line Designs, and Linda Lee of the Sewing Workshop. They jointly developed a series of easy sewing, easy fitting garment in this line. The High Five jacket, is the best one.


And it is stinkin' cute, in this rather unique piece of fabric.


In her honor, I will watch the big game this Friday. I will visualize her cheering them on in this jacket.  We will share some joy or sadness with the results. I am lucky to have a friend like this, for sure.


Sewing friends are the best.


Shifting, Mixing and Splitting

The small piece that generated some interesting and informative larger pieces

The fun continues with Jane Dunnewold's online class, Dye Mastery: From White to Wow. I've learned and learned and learned. I am unaware of some of the lessons I've learned. And there is more.

Meanwhile, this sweet cactus is about to show off in my kitchen window.

The class end is near and I will miss it. So I will probably fix that longing by signing up for Jane's next class, whatever it is. This series has been time consuming, labor intensive, and deeply satisfying. I am so tickled when it's time to open the bundles and begin the arduous process of rinsing. And then when it dries, oh, my.

At the beginning - preparing undyed silk noil for dye bath 1

Here is my favorite at the moment:

Actually it's 3 pieces, all inspired by the smallish piece above. One is 1/2 yard; one is a full yard; one is 1.5 yard. Boy, did I learn something. In the future, I will limit the size of my pieces even when I hope to make a garment. That 1.5 yard piece just about did me in. And it is flawed, probably a reflection of the difficulty in handling a larger piece in this low-water immersion technique. However, there is enough to cut around the flaws, I think. 

In the picture above, you can see the flaws pretty clearly on the left hand side. Do you see the red speckles? It looks a bit like undisolved dye. I don't think that's what it really is. Rather I think it was a problem with my rinse out. 

Pieces being batched (bathed)

Lesson learned: the smaller the piece, the less likely I am to create flaws.

The 2 smaller pieces (1/2 yard, 1 yard) after Bath 1 - I used a cool yellow pure dye

DH says it does not look bad, just different. Hmmm...

The larger piece after Bath 1 - I used a warm yellow pure dye

Now I am day-dreaming about what I will make. Will it be a button up shirt, or a loose pull-over, or a jacket. Actually, I've eliminated the jacket idea.


The Hudson tunic from the Sewing Workshop is a real contender for these soft silk noil pieces.

First step in the rinse-out after Bath 2, all 3 pieces.

I have made and worn tops made from that very simple pattern many times. I do love the older Sewing Workshop patterns and reach for them time and time again.

I used the same combination of dyes for Bath 2, so they are beginning to look more similar.
Top piece is my inspiration

I definitely need to get all my samples organized into some kind of a notebook. I'm trying to determine the best way to store them. For now, I like having them out in the sewing room. 

After Bath 3, they seem to fit together though each is a bit different.
I am especially fond of the splitting that happens when pure dyes are mixed.
That is what I will be working on for a while, I think.

I am thinking maybe a loose-leaf binder with page-protectors to contain the dye recipes and small samples of my results.

The two smaller pieces. What can I make with a 1 yard piece and a 1/2 yard piece? Not much.

Perhaps these pieces need a 4th bath before becoming something...


Monday, November 6, 2023

TDF

Poor little blog. No October attention. And not a lot of sewing either. I'm in the middle of Jane Dunnewold's Dye Mastery which started in October. At the same time I was taking a live watercolor painting class and did some travel. So, not much sewing.

The Dye Mastery is terrific. It has challenged my organizational skills. I tend to approach my crafts as a seat-of-the-pants operation. With dyes, that means that nothing is predictable and some of my dyed fabrics and clothing have not been good. I do have the occasional win, but it's not predictable and I don't really learn from the experience.

Jane has inspired a new way of approaching dyes. And I have had a blast. Very, very few fails, and even those generated some knowledge I'll use in the future. It is physically hard work and I note that I'm fighting some lower back pain, as well as a tricky thumb joint.

It is SO worth it!

The approach is low water imersion, something I have limited experience trying and zero knowleedge, at least when I started.

We have some choices in materials. I chose to follow Jane's advice closely, rather than going rogue or even working with alternatives she offered. So I'm using silk noil for all samples, and PRO Chemical and Dye powdered dyes in the colors she lists. 

After a few mistakes - well, maybe more than a few - I've pretty much created a planning and recording regimen that is helping me to do two things. I am producing fairly predictable results and I am learning solid basics with this type of dyeing. In our most recent unit, we were given more lattitude in creating samples, so that we can learn from the previous lessons what happens and what we like.

I've taken several online classes with Jane. I always learn so much. She is an excellent teacher and truly understands her audience. We receive each lesson in 3 formats! And there are periodic Q and A sessions that are live. Lessons are released 1-2 weeks apart. 

First I created a 12 part color wheel. And then I knew I was hooked.

Next we overdyed - a concept I thought I understood, at least vaguely. I did not. So many interesting and surprising (to me) results.

At the end I'll have lots of samples and documentation to place in a notebook for deliberate dyeing. So far, the results are truly To-Dye-For.

Lower right corner is the Blue control; others are over-dyes of that blue.