Showing posts with label liberty. Show all posts

Thursday, April 8, 2021

Hey, Spring!

When I first moved from the northeastern US to the southeastern US, I noticed that no one said "Hello" or "Hi." Instead, people said "Hey." I think it's very southern. And now I say "Hey."

Hey, spring. I am grateful for spring this year, as I hope you are. It feels long-awaited after the year-plus of COVID. And I am loving color. Rich, saturated, vibrant color.


This ensemble jumped out of stash because I wanted color to fit the season. I have a number of other tops and bottoms that work well with these two pieces.

The top is the modified Liberty Shirt from the Sewing Workshop, a technique I first learned from Elaine of the Curvy Sewing Collective

Hers are primarily knit tees. My first version as a pull-over was in a rayon-wool boucle with some stretch. 

This fabric is mostly silk with a touch of lycra. I tend to avoid such combinations but, somehow, there it was in stash. Probably I could not resist the colors and pattern. They are glorious, aren't they?

The shirt is quite plain with a simple jewel neckline bound with bias-cut black silk dupioni, as are the sleeves. It fits over my head though a bit snugly. I may enlarge the neckline at some point, but it is not a struggle.

The angled front seams that create an uneven hemline are the best feature of this pattern, IMO. You can almost see the black piping I inserted using the same black silk dupioni. 

The pants are also made from stash fabric, a nice medium weight linen, the kind that rumples but does not wrinkle. That color in pants is a bit bold for me, as I tend towards black, navy, dark brown bottoms, but this had to be. 


Linda Lee mentioned that the Sewing Workshop's new jogger pants were drafted on the Kinenbi pants which, of course, I have in stash. I made them once.

I re-cut them to my new size and added fun pockets. 

The kinenbi pants have a cut-on waistband. I removed that and used a separate waistband. I prefer this method with most pull-on pants, because the waistband can be cut on the lengthwise grain. This makes insertion of the elastic much easier because there is no somewhat-bias cut edge to finagle. 

As I finished these, I noticed that the front of the Kinenbi pants is wider than the back. Evidently I did not notice that the other time I made these. It's a little strange so I double-checked the tissue. 

Yep, the front waist is more than an inch wider than the back.  I wonder if this was deliberate, perhaps done for stylistic reasons?

This does cause me to do some slight contortions to use my pockets, but it's OK. I probably won't use this pattern again for pull-on pants. From the Sewing Workshop line, I prefer the Quincy pants. But I do really like these pants. They are loose without being sloppy, I think.

This ensemble welcomes spring for me. How are you welcoming spring, if you are in the Northern Hemisphere, or autumn in the Southern Hemisphere?


Tuesday, January 26, 2021

Liberty Pull-Over

Remember the Liberty shirt from the Sewing Workshop? I think it may be the most popular top pattern they ever produced. I've certainly used it lots. There are similar shirts in the Cutting Line Design pattern list, as well as Tessuti, but the one from TSW is my personal favorite.

About 5 years ago, I book-marked a tutorial for making this into a pull-over knit t-shirt, as I just love that hem. And Elaine's t-shirts are great looking, I think.


The fabric I used is a rayon-wool boucle from TSW. They call it English boucle. It's a knit but fairly stable without a ton of stretch. It does not ravel, so no need for any special seam finishes.


It was fairly easy to cut, no curling but fairly thick so I cut it single layer. I'm finally convincing myself that this is almost always a good idea. 


I redrafted the front, filling in the lower center front cut-out, as described in Elaine's tutorial. The center front cut-out is so that the cut-on front facing is not bulky. And I remembered to make a forward shoulder adjustment. Yay!


It came together quickly. There were only 4 pieces: a front, a back and 2 sleeves. The exception was the neckline.


Getting the neckline right for pulling it over my head took a few tries. I have found that, with knits, the amount of stretch is hard to predict. Each fabric requires a different circumference in order to easily go over my head. I chose to finish the neckline with some bias-cut silk from a kimono remnant to reduce bulk. 


I cut the silk 2" wide, folded it lengthwise, and pressed lightly. At first I tried Linda Lee's 7/8 rule for making it but my bias silk did not have enough stretch for that. Instead, I sewed the binding onto the shirt almost one-to-one, two raw edges of the silk matched to the raw edge of the garment. I kept the silk on top so that it drew in the neckline just a bit as I sewed it on. I had previously stay-stitched the neck edge to keep it from distorting. Then I joined the ends of the silk binding, finished sewing it on the neck, pressed it away from the garment, folded it inside, and top-stitched.

At this point it looked like a sweat shirt to me. Not in a bad way, just a very casual garment to wear any time. I like that vibe during these COVID times. I won't feel too silly wearing it around the house.

I wore it a day or so, and decided it needed more. 

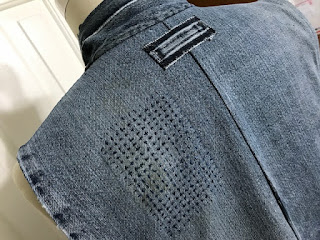
First I added a little kantha remnant to the back neckline, with a piece from the silk binding stitched on top of it. 

Then I just had to add a little sashiko, and then some more. 

Liberty pull-over with rayon jersey Picasso pants

I also added a little sashiko to the shoulders, as this fabric has a tendency to stretch out. I even noticed that on one of Linda's garments made out of this. The sashiko allowed me to draw it in and stabilize it in one pass.

Now I'm done with it. I'm really quite pleased with it. I want to make another maybe with a collar like the one in the tutorial. Maybe with Alabama Chanin vibes. 

I also have some re-sizing on some old pants to fix. I enjoy fixing things. Recently when I was wearing this wool coat, I realized I would really love pockets. I was lucky to find remnants in stash and added them. Voila! Just right.

fabric: heavy quilted wool & brown silk; pattern: A New Dimension, CLD


Friday, September 15, 2017

One white shirt, two pockets


White shirts have a shorter life span than some pieces, I've found. The white becomes dingy and the stains are in a place where no amount of boro design will save them. And so I will cut them up for quilts and other small pieces.

I added a button to an otherwise weak juncture in the construction at each sleeve cuff.
And, as it happens, white shirts are great fun to make. This one is based on a tutorial in Sew Confident from the Sewing Workshop. It is a hybrid of the Liberty shirt and the MixIt shirt. Their version is more of a tunic length but I kept the original length of the Liberty with its deep hems and pretty miters.


If you are familiar with these two patterns, you can probably see that the neckline is from the MixIt and the rest is the Liberty with shorter sleeves. I think the V neckline of the MixIt is sweet, especially when the tiny collar is omitted. And the Liberty hem is always appealing to me. I really like those diagonal seams in the front and top-stitching the facings creates a faux princess line.


The tutorial suggests that you shorten the sleeves at the shorten-lengthen line but I was pretty sure that would make the sleeves too tight on me. So I shortened mine 3" at the hemline and redrew the cuff portion. You may be familiar with this easy formula for redrawing the hem facing/cuff: fold the tissue along the new hem line and trace the side seams.


The fabric is a cotton shirting purchased at Gail K in Atlanta. They have such wonderful men's shirting. This one has a dolby weave so it's not just a plain white shirt.


Of course, Diane Ericson's pocket challenge is on-going so I added a pocket. It's placed too high in the picture at the top but I fixed that. It has an inverted pleat and a flap. The first version was too large so I'll save that for another project. It was fun to just play with a small piece of fabric, folding until it pleased me.


The pocket structure is a little more visible here:


I am enjoying following along with Diane's pocket challenge on Instagram. Hers are always so artful, whereas mine are more utilitarian.


This zippered pocket was added to my jeans vest after I wore it for the first time. Originally I constructed it with only one pocket - the breast pocket. I decided then that I'd enjoy it even more if it had another larger pocket. I was able to harvest a pocket from the scraps remaining from the raggedy jeans, as well as the zipper. The panel above the zipper is from the fly! I simply top-stitched it down, but it does not show much at all on the exterior. I like that it is behind the shadow of a pocket from the original jeans.


Now it's even more fun to wear!


Saturday, October 15, 2016

Two Liberties


This has been a favorite pattern for many years. I have made it in coordinated cotton and silk fabrics, as well as a rich turquoise silk dupioni. It must be a top-selling pattern from The Sewing Workshop (TSW) with its Issey-Miyake-styling. I've seen and admired many created by other makers.


One variation I've wanted to try is the t-shirt version. Knit fabric is cut so that the center front (CF) of the front piece is placed on the fold. Here is one I just finished in a sheer linen knit:


The front piece has a deep notch cut at the lower center front. This is hemmed to the facing. I forgot its purpose and so had to just cut it shorter and then use a hem facing. Facing the hem, as opposed to just folding it up, added some nice weight, I think.


I dinked around with the neckline almost to the point of ruining it. The neckline had to be cut down in order for it to slip over my head. It took 3 tries to get it right.


The simple slits in the sleeve seam is one of my favorite features of this pattern. But it is a little too slouchy with the sleeves down, so I roll them up twice when I wear it. The fabric is yummy up against my skin. It feels almost like silk.


This is a super comfortable top to wear but it feels oddly sloppy and frail at the same time.


So I made another one, using a pretty shirting from Gail K here in Atlanta. It was such a pleasure to make and I know I'll wear it a lot. There is something fresh about a simple white blouse.


The original collar on the Liberty is a Peter Pan collar rolled up to created a ripple effect. I like it but wanted to go more classic with this white shirt. So I borrowed the collar stand from the Florence shirt (also from TSW), making about 1/2 inch deeper as a stand-alone collar.


With this version, I will not be rolling up the sleeves so I'll enjoy that sweet slit in the sleeve seam.


When I finished this shirt, I had to go to Gail K to buy the buttons. It took such restraint to avoid walking out with yet another yummy cotton shirting. There were some terrific stripes and I know the Liberty is striking in a stripe!


I seem to be on a roll with older patterns at the moment. I'm sure I'll make another Liberty before long.