Showing posts with label indigo. Show all posts

Friday, August 30, 2019

Blue and White


Blue and white - forever and ever a favorite combination for me. Toss in a little rusty red, and my heart sings. Indigo dyeing is maybe even more seductive to me. It fits nicely with my craving for blue and white. I do love most colors and have trouble sticking with a curated palette, but I always return to blue and white.


So as I approach the birthday of DD1, my bio daughter, I created with my favorite combination. This is dangerous territory, making wearable gifts for people who don't want to hurt my feelings, but I cannot stop myself.

The first item is a haori in cottons and precious scraps from previous projects. I cut out the solid dark navy cotton with some petite mods for her tiny frame, and then proceeded to piece on top of that.


I've been down this road before, with less than spectacular results. So I was not surprised when I discovered that it just wasn't working.


All that piecing creates a very busy and somewhat stiff silhouette, like wearing a quilt. Not good.


So I took every single piece off the solid dark navy cotton and began again with the solid navy cotton pieces.

Finished Haori
I purchased this cotton print with the intent to use it with the solid navy, but I veered off course. Once back on course, I completed the haori, fully lined with the print.


Making sure that the outer coat and lining were as exactly the same size as possible, I sewed them together by first sewing the hems right sides together and adding several rows of top-stitching.


That's when I decided to add patch pockets.


I basted the two layers together to keep things from shifting during the finishing. The sleeve hems are a double fold silk bias, from a favorite blouse.


And I used some of the precious scraps for the front band. That was very satisfying.


At the end of this, my entire sewing room was covered with piles like this.


Rather than put it all away, I made DD1 a komebukuro or rice bag. Maybe she will like this, even if she doesn't like the haori. If not, I'll take it back and use it myself! I actually like it quite a lot. 


My first komebukuro bag, 6x6 inches
The komebukuro pattern is from kzstevens. I previously blogged about the red one. It is so worth the $6 for a PDF download. The download is just instructions and measurements, no pattern pieces.


This time I made the larger size described in the pattern. Of course, it's pretty easy to scale up or down, but I used her measurements. The finished large bag is 8x8 inches.
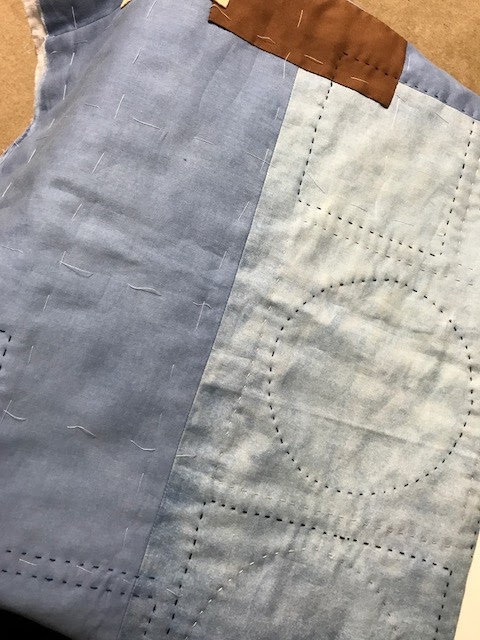

quilted bottom

I got to use some of those precious scraps (hooray!) and I quilted them to cotton flannel that was a little larger than the finished cutting sizes. 


Then I cut it down to the exact sizes listed in the instructions. This is key to making the pieces fit together.

I made a few changes to the instructions based on my previous experience making the small version. I made dots in the bottom square and quartered off the main bag piece, which is like a soft bottomless box.


That made it so much easier to attach the bottom to the body of the bag. I sewed it in 4 steps - one for each side of the square bottom, clipping at each corner in the main bag piece.


Outer bag before attaching lining
The lining was cut to the exact dimensions and sewn in 4 steps too. I got to use some scraps from Christina Daily's kind donation to me. It is shibori-dyed cotton and linen, and has a fairly beefy hand. There was no need to interface anything, given the quilting on the outside and weight of the lining.


I added a little rusty red square and lamp shades to the cording ends. These two additions finally did make my heart sing.


Note: I'm sure these little fabric scraps on the ends should not be called lamp shades. I just cannot remember the proper term, as taught to me by BSF.


I am so grateful for this satisfying hobby that allows me to surround myself with colors and shapes I treasure.

Monday, November 5, 2018

Seasonal Changes

It is finally autumn here in the southeastern part of the US. And it feels a bit like we're heading into winter quickly. It always feels that way because I love the feel and look of fall and want it to stay a while.


Twice a year, I move my clothes from one closet to another. It is always a good time to assess the items I'm not wearing or items that need mending. And I find myself enjoying the making of small tweaks in a few items.


First up is this black cotton shirt with white sashiko, constructed 2 years ago. It is made in a medium weight cotton that feels a bit like washed linen. I traced the pattern while at Sew Kansas. It has never been published by the Sewing Workshop.

This neckline is not part of the pattern. I adapted it from the Egyptian shirt from Folkwear.
I like it a lot and have worn it often. Black pants; black top; done. No surprise that is began to look quite washed out after a number of washings. And I have all this black walnut juice around, so I thought, why not?


But I did not want to dye the white sashiko so I removed it. I let the top soak in a solution of black walnut juice and iron water for several days, simmering it on the stove from time to time. I think it did get a bit blacker. Afterwards I restitched the sashiko. Yes, I did. Who does that?!?


Next up was an unlined version of the the Sewing Workshop Tremont jacket. I have used this pattern more than once. It's a charming pattern, I think, with its asymmetrical fronts, set-in sleeves, and face-framing collar. This one was constructed using a hefty loosely-woven cotton ikat. I added some red accents that got in my way when I actually wanted to wear it. And it really should have been lined from the get-go.

I now see that the red accents are just about invisible. sigh.
So I removed the red accents and lined it. I used a soft light-weight cotton Ikat for lining the body and rayon Ambiance for the sleeves. I really like the weight of it now.


I also added a new closure using remnants from another cotton ikat project. I created frog knots per Sandra Betzina and simple loops on the other side.


And then I decided I didn't like that and removed the closures. Jeez.


Last weekend I signed up for an indigo dip at my local recreation center. I looked around and saw this nice white top I made with a French pattern, the Cezembre. I had already adjusted it once, as the cotton shirting was too tightly woven for the sleeves to fit smoothly into the armscye.

Cezembre before
I tried to create a gradiated indigo color with the darkest portion at the bottom. It was impossible (for me) to keep the upper portion white, so I dipped it all. I'm pretty happy with this color. I do love indigo blue.

Cezembre after
Ah, well. Two steps forward, three steps back. It's all about the joy of working with cloth in my hands.

Sunday, July 2, 2017

Dual Solution

Reading Betty Edwards' Drawing on the Right Side of the Brain has led me to think of the duality of other aspects of life. Dr. Edwards discusses the roles and interference between the left and right sides of the brain, particularly as it applies to drawing. But there is duality elsewhere too.

This quilt has a very traditional side. This side is mostly symmetrical in terms of the layout of the overall pattern and even the layout of each block. I've used equal amounts of light and dark, square and circle. And it is a 36 inch square.


And it has a boro side. This side is clearly asymmetrical, almost chaotic, I think. The colors are unbalanced. The shapes are squares, rectangles and circles.


When I consider this side, I feel organized but a little sad.


And when I consider this side, I feel creative and a little bit wild.


This will hang in my sewing studio but I'll probably flip it from front to back some. It will hang above my thread cones, protecting them from dust and sun damage.

Friday, June 23, 2017

The blues

Sew blue. Mini layers.


This quilt has a conventional side and a boro side. You can see parts of the boro side that is made up of some fabrics that I dyed in an indigo class with Rowland Ricketts at Arrowmont several years ago. I'm in the process of hand-quilting it with size 12 pearl cotton thread, my favorite. The pattern mostly follows the conventional side, with one nod to the moon-shaped resist on one of the indigo pieces (boro side).

the more conventional side before quilting
I am amazed at how meditative this has been. That is probably a response to my full week of hand-sewing at Arrowmont this year with Jody Alexander. I can hardly bear to do anything but stitch on this. It's also a healing process during an upside-down week.


It's been feeling a lot like summer here, as it should, since we just passed the summer solstice. I wanted loose clothing and imagined this until I finally made it up.


It is the Urban tunic from Indygo Junction, again lengthened three inches so that I can wear it as a dress, probably more often than not with leggings or jeans underneath. I guess that defeats the purpose of loose clothing though.


The fabric is a medium weight linen that was delightful to cut, press, sew. I did goof one part. I really should have added interfacing to the pocket openings. I can always unsew and correct that.


I have a blue jacket cut out and ready to puzzle through. It is the All About Details pattern, view B, from Cutting Line Designs. I will likely enjoy that process a great deal. It is full of Issey Miyake details. The CLD patterns almost always include a few interesting details to try, but with the Miyake inspiration, this one promises to be a particularly good puzzler.


So I guess I'll continue to sew the blues for now.