Showing posts with label wearable art. Show all posts

Tuesday, August 29, 2023

Sewing, not Seeing, Red

Christmas prints on cotton, some with a little gold sparkle


A dear elderly - that is, older than me - friend keeps cleaning out her stash and giving me quilt cottons. Though my quilting activity is low, my traditional quilting activity is non-existent. Recently she gifted me a stack of red Christmas prints. I said Thank you.


Now I do love red. My dear sainted mother used to say that red is her neutral. When it's cold enough, I wear a long red wool coat bought at Talbot's decades ago in her honor. Red has a special place in my heart.


My local ASG has issued an art-inspred challenge to sew something - anything - inspired by Klimt's well-known Lady in Gold. The story behind the painting, particularly as portrayed in the movie staring Helen Mirren, is riveting and inspiring. I read a bit further about the painting and became curious about the dress the Woman in Gold wears in the painting.

Emilie Flöge shown here with Klimt

Emilie Flöge is the clothing designer behind the beautiful garments worn by those Viennese women in Klimt's colorful paintings. She has a storied past that piqued my interest. She was a companion of Klimt's, a hippie in her own time, a free spirit. Her designs are works of art, detailed, exquisite. 

Back panel


Her personal choice of clothing led to my response to the ASG challenge. I imagine such a linear dress as the one above might have been seen as radical in her own time. And Klimt is dressed similarly. You can see more of her designs here.


I chose a favorite pattern from Folkwear: 104 Egyptian shirt. I have used this pattern at least 4 previous times. There is something appealing to me in its rectangular lines. My most worn version is in an interesting white linen weave. Extended full length, it is called a galabia.

104 Egyptian shirt from Folkwear

By combining so many red prints, my hope was to get away from the Christmas theme. Some of the pieces were 1/2 yard; a few were a full yard. I cut them into 8" x 18" chunks. I created fabric, sort of, by sewing them together along the short ends, making one very long 8" wide strip of fabric. There was no plan to the order in which they were sewn together, except to avoid sewing identical fabrics together.

Center back panel of the Egyptian shirt

I chose the 8" width based on the size of the front and back pieces in the Egyptian shirt pattern. Along the way, I wondered if I needed to break up all that red print, perhaps with something like a black and white print piping. That did not work out - it looked more like Little House on the Prairie than it did Turn of the Century Vienna.

one of the sleeves


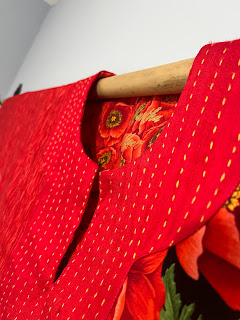
This pattern introduced me to the idea of flipping an exagerated facing to the outside of a garment. I have used that idea many times since on tops. I especially like the lines of this particular facing flipped to the outside. It reads exotic. I imagine that Emilie liked exotic. Perhaps this traditional Egyptian look would have appealed to her. 


For the facing, I used a remnant of red silk dupioni, sashiko-stitched in vertical lines. I backed it with cotton batiste. Once I had completed the garment, I thought to check to see how the shoulders lined up. Of course, I needed to do a little after-the-fact sashiko correction.


I added an interior back facing of the red print quilt cotton so that the back side of the cotton print does not show when it is hanging. I am pleased with how it looks hanging on the wall of my sewing room. 


The Egyptian shirt pattern resembles the lines of the Fit for Art Tabala Rasa pattern, another I've used multiple times. It also resembles the Sterling pattern from the Sewing Workshop. Good design is present in all cases. This traditional design includes clever and easy pockets in the side panels. 


My long-term plan for this piece is to use it as a summer weight robe. While at Shakerag this summer, my sweet roomie demonstrated the need for such when she accidentally locked herself out of our room following a shower in the communcal bathroom.


This piece already has a few stories sewn into it.


Friday, June 30, 2023

French Fold Shrugs

Pattern: French Fold Shrug from Diane Ericson


This is a super interesting pattern designed by Diane some years ago. It has floated across my consciousness over the years and I finally decided to make it. The overall design is almost zero-waste. The resulting garment is created through folding and strategic cutting. 


It starts with a rectangle, so the result also is related to the size of the rectangle which can be varied to create longer/shorter sleeves, as well as longer/shorter overall piece. This could be a small shrug or even a longish coat, I think. So many opportunities for play!

Sizes: S, M, L (easy to adjust up or down)

Seam Allowance: 1/4" or whatever you like.

Inspiration and Help: Diane Ericson (with Gayle Ortiz) and the big sew along by Gini

VERSION ONE: Size S (20.5" long X 54" wide), pieced linen plus a hand-dyed linen/cotton blend. The lining is light weight cotton dobby weave. 


The front *flanges* are folded to the back beneath the upper jacket. Likewise the back flanges are brought to the front and placed under the upper portion of the upper front. 


I had fun playing with the folds on version 1.

This looked fine flat on my table. The dress form was invaluable for evaluating the various folds. 

I added pleats and then overlapped the flanges to avoid that bulge in the back seen above.

Lessons learned: 

  • Stay stitch ALL the cut edges, especially the place where three seams come together
  • Lining ups the ante for learning. The place where 3 seams meet is not pretty.
  • I'm really a size M. Size S is too tight through the shoulders. There is no size chart.
  • I want to play with length, width and more folds.

On me:


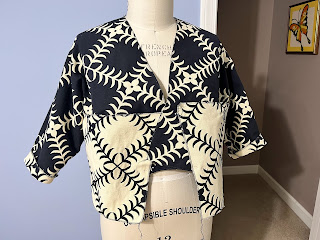
VERSION TWO: Size M (36" X 48"), heavy weight cotton double faced positive-negative weave on a thrifted piece from Goodwill. I omitted the lining.

Placing the garment flat is interesting but not as important as draping on the dressform.

Above the black side is right-side-out. Small cuffs are folded back and the front flanges are folded over themselves along where the side seam would be.

The same is done in the back. There are no side seams in this version. There is a vertical fold forming a vent of sorts.

Similar to the folds above except that the white side is the right side and the flanges are folded at an angle.

Above the front flanges are folded to the front and the back flanges are left to drape at the side.


The shrug is pretty but more ordinary if the flanges are left dangling. Here it appears the way a T-shaped kimono might looks if it is wider than it is long.

Lessons learned:

  • Stay stitich ALL the cut edges. Serging is challenging given some of the angles.
  • That positive-negative weave provides lots of design options.
  • Yep, I'm size M, though with different fabric I might even go up to L.
  • It can be completely zero-waste by changing the front cut a bit.
  • The off-white and black is not great on me. I may dip it in blue dye and see what happens.

VERSION THREE: Size M (36" X 48"), Brussels washers in a beautiful green apple green. No lining.


I chalked in the cutting lines and stay-stitched at 1/4" before actually making any cuts. 

After adding the second row of stay-stitching, I decided that I did not want the raw edges.


Binding: I tried binding the edge by simply wrapping it with light weight printed linen. I settled on a bias facing, about 1.5" wide to start. Binding the sharp interior edges has still proven to be quite challenging. This is especially true at the underarm juncture. Diane has some clever work-arounds for this that I may try later.

Wrong side at neckline. Binding is not sewn down yet.


Right side at neckline. The lower portion tends to fold back, creating a shawl collar effect in the front.

I even made a sample!


The sample is a right angle, so easier than my tight acute angles. The sample gave me a start. I'm still working on it.


Options, options...I think it's time to stop!

The neckline has variations too. If the pattern is cut with a T shape up the front, then a slight shawl collar is formed in the front. I've noticed this in some of Gayle's pieces (see the above link to Diane's blog)

On me:

Probably not the silhouette I'm after. I think the dress should be way longer, or the shrug should be re-proportioned with folds, making it shorter.

Lessons learned:

  • I stay stitched twice around all raw edges, once at 1/4" and again at 1/2", thinking I might leave it raw edged. However, the fabric ravels too much to do so, IMO.
  • The drape and weight of Brussels washer is perfect for a summer shrug.
  • Still size M.
  • Tried the zero waste option by cutting a T shape up the front. This creates a lovely fold-back that I like.
  • I'm still playing with the edge finish. For now, I've attached a bias piece of light weight printed linen to the edges and sewed it in place with a running stitch.
VERSION FOUR: This exists in my head. I think it would be great in a two-layer cotton (or other fiber) knit, sort of Alabama Chanin style with raw edges. 

The knit needs to be stable to handle raw edges. Some knits look rough when left raw-edged, IMO. For example, ponte can be left raw-edged, but I'm not fond of the way it wears, if the raw edge is visible. 

Alabama Chanin cotton knits would work great. And then I would add lots of sashiko. Wouldn't that be lovely to sew and to wear?

NOTE: I have not finished any of these. Finishing is overrated. Honestly this pattern lends itself to never finishing. It is hard to stop playing long enought to finish. 


Sunday, March 22, 2020

Now Sewing, for sure


Sarah Campbell
with a muslin she painted during my workshop
Welcome to the new world. It has now been a week since the corona virus changed the world. Of course, it's been coming for a while, but now we are all feeling it, I think. 

I hope you are safe and well and spending lots of time creatively. Sewing and other making keeps me sane and cheerful. So far. Perhaps you are finding that too.

Sarah has a fun sense of style. 
Like so many of you, I have a bit of a stash. Now is definitely the time to be sewing, isn't it. And I happen to have a few new pieces in said stash.

Striped linen, Japanese cotton crepe, plus two Sarah Campbell designs for Michael Miller
A few weeks ago, I was thrilled to attend another Sew Kansas in Topeka with Linda Lee of The Sewing Workshop (TSW). This one was very special because Linda brought in the delightful and amazing Sarah Campbell from her home in England.

Sarah's design for Michael Miller fabrics
Sarah is a well-known print designer with impressive credentials. She and her sister Susan Collier created together for over 50 years before Susan died. They created prints for Liberty of London, for example. Lately, Sarah has created designs for home goods found in West Elm.

Another of Sarah's designs for Michael Miller fabrics
For an entire week we created pattern, as Sarah called it. We started with plain newsprint, then muslin, and finally some fabric of our choice from the Sewing Workshop. We played with shape and color and repetition, all areas where Sarah is expert. It was loads of fun.

one of my muslin pieces
For my workshop design, I chose some wonderful light gray linen from TSW. It is one of those really good linens. You know the kind. Perfect weight, soft after washing and drying, lovely to sew, and a dream to wear.

another of my painted muslin pieces

I chose the Cottage Shirt pattern for my workshop piece in the linen.

But then I got cold feet. So, instead of painting the linen, I painted my paint shirt. I needed more practice. It was a fun project without any worries or second guessing.


If you look carefully, you may be able to see that I spelled out my name.


You may have noticed that my aesthetic is a a bit different from Sarah's. I do love Sarah's wildly exuberant style but that kind of painting takes a lot more practice than I've had. And I'm OK with simpler designs, in general.

Linda Lee, Sarah Campbell, and me!

Next I began to paint on the linen. 


My idea was to rough-cut pieces that could be re-cut when I was home. It was not a bad idea, exactly, because it's a lot easier to manage small pieces in shared spaces. I did not have the actual pattern with me and so made rough guesses as to the size of the pieces, based on a finished sample from TSW. 

Once I was home and had washed and dried the pieces, I began to cut out the Cottage shirt. Except for the cuffs, nothing fit! I had to completely rethink the pattern placement. This is what I thought the front might look like. I thought I would make the Cottage as a pull-over, perhaps with a front placket.


Here is the actual front:


Likewise, here is what I thought the back would be:


And here is the actual back:


Something else happened that surprised me, but should not have. Maybe it's more accurate to say it disappointed me. The color faded quite dramatically. I feel certain that the color attached to whatever sizing was in the linen and then washed away.


It's finished now. But I may go back in and paint some more, now that the sizing is gone. I'm running a little experiment with a washed scrap so that I can compare the results You can see in the picture the pre-washed paint (black and red swirls at the bottom), and the new paint I added at home. We'll see!


For now, I'm quite happy with this piece. I really like the cottage shirt and the linen feels great. Of course, for now, I'm all dressed up with no place to go.