Showing posts with label Mary Ray. Show all posts

Thursday, February 23, 2023

Bricolage

In January, I attended a virtual class with the wonderful Mary Ray via my local fiber art organization, Southeast Fiber Arts Alliance. And it was just full of the kind of inspiration that makes you want to drop everything and get into the sewing studio. It was just what I needed!


We have a follow-up virtual meeting this coming Saturday. During this meeting, participants' bricolage projects will be shown. I cannot wait to see what everyone made.

So what is bricolage anyway? As I understand it, the basic idea is to use what you have. That is not all that difficult given the embarassment of riches I have in my fabric storage.

1st Attempt:

Ever since I made a vest from my husband's old jeans, I have been collecting old jeans. I volunteer at a food pantry that also includes a clothing closet. I sometimes rescue items that are deemed unredeemable and end up in the trash. The clothing volunteers are on to me and pass along used jeans when not useful.

I now have a fairly substantial pile of old jeans, some already diassembled. I tried to disassemble more but, two bandaids later, I simply cut them apart. Next I made *fabric* by stitching pieces together.

My idea was to recover 8 cushions on my sunroom love seats. Ha!

2nd Attempt:

When I finished covering one cushion, I stopped. It did not look that great, honestly. And it took forever to piece together enough to cover a cushion. This surpirsed me. Not one to let go too easily, I converted it into this pillow:

3rd Attempt:

About a decade ago, we visited Spain on a tour. In Barcelona I became enamored of Gaudi, of course. How could I not? And I wanted fabric to remind me of Gaudi. 

Tours like ours did not include fabric shopping.  Instead I bought a tshirt with a Gaudi-esque print on the front. It was a too-small size but I liked the front print, so I bought it, figuring I could work it into something.

After capturing the maximum amount of fabric from the tshirt, I pulled out some thrifted tshirts acquired over the years, one of which I had used for another project, leaving me with less that one tshirt.

I selected the Odette pattern from the Sewing Workshop's Odette and Ivy. It's an interesting take on a tshirt with lots of assymetrical piecing. 
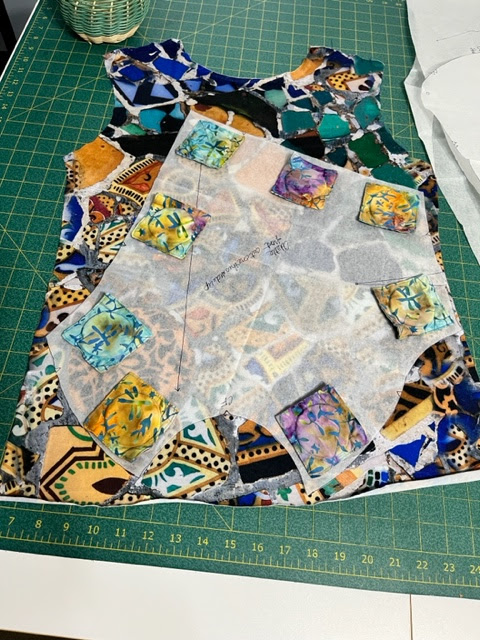


My approach was to start with the focus fabric from my Gaudi tshirt. I wanted to use it as efficiently as possible while keeping the focus on it. It became the front piece.

I worked from there using first one and then another shirt to cut out the various pieces of the Odette. In the end I did not have a lot of choices. The sleeves and the lower band take a good bit of fabric. Then I spotted the bicycle and decided to incorporate that.

Next I began to cut apart the other tshirts, using parts for first the large pieces in the pattern, until I had each piece cut out. I enjoyed the process so very much. And I like that the funky bicycle made it into the final piece.

OK - bring on the bricolage!


Tuesday, February 17, 2015

AND

Louise Cutting named this pattern A New Dimension, AND. For me, it is a finally-finished long-term project. I chose View B for its simple lines allowing me to use the Mary Ray quilting technique.


There are 4 main pieces - center fronts, center back, side front, side back - as the sleeves are cut-on. I guess there are five pieces if you count the collar. I did not use any facings because of the quilting technique. And I omitted the pockets. I kind-of wish I had kept the pockets.

I think of Mary Ray's quilted clothing technique as an approach to single-layer tailoring. I've used it on a single layer of wool for a light weight jacket, as well as for quilted garments like this.

This fabric is a fairly beefy wool from Sawyer Brook fabrics. This may be the heaviest fabric I've ever handled. It was lovely to cut, press and sew. It is hard to beat a quality wool for a smooth sewing experience.

First I rough-cut each pattern piece in the wool, cotton flannel, and Bemberg ambiance. The exceptions are the front pieces and the collar. For those I used a pretty brown silk shantung in place of the Bemberg lining fabric, because they show more. 

Then I quilted the three layers together in vertical lines about an inch apart using my trusty walking foot. Next I steam-pressed each piece into submission. The extensive quilting distorted the larger pieces with the cut-on sleeves quite a bit, so I was glad I left some margin for re-cutting each piece.


Initially I thought I would go with Hong Kong seam finishes but then I decided that I did not want any of this rough (but beautiful) wool anywhere near my skin. So I did something quite cludge-y.

I sewed bias strips of the lining fabric to one side of each seam. Then I pressed the seam allowance open and flat. Finally I folded the bias strips back over the exposed seams (inside the jacket) and slip-stitched the bias strip over the seam, completely covering each seam. This caused the machine stitched side to pop up a bit, so I went back and slip-stitched that down too.

Sometimes I go down a rabbit hole with a project. If I had planned everything, I probably would have abandoned the project and made another tee shirt. Or maybe a quilt.


I soldiered on, oblivious to the number of hours going into this jacket. Finally I finished all the edges (sleeve hems, jacket hem, front edges, collar edge) with a bias strip of the silk shantung. That was quite a pleasure after those crazy covered interior seams.

This is why I could never make a living sewing for others. I would starve to death. I do admire those who can parlay sewing into a career.

I am happy with this coat. Almost.

Now I'm wondering if the buttons are spaced badly. Because I used covered snaps, instead of button holes, I do have the option of moving them around. Someday. What do you think? Move the buttons closer together? Buy more buttons?


Actually I'm ready to wear this now. It was 25 degrees Fahrenheit today, so just in time. And I bought these leather gloves more than a year ago while on vacation in Italy. They really needed a proper jacket.


Wednesday, March 13, 2013

Atlanta Sewing Expo 2013

Mary Ray
Wonderful times seeing old friends, meeting new. So much inspiration. But, perhaps the best part, was to see so many women who are elegant, smart, creative, and encouraging of one another.

I took so many wonderful classes:

Mary Ray returned to Expo to teach and I took everything from her that I could, starting with her take on garments made from quilt store fabrics. As with all her pieces, the samples for this class were wonderful, even elegant. And her teaching style is so conversational, yet brimming with ideas I want to go straight home to try.

And of course, Mary walks the talk, looking so healthy, so put-together, so chic. So totally Mary Ray.

Sandy Miller has become another favorite teacher. She has accompanied Louise Cutting for quite a while and has always modeled those patterns to good effect. In recent years, she has begun to teach and I find that I learn much from her too.

Sandy Miller
This year, I took a course concerning the use of a single pattern to achieve many different looks. You get to keep the signature Louise Cutting details, and add a clever twist that changes the look quite dramatically.

And, like Mary, she walks the talk and looks fabulous always.

And of course, there was shopping. Patterns, fabric, notions, and an embroidered, storied story block made by impoverished women in South Africa. My favorite vendors are Louise Cutting, Laura Murray, and Vogue Fabrics.

This year, Linda Lee returned with new classes. I took an interesting wardrobe class from her. Though I don't totally agree with her take on it (exclusive use of Sewing Workshop patterns, for example), it was food for thought.

As usual, I left the Expo wanting to sew, sew, sew!

Thursday, January 24, 2013

Coolie Complete!

This time, I think it's finished. I really, really like this little jacket, Paco Peralta's Coolie Chinese Jacket. Such a cute style, so easy to wear and feel good in.

hidden pocket in pieced facing
And there's just something about red.

Maybe it's not my best color but I always feel good in it for some reason. It's just so cheerful in the middle of winter here in the US.

Finishing touches:

Finished the sleeve hems with bias binding in silk dupioni. No surprise that I had bright red in the stash.

button loops satin-stitched down on the outside
Finished all the interior raw edges with Hong Kong binding from a pretty shirting remnant.

Tacked down the loose bias tubes, turning them into button loops. Much more practical than wrapping them around the buttons.

Yep, I'm pretty sure it's finished, for now anyway.


Hong Kong edge finish


Monday, January 21, 2013

Paco's Coolie Jacket

Paco includes a label in the pattern. Love it.
Paco Peralto designs and sells such interesting patterns. They are hand-drafted in pencil, and all the sizes are included. The instructions consist of the yardage requirements and little else.

Because they travel across the Atlantic to me, and a bit of postage is involved, I decided to go ahead and buy three - the Coolie Jacket, the T (shaped) coat, and the drape front shell. I started on the Coolie Jacket first.

Iteration 1.2
It is a very simple design, not really requiring instructions. There are just two main pattern pieces - the front and the back.

I'm so spoiled by using Louise Cutting patterns. So I did wring my hands a little, and scratch my head a bit on the in-seam pockets.

I shopped the stash and used red silk noil for the face fabric. I decided to use a Mary Ray quilting technique, and chose cotton flannel for the batting, and Bemberg Ambiance for the lining. I channel quilted it following the front grain line. This created a nice chevron effect on the lower portion of the cut-on sleeves.

The pattern calls for 60 inch width in the fabric, but my noil was only 45 inches. I pieced the sleeves on both the front and the back, based on where I encountered the selvage. This fit in with the chevron in the quilting, as the new seam followed the grain.

pretty curved vents on the side
As is becoming a habit of mine, I ran out of fabric. This meant I had to piece the front facing piece. So I added a third in-seam pocket where the piecing occurred.

This jacket is evolving. Garments often do this. I sort of enjoy it.

This time, I tried some experiments. Now that I've worn it, I know some things that will be changing.

First, I created a closure with bias tubes on one side, to be wrapped around buttons on the other side. It doesn't really work, so I will convert the tubes into button loops.

Second, I pinked the edges of the facing. In version 1.0, I turned the edges of the facings under about 1/4 inch and hand-stitched them to the lining. This created a hard line, particularly across the back. Not good-looking.

In the next iteration, I pressed the pinked edges flat and hand-stitched them to the lining.

That worked until I wore a white blouse under it. Lots of red fluff stuck to the shirt. Next I will apply a Hong Kong Finish to the edge of the facings, similar to what I did to the seams. Hope the hard horizontal line doesn't appear again.

bracelet length sleeves
Third, I was so short of fabric that I had nothing to finish the sleeve edges. Since I'm taking classes from Jude Hill, I decided to try to simply attach a raw edge binding.

More red fluff. So off with those bindings, and on with some ordinary (enclosed) binding in silk dupioni of similar color.

The raw edge was pretty, just not practical in this instance.

In sum, I think this is a cute little jacket, perfect to toss on over lots of clothes. There is PLENTY of room for layers underneath. I believe I will wear it often.

Tuesday, August 9, 2011

Vest Revisited

This is my second vest using Mary Ray's techniques. I think it may be my first success. I just realized that I never posted the finished first vest. I think it may be related to my dissatisfaction with that one. Both use Nancy Erickson's FSG 1945. This is a TNT pattern for me after taking a fitting class with Pam Howard in 2010.
This one combines my better understanding of Mary Ray's techniques with a piece I made in order to teach Sewing With Curves in my ASG neighborhood group. It was my demo piece for brute-force-curved piecing. I had imagined it as a summer top. The brute-force-method threw off the grain so much that it was never a satisfactory piece for a top. Following Mary Ray's class here for ASG, I realized it might work using her techniques.

Mary's quilting technique requires that only the lining layer be on grain. The top-layer may be in any direction and the quilting process stabilizes it all. I used a quilting technique - foundation piecing - in my first quilted vest. Way too stiff.

Back After
For this one, I cut up the curved pieces from my demo so that I could distribute those meandering rivers over the vest in a somewhat balanced manner. Then I worked on the center back pieces. I found that my choice of fabrics to piece was too busy.

So after simplifying that, I moved on to the other pieces. I had to adjust in a few other areas too. The vest is lined with Berberg Ambiance. This is great stuff for a bottom layer in a quilted garment. Fluid. Light. Especially with Mary's recommended batting: Hobbs Premium Wool. 

But the lapels fold back and it would not do as a surface fabric. Initially I thought I'd use the cotton batik that is dominant on the piece for both the top and bottom layer in quilting the lapel. This felt heavy and stiff, so I pulled out a remnant of a solid brown linen-rayon blend. It is soft and the solid color provides a nice resting place for the eye. It also shows the curved quilting nicely.

Using Mary's version of the Hong Kong seam, I finished each seam with china silk. I also used a larger bias strip of this to finish the hem. The armholes are finished with a narrow bias strip in the dominant batik fabric so that it blends. The front edge is finished with a different batik - sort of a curved stripe. I included a bias loop on one side of this edge so that I could use a large button as a closure.

Mary covers a great technique for single layer jackets with collars and lapels. It is in Threads issue #100. I used this on my previous vest, but decided I'd rather omit the collar on this one. When the weather is cooler, I think I'll like it with a turtle neck. 

Now I'd better get started on back-to-school sewing for my grandgirls!