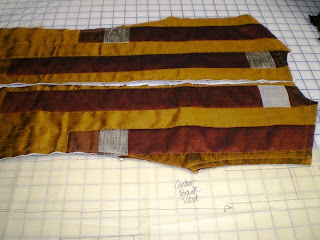
Next I began the truly Zen part of the process - the actual quilting. I placed generously cut solid silver silk dupioni pieces on the flannel, creating the quilt sandwich. Of course, the stripped silk side was already attached to the batting (the flannel) so it is a little different from ordinary machine quilting. Except for the collar pieces, I decided to simply stitch-in-the-ditch on the strip-pieced side. I think creating new quilting lines would be too much. And the quilting is very subtle on the silver side.

For the collar pieces, there was really just one seam in the strip-pieced side, joining a silver tip to plain gold silk dupioni. So here I first stitched-in-the-ditch and then channel stitched at approximately 1" intervals. Again the quilting is subtle and the hand of each piece is very soft. I now have 12 small quilts since there are 12 pieces in this vest!
At this point, the pieces were still generously cut, not aligning perfectly with my muslin pattern pieces. So I stitched around the perimeter of each piece about 5/8" from the edge of my little quilts to hold them securely in place. Finally I put each original pattern piece from my muslin on top of each quilted piece and re-cut, following the precise edges of the pattern piece. Then I trimmed off the excess silk stripping.
For some pieces, like center backs and center fronts, I wanted the pieces to appear as mirror-images of each other. For example, the center back has a seam so there are 2 center back pieces. To do this, I created a pattern tissue from the muslin piece and placed the tissue over the untrimmed piece and determined where to trim off the edges. Each center back piece was trimmed separately. This allowed me to trace part of the patch-work design onto the pattern tissue when I cut the first piece and then flip the pattern tissue and precisely place it on the remaining center back piece prior to cutting this 2nd center back piece. Now my center back pieces (and front pieces) are more-or-less mirror images as can be seen in the picture of the center back pieces.
- Threads #98 January 2002 "Basics: Seam Finishes" page 20
- Threads #100 May 2002 "Binding Notched Collars" page 52
- Threads #122 January 2006 "Batting for Quilted Garments" page 49
So I'm now looking forward to actually attaching the vest pieces. What fun, even if I never actually wear it!


No comments:
Post a Comment