From time to time, I have thought about making a jacket version. I have seen so many pretty San Diego jackets, in person and online. First there was this vintage version from the basement at the Sewing Workshop in Topeka KS. I think it must be a beefy silk tweed. Isn't it lovely?
The one below has been modified (I think) to make the fronts extend horizontally to create an extended collar with more vertical drape.
And the Sewing Workshop hosts a trip to France that often involves lovely versions of the San Diego jacket. I watch for those posts on Instagram. Always inspiring.
So this time I made the jacket version. My fabric is a linen-cotton blend from stash. I think it is a Robert Kaufman fabric probably purchased at a quilt shop. I like these fabrics that are cross-dyed, this one in burgundy and off-white. The addition of linen makes it right for a light-weight fall jacket.
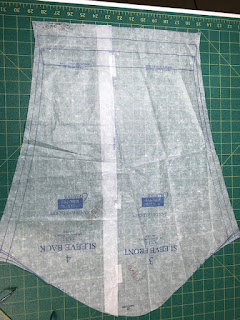
It is not dramatic and the making is quite simple. There is a Y seam that forms the collar, but otherwise it is very easy. The pattern does have a 2-piece sleeve but I'm not sure why. It is strictly a design feature and that may be enough. It would certainly be an interesting place to insert some pretty piping. You can tell by looking at the two pieces that this is essentially a one-seam sleeve. The seam between them follows the straight-of-grain.
To me, this seemed a blank slate for pattern play. I started by reading about the anatomy of sleeves in Helen Armstrong's Patternmaking for Fashion Design. That gave me the basics of drafting a sleeve but it did not help me alter an existing sleeve. A quick search on Youtube led me to a tutorial by Christopher Sartorial. His video was clear and exactly what I wanted.
The first step was to convert the original two pieces into a single piece. This was accomplished by overlapping the seams by 1.25" as seen below.
 |
 |
| Original 1-piece sleeve after seam allowances were removed. |
Next I traced lines according to the tutorial to create an under sleeve and an upper sleeve. Below you can see that I've added back the 5/8" seam allowances, as well as hem allowances.
 |
| Each says Right Side because I discovered I had created a right upper sleeve and a left lower sleeve. |
This version of a two-piece sleeves has one vertical seam that is visible from the front and another that is visible from the back. It creates the effect of an elbow dart and some very subtle shaping.
I tested this by creating a toile for just the sleeve pieces and basting them into the jacket armhole. I was (as usual) short of fabric and could not take a chance on my pattern play failing. But it worked. Hooray! I was still a little short on fabric and so added cuffs to my sleeves.
In fact, I had to further piece one of the sleeves. You can see if you look carefully below that the undersleeve has an extra horizontal seam. I sort of like that it's different from the other sleeve.
The original pattern includes a single back piece cut on the fold. In order to add a bit of upper back shaping, I created a center back seam.
Because this is a light-weight unlined jacket, I sewed flat-felled seams throughout.
 |
| Finishing the armscye |
This was a satisfying experiment. I hope to wade into pattern drafting just a little deeper because this was fun. And honestly I don't need clothes so fast sewing is hard to justify.


This is just perfect for you Martha! I love crossweave fabrics also, and the color you chose is really nice. Thanks for the interesting photos about the pattern work.
ReplyDeleteI have that pattern from years ago – not the updated version. I love the pale silk tweed version – Bea Arthur used to wear clothes like that in the Golden Girls and I always admired her wardrobe. You've given me some inspiration to get out the pattern and make one. Do you know what the differences are between the original version and the updated version?
ReplyDeleteI like very much what you did to the sleeve on your new jacket and the cuffs. The top button looks dramatic and just right. Well done. Brava.
Thanks, Barbara! The updated pattern includes 2 additional views. It includes the original jacket which is a bit larger, plus two blouse versions that are redrafted to fit more closely. That's why I think it will work to make a blouse version to slip under this jacket version.
DeleteI love the crossweave also. this has given me an urge to do something like this myself. I have a question, in viewing the other shirts you have made I do not understand the patch on the back. Is there a purpose or it is only decoration?
ReplyDeleteThanks, Jane. I often include a little patch on the back shoulder of a garment to give it a little back interest. I have not done so with this garment. Yet!
DeleteSo instructionable! Wonderful sewing lesson. Thanks, Martha. :-)
ReplyDelete