Monday, August 30, 2021

Bias Work - the Emerald Top and Dress


After I read Patti's review of the Emerald Dress and Top, I needed it. It is still hot as Hades here and I do love a linen dress.


This shift dress is composed of 4 panels - two fronts and two backs. This is necessary to in order manage the bias cut. The direction of the bias is mirrored across the front and across the back. It provides a flattering vertical seam down the front and back.

First I made the top in a beefy linen that I thought of as hot pink. DH called it red and it does read red too. After all, what is deep pink if not red? Either way I find it to be a delicious color, and it makes me feel good to wear it. I bought it at my local wonderful Gail K on Cheshire Bridge Road in Atlanta.

Patti made it clear that the top was very cropped. I knew that would not work for me, as my bottom pieces, by and large, have elastic waistbands. This is not a pretty look. Plus I do like a bit more coverage. She added 2" to the pattern pieces and so did I.

It is still a little short at the sides, but not bad. And adding 3 inches might have made it too long in the front and back. The hem is dramatically curved, similar to a man's shirt. 

I love, love, love the drape of bias cut linen. It makes me feel feminine, yet comfy.

Next I pulled out a nicely aged black something-or-other I purchased at my local ASG tag sale a while back. It is at least 60" wide and I think I started with about 4 yards, plenty for the dress. And something else too.

The burn test and the selvedge read rayon, but I think there is something else mixed with the rayon, maybe cotton. It is lightweight, not transparent though. The drape is just right for a bias cut garment, I think. Maybe I said that already. This pattern benefits from some pretty drape.

The dress and the top have deep facings for the armholes, the neckline and the lower hem. These are top-stitched in place adding a nice design detail and serving a good purpose. I especially appreciate the deep hem facing with the light weight black fabric, as it adds some needed weight to the bottom.

The dress includes in-seam pockets and a novel (to me) manner of insertion. It is actually easier than the way I usually insert in-seam pockets. The directions have you attach a single pocket to each front side seam and each back side seam separately. 

Then you align them for stitching of the side seams. I'm not sure the result is as flat as my usual method. This one requires that you press the side seams to the front, something that feels a little off to me.

I am also not thrilled with the finishing on the lower point of the armholes. It finishes nicely on the right side, but not as cleanly on the inside. 

The instructions were not as exacting there as I would have liked. On the top, I just winged it in the absence of specifics in the directions. 

On the dress, I lined up the dots and only stitched between the dots, thinking that might provide a clean finish inside. Ultimately it made no difference. The inside is still a little unsatisfactory.

All of these points are picky, picky. It is a beautifully drafted pattern with clear directions. I think it would be instructive and helpful for even a beginner. 

And I think the shape is just darned nice.


Thursday, August 19, 2021

Color Blocking and a Theorem

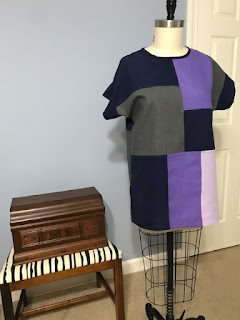
Just finished my upteenth* version of the Eureka top from the Sewing Workshop. It is this month's featured garment for the subscription service called Sew Confident!

Their kits include woven rayons and silks of similar weight, so not really color blocking. I do like the combinations in their kits, but not enough to buy a kit. I might have been able to pull off something similar but decided there was serious danger of creating a quilt top with armholes. 

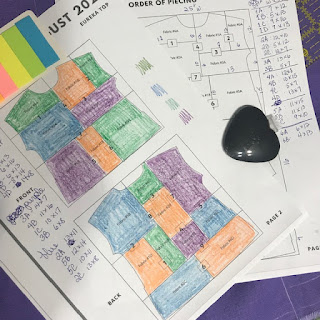
And I have all these lovely remnants. You may know how much I love my remnants. I was fairly sure I'd be able to make a color-blocked version with solid colors of linen. So I started mapping out my plan. 

I remembered a theorem from my college days - the four color theorem. It states that any map can be drawn with 4 colors and no more. The theorem assumes that countries (or counties or whatever) have adjacent sides. It does not matter how many sides or how many countries. I think that's pretty cool. But as my daughter says, Nerd alert!

So I set out to draw and color (with 4 colors, of course!) the shapes needed for my new Eureka top. First I checked the finished measurements of the Eureka in a size XS. I have made this in size Medium, but wanted a closer fit, particularly since this was to be lengthened. As a more cropped top, the Eureka is good in a crisp fabric. There is no real fit needed in this top, as it is mostly boxy. It does need to big enough, of course. 


I traced a size XS from the lengthen/shorten line up. Then I carefully moved the pattern piece down 9" and traced the rest of the size XS. It was easy to true up the intervening cutting lines.


I made several copies of the line drawing provided by the Sewing Workshop for this project. I like the overall plan of their blocks, notably long rectangles, instead of wide rectangles. Their measurements did not match the size XS I wanted to make so I set out to determine my own measurements. I kept roughly the same proportions.

I planned on 1/2 inch seam allowances for piecing the blocks. I chose 1/2 inch simply because I wanted to keep the arithmetic simple. I added 1 inch to the overall width and length of each rectangle. This allowed me to make flat felled seams and avoid lumps from piecing.

I have lovely colored pencils that were just right for this project, but I was not careful enough to try for the actual value (tint) of my fabric. This tripped me up a few times but was a good puzzling activity.

Here were my fabric choices:

  • Navy blue silk twill
  • Very light lavender linen
  • Medium purple linen
  • Medium gray linen
All are of about the same weight. And the values are 1 dark, 2 medium and 1 light.


Carefully following my map, I cut each piece according to plan, pinning a label to each piece. As I got close to finishing my cutting, I realized that I did not have enough of the lavender linen to follow the plan. I think there were 3 pieces left, all requiring the lavender linen. 


In one case, I split the planned piece, using a smaller lavender plus one of the other colors. In the other two cases, I chose one of the other colors instead of the lavender. I made sure there were no adjacent pieces of the same fabric.


It was quite fun. 


I began the piecing process by sewing two pieces together for the front, then two together for the back. The Sewing Workshop line drawing provides a perfect road map for the order of construction, though that's not hard to determine. I still managed to confuse myself. The solution was to finish piecing the front, and then piece the back. That way, I could keep the maps handy and triple-check things as I went along.


After the piecing, the rest was super easy - shoulder seams, neckline binding, arm bands, then side seams. I finished the neckline and the armbands by hand but all else was finished by machine.  


After trying it on, I decided on 2" hems. Then I finished it and took some pictures to see which pants I like best with it. I actually have a pair of Quincy pants in the navy blue silk, but they need to be modified. They feel quite sloppy with this tunic. The Helix and the Hudson pants work great though.


After looking at the pictures and reading a bit more, I realized that I made the front too long. TSW recommends adding 6" to the front and 9" to the back. I added 9 (or was it 9.5) inches to both.  The silhouette was not the best on my 5'5" frame.


In the end I created very deep hems so that my finished Eureka is 6" longer than the original. I am pleased with the result. I wore it today and felt good. Isn't it nice when wearing a piece makes you feel as good as making it did!


*The pattern calls for using a knit but I much prefer a woven for this pattern. Just checked my closet and found 5 previous Eureka tops. That does not count the first one I made in a rayon jersey. I never was happy with that one and gave it away. 

L to R: rayon woven stripe, B&W linen pin stripe, green pique, white textured linen, blue cotton voile

I have some more ideas for the Eureka top, a nice canvas for creative playing.

Tuesday, August 10, 2021

Working in Threes

When I was learning to play bridge from my mother, she said Once, Thrice, but never Twice. At least, I think she did. She was talking about the etiquette of shuffling cards of course.

Recently I've been working with a pattern three times before I'm ready to move on. This happens if it relatively simple and successful. Some patterns are definitely one and done. I won't name any but you know what I mean.

I just finished 3 Ogden camisoles, a pattern by True Bias. Such a lovely little pattern, deceptively simple, beautifully drafted.


I imagined myself drafting a camisole. It seems so very simple. But fit is everything in a camisole, IMO, especially if the cami is in a woven fabric. So, as usual, I decided I preferred to test a pattern over drafting my own.


The Ogden cami kept popping up on my IG feed. There are many versions of it out there, every body shape, and with numerous *hacks,* some I'm ready to try myself. Check these out!

For my first one, I used a thrifted man's shirt I had already deconstructed. This required that I add a center back seam and cut the facings cross grain. For fun, I added the pocket from the shirt to the lower front.

And I love the result. It is now my favorite hot-weather PJ top.

For this first one, I followed the excellent instructions fairly closely. 

I note a few features and characteristics of this basic camisole pattern by True Bias.

  • The straps are fairly short, providing more modest coverage which I like.
  • The straps are cut on grain giving them more stability.
  • There are no bust darts. Instead the front hem is longer that the back with more *swing.* I think of it as rotating the darts to the lower hem and then releasing them. In fact, I may reverse this for a closer fit in a future version.
  • It works great as a layer under a jacket. I probably won't wear it stand-alone outside of the house. I tried several things to cover the bra straps without much success.
  • The front and back necklines are V-shaped, so pretty I think. 
Let's look at the shape of the front and back. You can see the *swing* I describe above, where darts could be placed.


And the back fits more closely to my body.

And now let's look at bra strap coverage. You can see in the picture above that, even though the straps are about 3/8" wide, they do provide some bra strap coverage, especially in the back. The front coverage is not quite as good. But it is darned close!

I'm thinking that some ladies would be OK with that. I might be one of those ladies. But first I tried to add some loops. My bra straps can be separated and I thought I might secure them by feeding them through these thread bars, right where the strap attaches to the bodice.


This first set of thread bars were too small for my bra straps so I removed them. This is just a PJ top anyway. 

For the purple linen version, I added larger thread bars. It worked OK but required that I thread the bra straps through the bars prior to putting the bra on. This meant some gymnastics to get into the bra-top combo. I have no pictures of that. You're welcome.


I wore the purple one to church with this Tabula Rasa linen jacket in a similar linen, and my striped cotton Urban pants.

When I returned from church and wiggled out of this bra-top arrangement, I found that the stress on the straps had caused one strap to fray where it attaches to the bodice. So I will be wearing these under jackets where it won't bother me to have bra straps showing.

The facing is just right. It stays in place with a little hand-stitch to the side seams and hardly shows on the next two versions of the Ogden - one in purple linen and one in gray linen. I chose to fully line the purple linen one in a navy cotton batiste. This did not change the construction at all. I think that a future Ogden will be layered by lining it with something longer than the outer layer. This would be fun in a semi-transparent fabric too.


I imagined I might improve upon the construction but learned otherwise when I constructed the third version in a gray linen remnant from stash. 


The straps are basted to the front piece prior to attaching the facing. Little slots are left behind for attaching the straps to the back piece in another pass through the sewing machine. You can see that here in the directions.


Because this is essentially sewing in a circle, I thought - why do it in two passes? I learned why. 

The straps are short enough to distort the *circle* making it nearly impossible to keep in place if sewn in one pass. And it's even more difficult to be certain the straps haven't twisted. Definitely not worth the trouble.


That's why I buy patterns.


The hem is a standard men's shirting technique, sort of a double fold baby hem. I made this third one from a remnant and I had to cut half of the front on the cross-grain. I like the center front seam but it did cause some distortion in the front hemline. I ended up cutting some bias strips of the striped fabric used on the facing to make a hem facing. 


I am finally pretty happy with it. It will be worn under another Tabula Rasa I made using Diane Ericson's Wing and a Prayer panel. 


Sweet pattern. I recommend it.