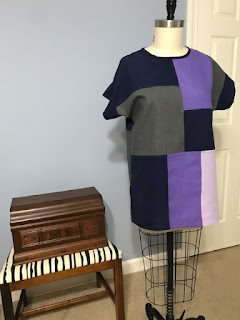
Just finished my upteenth* version of the Eureka top from the Sewing Workshop. It is this month's featured garment for the subscription service called Sew Confident!
Their kits include woven rayons and silks of similar weight, so not really color blocking. I do like the combinations in their kits, but not enough to buy a kit. I might have been able to pull off something similar but decided there was serious danger of creating a quilt top with armholes.
And I have all these lovely remnants. You may know how much I love my remnants. I was fairly sure I'd be able to make a color-blocked version with solid colors of linen. So I started mapping out my plan.
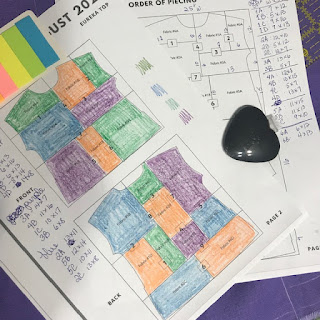
I remembered a theorem from my college days - the four color theorem. It states that any map can be drawn with 4 colors and no more. The theorem assumes that countries (or counties or whatever) have adjacent sides. It does not matter how many sides or how many countries. I think that's pretty cool. But as my daughter says, Nerd alert!
So I set out to draw and color (with 4 colors, of course!) the shapes needed for my new Eureka top. First I checked the finished measurements of the Eureka in a size XS. I have made this in size Medium, but wanted a closer fit, particularly since this was to be lengthened. As a more cropped top, the Eureka is good in a crisp fabric. There is no real fit needed in this top, as it is mostly boxy. It does need to big enough, of course.
I traced a size XS from the lengthen/shorten line up. Then I carefully moved the pattern piece down 9" and traced the rest of the size XS. It was easy to true up the intervening cutting lines.
I made several copies of the line drawing provided by the Sewing Workshop for this project. I like the overall plan of their blocks, notably long rectangles, instead of wide rectangles. Their measurements did not match the size XS I wanted to make so I set out to determine my own measurements. I kept roughly the same proportions.
I planned on 1/2 inch seam allowances for piecing the blocks. I chose 1/2 inch simply because I wanted to keep the arithmetic simple. I added 1 inch to the overall width and length of each rectangle. This allowed me to make flat felled seams and avoid lumps from piecing.
I have lovely colored pencils that were just right for this project, but I was not careful enough to try for the actual value (tint) of my fabric. This tripped me up a few times but was a good puzzling activity.
Here were my fabric choices:
- Navy blue silk twill
- Very light lavender linen
- Medium purple linen
- Medium gray linen


This is absolutely beautiful...and thank you for sharing your process!
ReplyDeleteWONDERFUL....Thankyou Martha!
ReplyDeleteThis is beautiful and inspirational!
ReplyDeleteLOVE this! And thank you so much for the 4-color theorum. Totally makes sense and I think may come in helpful! (Talk about scraps ... wanna compare?)
ReplyDeleteLovely and that length adjustment was perfect.
ReplyDelete