This pattern has been in stash forever but never actually used. The Nomad Hobo is a free download from fabric.com. I think I downloaded it as a possible pattern to use during Camp Sew 'n' Sew.
I thought using free patterns would keep the costs down. But, really, not worth the effort to make the instructions beginner friendly. This one is labeled Advanced Beginner, appropriately I think.
I do really like the shape for a large tote. For me, it will not be a purse. I like small purses - they cannot get too heavy. But this will be a great project bag for travel, I think. And, from time to time, I feel the urge to make a bag. Now I'm thinking I want this in leather!
Like some other free patterns I've used, this one is lacking in a few areas. Most of the areas are quite minor and can be worked out easily by an experienced sewist.
The exterior fabric is probably a cotton-linen blend, almost canvas-like. The interior fabric is a Japanese cotton, a little nicer than ordinary quilt cotton. I used some of the striped canvas fabric for parts of the interior.
The pattern pieces are not numbered and the descriptions in the accompanying instructions are not always clear. The seam allowance is 5/8" except around the zipper where it is 3/4" - this, in the fine print.
My magnetic snap is fairly strong and I felt like it needed more reinforcement than the suggested interfacing. Also you are instructed to place the snap on the sides with the long handle. I would have liked it better on the short sides.
The pockets are not lined. This is not a big deal except interfacing is recommended and I don't like the look or feel of that stuff on the inside of a pocket.
In general, the pockets are overly complex and the diagrams do not support the complexity. Some real beginner opportunities for in-seam pockets were ignored. One pocket is zippered - this one definitely benefits from lining, as it's easier to line a zippered pocket, enclosing the zipper tape and raw edges nicely.
The bag and its lining are constructed with 4 vertical seams each. The four seams meet at the bottom of the bag. I think it's hard to make this neat if construction does not include stopping each seam 5/8" before the bottom raw edge.
Attaching the handle after dropping the lining into the bag is quite clever. I followed those instructions blindly and was pleasantly surprised! It is a tiny bit lumpy but not enough to fret over. I did add a little patch to make sure that area is strong.
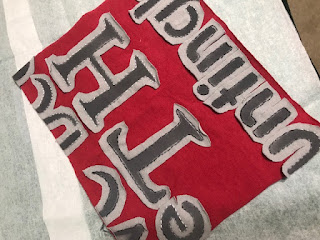
Here it is with my current Alabama Chanin project. I made some poor choices on this - it is heavy. Wearing it feels a little like getting my teeth x-rayed. The stencil I chose contains random words in a variety of fonts and sizes. I outlined the letters with a 3-ply back stitch.
The lettering is not large enough to cut away much of the top layer inside the letters.
One alternative is to cut away the outer layer by cutting around the letters. I tried that on my sample and it was not good. To me, it looks like letters stuck to a flannel board.
All of this adds up to a heavy top that stands away from my body. I have not attached the neck binding, so I'm thinking of some *fixes.* Currently at the top of my list of fixes is to cut away the back layer around the letters. It won't change the look at all but it should make it lighter allowing it to drape in a more attractive way.
It won't take long to deconstruct and I think I'll be much happier. Fingers crossed. Still thinking about this. Ideas?


Also it turned out way larger than the drawing suggests.
ReplyDeleteI actually love your top, but if it doesn't FEEL good then that's not working. You could open up the front seam and turn it into a jacket. Maybe with snap tape or something to compliment the graffiti-like quality of the lettering. The bag, too big for my poor shoulders! But as usual, even your interiors look great!
ReplyDeleteWow! That is one l a r g e bag! I could pack it, but likely would not be able to carry it!
ReplyDeleteI love the way the AC top looks as it is, but understand why you feel the need to “fix” it! It has to feel as good as it looks!
I've made quite a few AC style tops and jackets over the years, and your idea of cutting away all the "excess" fabric on the underside is exactly what I would recommend! I have done just that more than once... the only time I want the extra layers is for either a jacket, or if I am wanting to add substance to a hemline, but particularly for a knit top, some more "flow" is all to the good. As long as you allow enough border between the design stitching and the part you cut away (I usually aim for between 1/4" and 3/16" by eye) it will be durable enough to launder, and significantly lighter and more flexible. I have even just added in small amounts of particular knit underneath a motif when I didn't have enough to start out with the entire pattern piece.
ReplyDeleteThanks, Alison. This is reassuring. I would really hate to ruin this!
DeleteOh your top is lovely I love the writing. That bag is a perfect gift for a friend so thanks for the review.
ReplyDelete