It has been over a month since I blogged. What happened? I have been sewing but not really much for myself. Rather I finally forced myself to finish a project I started in November for my church. I will recount that in another post, primarily in case I make such liturgical pieces again! I'll want to avoid repeating all my mistakes. And there were lots of mistakes to avoid.
This past Sunday, I took it all to church and declare it DONE. Then I got right to work sewing for ME!

First up was the February project for Sew Confident! from the Sewing Workshop. In my previous blog post I described the new rendition of the Quincy jacket, now called the Sterling jacket. This year in Sew Confident! the theme is wardrobing. The Sterling jacket was for January and a hack of the old Hudson pants was introduced as the February project.

The Sewing Workshop offered kits and I chose a dark navy linen version. The lovely thing about a kit in this situation is that I was sure it would match the Sterling jacket which I also purchased as a kit. The navy blue linen did not disappoint. It is one of those lovely soft linens that looks good when it wrinkles, especially after washing and drying. It is a nice medium weight fabric that was great fun to cut, sew and press.

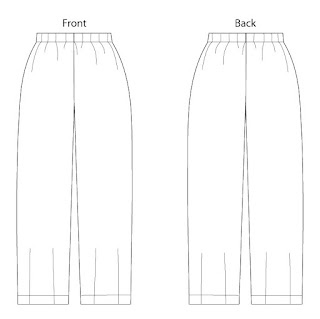
The Hudson pants are a basic pull-on pant with only two pattern pieces - the front and the back. It is interesting because of the vertical hem darts. The addition of the darts slightly alters the overall silhouette and shape. I've made them a number of times but not recently.

The hack for February includes eliminating the hem darts, creating a separate waistband, and adding pockets. The pants are shortened, then overlapping panels are added to the bottom of each leg. The final piece has a silhouette similar to the original Hudson pants, I think. But it was more interesting to sew.

There was also an emphasis on pants fitting for February so I took the opportunity to re-evaluate my older Hudson pants to see what I liked and what I did not. I lost some weight about a year ago now, so I took in the side seams to create a more slim look.
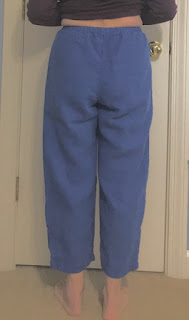
I made a serious attempt to *read the wrinkles* in the back, but also consulted a bit with Linda Lee via email before making the new pair of Hudson pants. The separate waistband gave me a late-stage opportunity for better fit than the original cut-on waistband did.

I made some tweaks and then added extra height in the upper portion of the pants. Before adding the separate waistband, I pulled them on with a knotted elastic at my waistline. Once I adjusted the position of the elastic band, I marked the elastic position with chalk. I stay-stitched along the chalk mark and cut off the excess fabric. Then I added the waistband and inserted the elastic.

For elastic waistbands, I like to mark the two ends with Sharpee so that when I insert it, I don't twist it. The elastic provided with the kit is softer and more stretchy than I'm used to sewing with and required a number of tweaks to make the pants fit closely enough. I may need to remove just a little more but it's pretty good for now.
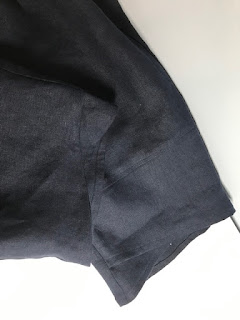
I do love the pockets. They are lifted directly from the West End pants, an older TSW pattern. They are simple and fool-proof to add to any garment with side seams, I think. The result is a pocket with very little bulk.

This is a super comfortable ensemble and really puts me ahead in my spring sewing. The jacket is made with cotton jacquard from the January project kit. The pants and tank are linen from the February kit. There were lots of color ways from which to select a kit. I'm pleased with my navy pieces. Just right for spring in Atlanta.

I cannot decide if I like the overall length of the pants. I may take the lower panels off, shorten the main body of the pants, and then re-attach the panels. They seem just a little longish for cropped pants.

Through careful placement of the Hudson pattern pieces, I had enough fabric left over to make a little shell using the MixIt tank pattern. Yay!

I adjusted the hem so that it is a sort-of shirt tail. I used the navy linen for a bias facing around the neck but created a more light weight bias facing for the armholes using a not-silky silk from stash. I used it in the Sterling jacket too.

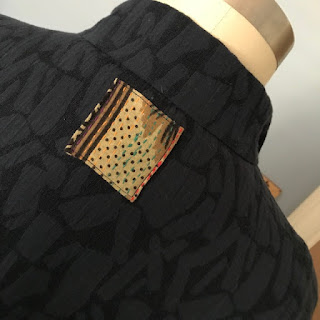
I added a little patch to the back neckline (of course) using my shrinking stash of remnants purchased from Mieko Mintz. I'm sad to report that she no longer sells her remnants, as far as I know. Too bad. They are so pretty.

And now I have an ensemble! Maybe. Should I shorten them?
I’m thinking these aren’t really cropped pants. Didn’t LLee say ankle length? When you “find the answer”, let me know as I finally got mine cut out! Love the navy on you, makes you look downright skinny!
ReplyDeleteI find Linda's hems to be all over and that is just fine with me. So I do what works for my height.
ReplyDeleteI like the length of your new pants, they show off your sandals and when seated wouldn't ride up too much. They also make you look tall. I always enjoy your writing and your projects are an inspiration. Thank you
ReplyDeleteWhat a great ensemble you now have, I think the trouser length is fine as is. I am just making up my Sterling jacket, my first Linda Lee pattern and I am enjoying it.
ReplyDeleteWhat a nice outfit. Pants length is perfect. Accentuates your long and lean look.
ReplyDeleteReally enjoyed your blog and the photos. I am a bit behind and need to fit my pants pattern. The Sterling Jacket was a pleasure to sew. Love sewing on woven fabric.
ReplyDelete