Thursday, August 30, 2018

Vogue 9081 - Dipped Again


Vogue 9081 is a dress pattern designed by Marcy Tilton, maybe two years old. I first made it in a bright orange linen. Yes, what was I thinking.


In its next iteration I eliminated the lower band, making it a tunic. Still too bright though, so I dipped it in black walnut juice. Over time it has seemed to continue to fade just a little to this:


So I dipped it again. I had kept a bucket of black walnut juice from fall 2017 in the garage. It had developed a white glaze over the year but after I removed that, it was still potent for dyeing and this is the result:


This color is the best so far, I think. I'm letting it cure a bit before washing it thoroughly and so I may lose a little color still. But it's almost time to collect black walnuts again so I'll have a fresh supply soon.


Meanwhile I'm experimenting with avocado skins and seeds based on Botanical Colour at Your Fingertips by Rebecca Desnos on rayon challis. It is certainly not dramatic but I do like the soft pink I got with the skins. You can see how subtle the results are below. And the process is multi-stepped over multiple days.

white rayon challis dyed with avocado skins, rinsed and dried (on left)

But I'm not easily diverted so right now I have another piece of rayon challis in the pot with juice from the seeds. It looks so pretty now but will no doubt be more subtle when it is finished and dried.


Sunday, August 19, 2018

Picasso Top and Pants


The Picasso Top and Pants pattern is the latest from the Sewing Workshop. When they sent out an email teaser, I was instantly enamored. The pants are cropped with lantern shaped legs, similar I think to one of the blog posts on their site. I have long admired that remake of their Trio pants but never got around to following their directions for modifying the pattern. At this point in my sewing life, I know I would much rather follow a pattern than draft one. So, thanks for drafting these pants, TSW!

The pants have the TSW signature waistline that is elasticized with a flat front. I first encountered this waist treatment in their Plaza pants that I've made many times. It has the comfort of an elastic waistband but places no bulk over the tummy. Their instructions still have you omit the elastic from the flat part but I've found I like it better if I extend the elastic all the way around, using the elastic in the flat part as a stiff interfacing. It only requires a vertical stitch through the elastic on either side of the front band. Without the elastic to support the waistband, my pants are prone to fold over there. It is not pretty.


The fabric is a chocolate rayon crepe - very drapey - ordered from Stone Mountain and Daughter. Rayon is not my favorite fabric but it works here as it has great drape and is light weight. It's still summer here in the southeastern USA. And this brown will wear beautifully on through the fall.


During the hot summer months, I am drawn to loose pants that are cropped like these. It is so much better than shorts on me! And they feel great.


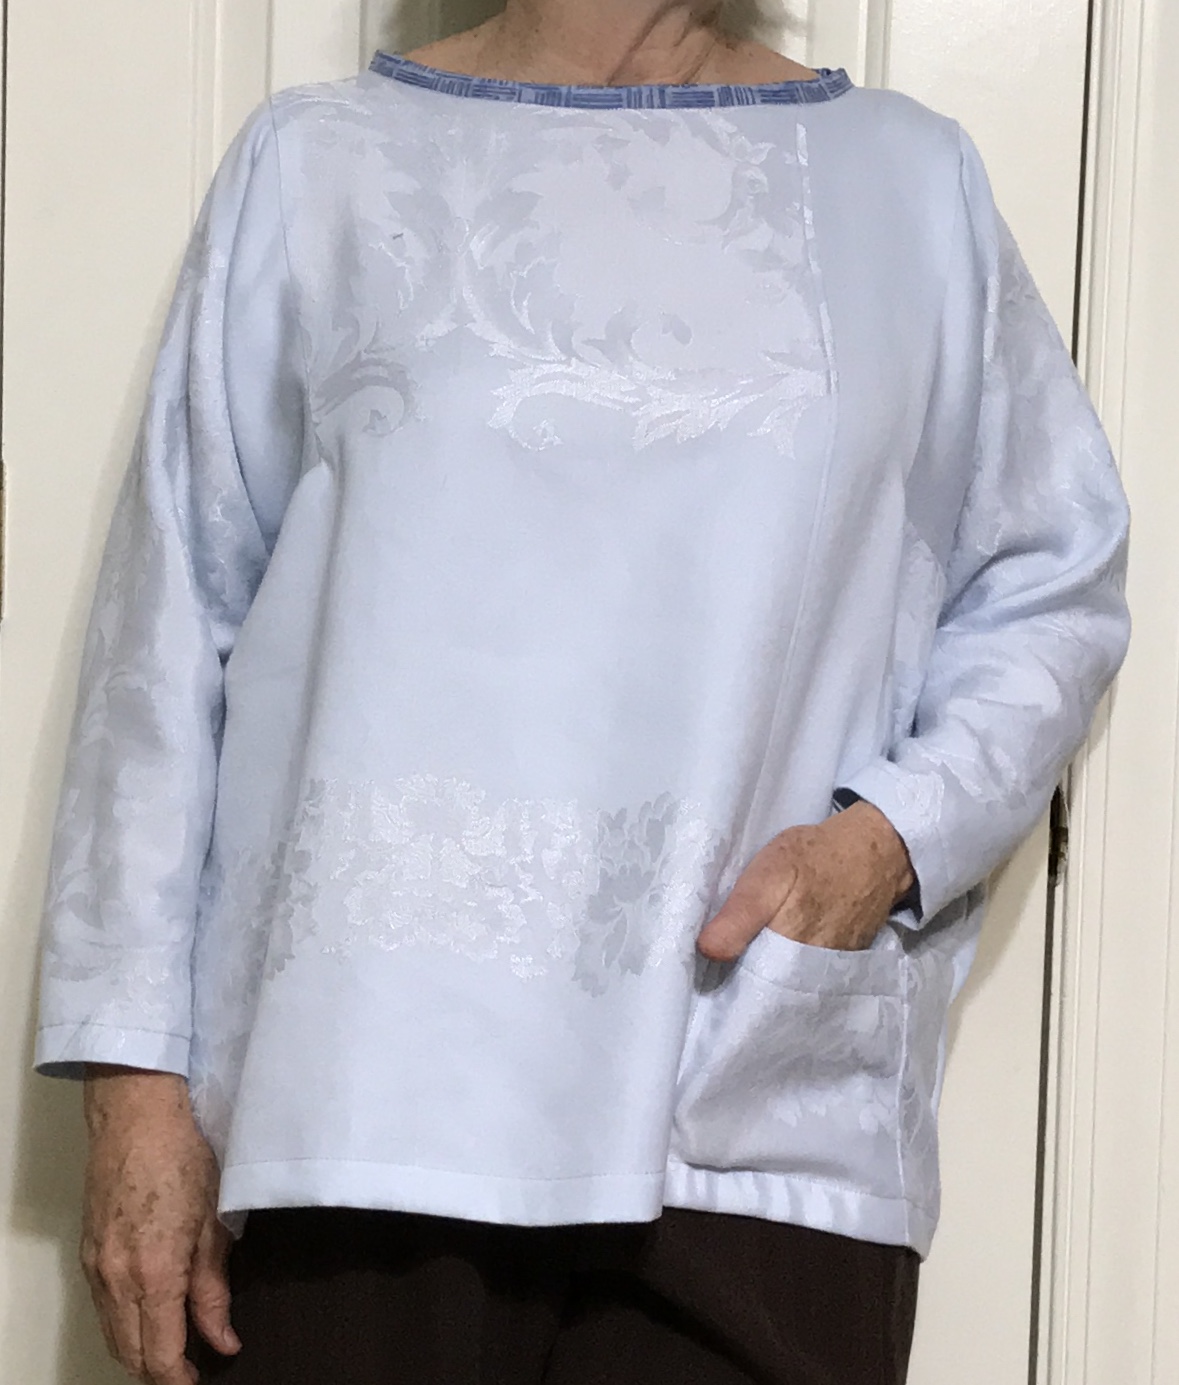
The top is also interesting. I like the asymmetry in the front and the cute little pocket. I've started adding a single pocket to many of my older garments. And aren't those square arm holes great?


So far I've only made a toile or muslin of the top. I often skip this step as I cannot stand to waste the fabric. I did skip that step with the pants but I took careful measurements and traced my size onto tracing paper rather than cutting into the original pattern tissue. They fit perfectly. Yep. I was lucky.


Having said all of that, I took a bit more time with the top. I began in my typical it's-only-fabric pants-on-fire manner. I usually cut a size M in this pattern line, but I started thinking about how this was probably oversized and I could cut a small. I was so cocky that I cut right into the pattern tissue on the size S lines.

I almost cut out the shirt using this interesting and expensive piece of fabric I purchased from Cutting Line Designs in March. It's a cotton-linen blend, a minimalist design by Yoshiko Jinzenji, and just the right weight for a top.


I washed and dried the fabric. I began to imagine how I might lay out the pattern pieces to take advantage of the placement of the markings on the fabric. And then I happened to glance at the suggested fabrics for the top. Knits with 2- or 4-way stretch. What?!?


Sure enough, a tissue fitting revealed that a size S would be too small, at least in the lower sleeves. The lower sleeves are probably drafted with negative ease to make it easy to push up the knit sleeves to 3/4 length. Of course, there is no such thing as negative ease with a woven fabric. 

Whew!


I dug through the stash and found an old cotton jacquard tablecloth to use as a toile. Then I graded the pattern tissue out to a size M. Cutting and constructing the toile was quick. I'm quite pleased with the fit. The shoulder seams fit me perfectly. The sleeves are probably a little short but I'll likely roll them up anyway. 


I am now looking forward to making the top in real fabric. The table cloth is OK but a little heavy for a top. 

I'll make the next one with my re-graded size Medium. I learned I need to make a minor change in the finish of the neckline. The neckline has a sharp curve at each shoulder, making it difficult, even with a bias strip, to create a smooth finish. Next time, I'll finish the front neckline and the back neckline before sewing the shoulder seams. I find that often works best on a boat neckline like this one. In fact I think that's what I'll do even with a knit. 

My neckline is finished with a bias strip of quilt cotton. It looks smooth here but it tends to pop up at the sharp curve.
So will I make a muslin with the next new pattern? Hmmm... Probably not.

Friday, August 3, 2018

Huipil

Huipil - #inspiredbyFrida #dresslikeFridaSAL
Huipil: the most common traditional garment worn by indigenous women from central Mexico to Central America

It's a simple shape for a topper - just rectangles, perfect for narrow fabrics created on backstrap looms. And I've made this shape before, not realizing it had such an exotic name - Huipil. The Huipil has been revisited by many sewists of late due to an exhibit at the Victoria and Albert Museum in London. There is a sew-along underway described here and seen here. I love seeing all the variations in this simple piece.

Here is my very first Huipil. This was before I made the connection to Frida. I still wear these PJs. The top is the simplest shape possible. I cut two squares and seamed them to make shoulder seams. I left a space in the middle large enough for my head. This is a knit so it was easy to just stitch the shoulder seam open to finish the neckline. I placed pockets strategically.


And I've lost this cute top:


Both were blogged here.

This time, I did make one pattern piece: the shape for the neckline - a 5x12 rectangular opening. I used another favorite top - the Cottage shirt - to make rough guesses at my preferred width and length - roughly 30x30.


Using remnants and small pieces from stash, I inadvertently took it from simple to slightly challenging to frustrating.


Because of the small pieces, I decided I did not want to just cut a hole for the neckline. Instead I built up the 12x5 opening as I went.


This meant 2 steps forward, one step back, because I designed it as I made it. You can see in the picture above that, at one time, I had a strip of red print running across the front and the back of the shirt. I hated it - made my shoulders look so sloped!


And of course I obsessed over how to finish the interior. I did not want to use the serger because I was afraid it would add bulk to an otherwise light-weight garment.


Last but not least, that square in the front is a very dense weave cotton. I think it must have a weird finish to it. Both my machine needle and my hand-sewing needle became noticeably dull as I sewed. But I do love that print - so worth it!


I love the deep hems on the Cottage shirt and so wanted to duplicate that here. To do this, I added a deep facing with the small Souleiado red print. It's only slightly visible.


As I was finishing some of the handwork last night, I was thinking - I'll never wear this. Then I put it on just now and I love how it feels. It's a perfect hot-weather top.


Maybe I'll make another one.


Saturday, July 21, 2018

Remember the Japonesque?


I do. One memory I have is when I got on a hotel elevator wearing my version. The woman on the elevator said "Japonesque?" I affirmed this and asked if she'd made it. She said  "yes, several times, once as instructed, once with two right fronts and once with two left fronts!"


It is one of the old - maybe early 2000's - Sewing Workshop patterns designed in the spirit of Issey Miyake. Maybe more of an Issey Miyake one-off. It has dropped shoulders, deep armscyes, and runs large. It has a floating pocket on the back right hip.

The chocolate piece is all shades of brown, my favorite color!
I've been holding onto 3 special one-yard pieces of fabric from Christina Daily. They are Essex linen-cotton dyed by Christina in what I'd call free-form shibori. I am unfamiliar with her process. One yard was chocolate and the other two pieces were indigo blue. It's fairly beefy and so a good weight for a jacket.


Christina and I became acquainted on Instagram. I love her hand-dyed fabrics as well as the lovely ways she uses it. Check it out here. A few months ago, out of the blue, she offered to send me some of her fabrics to see what I'd make. I was amazed and delighted. This version of the Japonesque aims to showcase her fabric.


Initially I thought I'd place the pocket on one of the fronts but it really seems to belong on the back. It was a fun pocket to construct given that it floats, attached only at the top of the pocket.


It's a detail I like and will use again. A similar pocket is on another Sewing Workshop top - the Icon (it's on sale right now). That's another oldie I'd like to revisit.


I experimented with the tab closure that is part of the pattern. It is intended to be inserted in the left side and buttoned to the right side at hip level. This is not a part of my body to emphasize and so I omitted it.


I also experimented with closures and decided on a single button shown below. It can also hang open for a slightly different look.


Even though I made this pattern 15+ years ago, construction felt novel to me. I love puzzling through a new pattern and this was quite satisfying. Several construction details required reading and re-reading instructions. To me, that's fun.

That brown next to the indigo blue looks almost like suede, doesn't it?
As I recall, my first version of the Japonesque was intended to be a shirt, made in a rayon batik. I did not wear it much and I do not recall why. This time I shortened it about 2 inches in the back. I'll enjoy it as a fall jacket.


Sunday, July 8, 2018

Re-entry

The past 3 weeks have been a blur to me as I attended a workshop at Shakerag, followed by a brief week at home, and then a week+ in Colorado with family. I'm home for a while now and I cannot wait to start a sewing project!

While in Colorado, mostly Breckenridge, I've been hiking, biking, and painting. I had the opportunity to shop at Fancy Tiger Crafts in Denver. What a sweet and inspiring store.


In fact DH and I went to their shop soon after landing before the huge family reunion began. You can see I'm a bit rumpled  from cross-country travel in my Sewing Workshop MixIt top and Hudson pants.

I stumbled across Fancy Tiger Crafts on Instagram initially where I admired the sewing and knitting projects. I am not much of a knitter but I loved their fabric and pattern selection. Their pattern selection was the most fun for me because it included brands I typically would need to order online.


I bought three patterns and one cut of fabric that I believe is cotton but may have some linen in it. It is a cross dye in black and white producing a textured look I love.


They had an interesting selection of fabrics too, including these Pendleton wools. If I lived in Denver, I would have been tempted by those.


The remainder of last week was spent primarily enjoying family activities. Breckenridge and the surrounding Rocky Mountains are wonderful for outdoor activities like biking and hiking. Also there was much inspiration for painting.


One of my favorite events was painting and drawing with my grandgirls.


The week prior to leaving for Colorado I scrambled to complete two pair pants from TNT patterns - cropped Helix pants in navy ponte and the Hudson pants in a textured rayon, all from the Sewing Workshop. The Helix and Hudson pants are real favorites of mine from the Sewing Workshop.

Helix pants require stretch fabric and have a smooth waistline.

Hudson pants require fabric with drape. I took mine in about an inch at the ankle for a bit more shapping.

The week before I was in Sewanee TN for a Shakerag workshop with Christine Mauersberg. We spent the week in meditative hand-stitching. It was delightful. I've learned that I may or may not make something I love in these inspiring workshops, but I always carry something useful into future sewing (or sketching) projects.


As it happened, Linda Lee from the Sewing Workshop was teaching right down the hall from our hand-sewing classroom. I made a few trips down to her classroom for further inspiration, as well as to visit with Linda and her fabulous students. I left with the fabric for my Helix and Hudson pants above.


So I'm back now, doing laundry, and dreaming of what I will make next.

Shrine Ridge Trail near Vail CO

I hope you are making something right now!

Street art on July 4th in Breckenridge CO