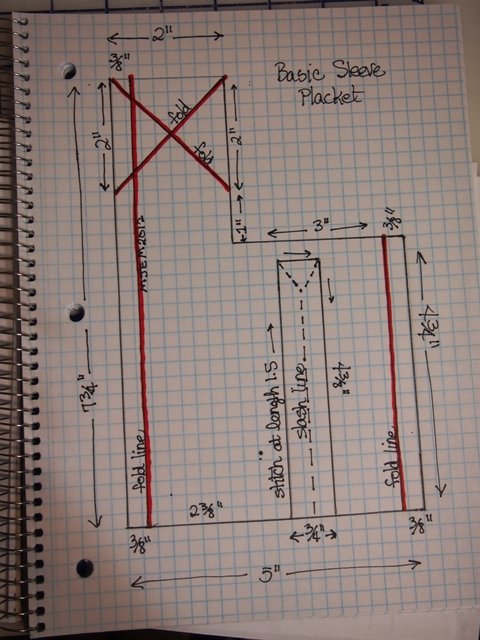
Step 1: Cut out a standard placket piece such the one shown below. Mark the rectangle to be stitched and slashed. Press along the fold lines, shown in red below. A little spray starch helps. Once pressed, it looks like a church with a steeple. The steeple looks a little off at this point because only one side of it is pressed.
Step 2: Place the placket piece in the marked position on the shirt sleeve. The wrong side of each is face up. Check that it is closer to the back of the sleeve than to the front. Also check that the short leg of the placket is closest to the back side seam. I've trimmed bulk from my steeple but it's not necessary.

Step 3: Using a short stitch length (e.g. 1.5) stitch around the placket opening pivoting around the top. Then slash this opening open creating a Y shape at the top. Clip close to the stitching in the corners. Here is how it looks from the right side now. I haven't turned the placket to the right side yet.

Step 4: Turn the placket to the right side and press. There is a gap of about 3/4 inch in the opening right now.

Step 5: Fold the short leg under covering the raw edge. This is a second fold because you made the first fold in step 1. At the same time, shift it to cover the 3/4 inch opening. Press in place.

Step 6. Edge stitch the short leg covering the length-wise raw edge. Note that there are still raw edges at the top of the short leg right now.

Step 7. Now fold the long leg into its final position, accordion style. Press. It covers the short leg, but has not been stitched into this final position yet.

Step 8. It should *look* like a finished placket now even though it is not stitched yet. Notice how the raw edges of the short leg get covered. Magic, right?

Step 9. Edge stitch the long leg into position, making a *P* shape (see note below). Start this stitching at the raw edge of the sleeve (the leg of the P), being careful to keep the short leg of the placket free. As you approach the top of the placket (the church steeple), raise the presser foot with the needle down. Now smooth the top of the placket into position with the top of the short leg sitting comfortably under the steeple. Finish edge stitching the steeple (the top of the P) of the placket to the shirt.

Step 10. As dear Shannon Gifford would have said at this point, stand back and admire your work! Way to go!
Note on the *P* shape. This shape is a minimum to catch all the remaining raw edges. Most shirts will have a decorative *X* in the upper part of the P, as well.
Design options are endless.
No comments:
Post a Comment