Recently I was asked to describe my approach to hemming an A-line garment. It is the one I used to finish my Soho coat, blogged in the
previous post.
It is that situation where the raw hem edge is wider than its final location. This happens often with an A-line skirt or dress. The upper edge of the hem wants to pleat or tuck if pressed into position.
One approach I see in pattern instructions is to run a gathering line along the raw edge and ease it into position. I think that will work and might even end up looking pretty good. But my preference is to hem it with a bias strip.
This approach is similar to creating a facing for the hem. With a true facing you would need to create the same curve in the facing as in the hem edge. No need for this with bias. Bias will re-shape itself as needed with just a little steam.
Cut a bias strip of fashion fabric at least as long as the hem edge. I like to cut it 1.25 inches wide. Much easier than drafting a facing, as you only need to know how long to cut the bias strip. Cut it the length or circumference of the hem plus an inch or two. It's usually easy to piece the bias pieces if your remnants of fashion fabric are too narrow. Or you can choose a contrasting fabric.
 |
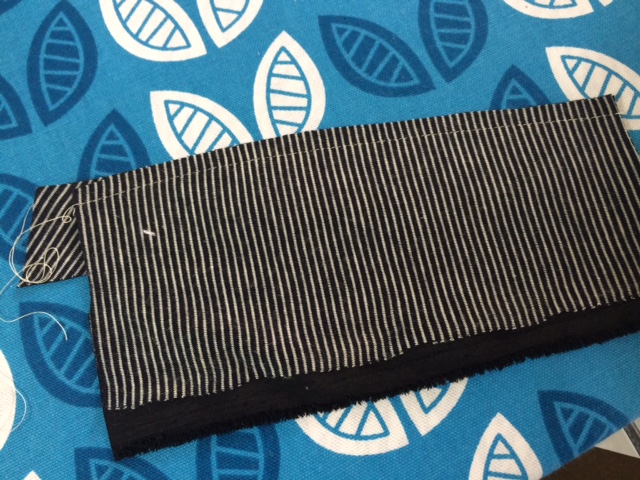
| My fashion fabric is solid black on the right side, striped on the wrong side, hence the obvious bias stripe on the wrong side of the bias strip. |
First trim the raw edge of the garment to within a 1/4 inch of the desired finished length. Then place the bias strip and raw hem edge right sides together(*). Stitch these together at 1/4 inch. It helps a lot to place the bias strip next to the feed dogs while sewing. Otherwise it will stretch and may cause the hem edge to gather.
 |
| *In this instance, I placed the wrong side of the bias strip next to the right side of the garment hem edge so that the bias stripes would be visible on the inside of my garment. In most cases though, you would place right sides together. |
 |
| Note that the bias strip is next to the feed dogs, garment is on top. |
Once these are sewn together, press the seam allowance toward the bias strip. Then fold the bias strip to the wrong side of the garment, and press again. The fold should favor the garment side in order to keep the bias strip from showing on the outside.
 |
| Wrong side of garment just after sewing bias strip to hem |
 |
| 1/4 inch hem pressed toward bias strip |
 |
| right side of garment, pressed to favor the solid black side |
 |
| wrong side of garment, pressed to favor the solid black side. looks like a tiny piping here |
Next I pin the bias strip into its final position with pins on the outside of the garment. I prefer to sew the final top stitch from the right side. Unless the fabric is thick, sew 7/8 inch from the hem fold. If the fabric is thick then you may need to reduce the depth of the hem to 3/4 inch or even 5/8 inch.
 |
| Finished hem in sample (wrong side of garment) |
 |
| Finished hem in coat (wrong side). (I love the Linda Lee approach to mitering.) |
This is also a great way to hem something that is too short. The hem take-up is only 1/4 inch.
HTH! Happy sewing.


Hooray for bias faced hems!! This is how I do 95% of my hemming now! Including knits! Can you tell how enthusiastic I am about this technique?!?! (OK, enough already with the !)
ReplyDeleteFor my knit tops (all hip length with a shirt-tail curved hem), I use a 2 inch* strip cut on the cross grain (no need for bias with knits), interfaced with Emma Kesey's knit fusible tape. I apply it just as you describe, except I keep the strip on top while sewing since I gently pull on it as I go around the curve of the hem*. This enables it to snug up when I turn it to the wrong side. I edge/topstitch it however I've feeling that day, and trim off any excess close to the stitching. Not only is it an easy-peasy way to hem a curve, but it allows for contrasting fabric, AND it provides some extra weight to the hem to counteract DVB (Dreaded Velcro B*tt...where one's hem hangs up on one's ahem "shelf").
*I have started just automatically using 2 inch strips. That way I always have lots to work with, and since it is non-raveling bias, trimming off the excess is not a problem.
**In fact, for BOTH knits and wovens, I keep the strip on top and pull gently when going around a curve. I haven't tried sewing with the strip on the bottom (where the feed dogs would do somewhat the same thing, maybe), but I'm going to. Thanks for the tip.
And thanks for helping to get the word out about this fabulous technique.
Most of the garments I've sewn were years ago for kids using wovens. The gathering the edge of the hem always worked fine for that, but I can see this being much better for heavier or knit fabrics. Pinning for later, thanks!
ReplyDeleteNeat and practical. Thank you.
ReplyDeleteI love your garment. Details like bias hem and pretty diagonal stripes hidden on the inside are why I love to sew. This is a great tutorial for the technique. Thank you!
ReplyDeleteI love your garment. Details like bias hem and pretty diagonal stripes hidden on the inside are why I love to sew. This is a great tutorial for the technique. Thank you!
ReplyDeleteThanks so much for sharing. Love how reading blogs lets you learn something new without even knowing that you needed to know/learn it. Hope that made sense. Your coat is fabulous.
ReplyDeleteLove that you share your techniques, thanks for that!
ReplyDeleteI have learned something new-thank you!
ReplyDelete