
Some months ago I volunteered to teach a class on sewing with bias to my ASG neighborhood group, City Wide Couture. I've been clipping articles and pictures and noting websites ever since.

Then I finally took the deep dive into my Threads magazines. Yep, I have physical magazines. Searching for articles on bias can be tricky, as all searching engines are limited. I did find a good one though. Using titles containing *bias* was too limiting. So I searched for the word *bias* and manually eliminated all those that simply contained the word, bias.

I do not have every issue but my filtering yielded plenty. So I began to read and make notes. There were a few articles about Charles Kleibacker and Madeline Vionnet. And Marcy Tilton wrote a number of articles with excellent how-to advice. Other authors touched on it here and there.

In addition I found some amazing videos from the 70's and 80's of Charles Kleibacker such as this one on cutting bias garments. What a treasure. The quality of the film is not what we're used to today and so it took me multiple viewings to understand his approach. Here are some interesting ideas that I had not considered:
- light drapey fabrics provide *drip* and stable fabrics provide *lift* when cut on the bias. He used this idea strategically in design. Coffin notes that drip fabrics cling to curves and lift fabrics skim the curves.
- Avoid cutting until you absolutely must. Some seams can be basted together while the traced pattern is still a part of the yardage.
- Pattern pieces should be mirrored as you work your way around the body.
- Through careful thread-tracing and basting, one should *stretch like crazy* while using the sewing machine.
- CF and CB seams can be used to create symmetry, if desired.


In order to better understand the techniques and ideas I read, I decided to try a simple one on my own. I chose the Eureka Top from the Sewing Workshop. I have made this over and over again size M but it has always run large, so I decided to try a size XS. I decided from the get-go that I would strive to follow the advice given by the gurus but remain practical and true to my own desire for joy.

First I traced the XS pattern from the original tissue and removed the 5/8" seam allowances. Then I used a grid to mark both bias grainlines on the front and back tissues. I wanted a balanced design and so I planned a center front and center back seam on each. I also chose to redraw the neckline so that a V cut fell along the straight-of-grain. It was just too tempting to avoid. As you'll see, I used the selvedge as my neckline edge. I also lengthened the pattern by 4+ inches.

I further reduced the complexity by selecting a piece of yarn-dyed striped cotton that is identical on both sides. Charles Kleibacker recommends that every fabric be cut with nap, and that the right side be marked carefully so as to be consistent in the cutting and sewing. I did not think I needed those extra hurdles here.

Laying the fabric out single layer, I pinned the pattern tissue for 1st front piece and thread-traced on the sewing lines. Then I rough cut it with generous one-inch seam allowances.

Moving the first piece very carefully, I used it to lay out the 2nd front piece on my yardage, again carefully aligning the neckline with the selvedge. Instead of thread-tracing the stitching lines on the 2nd piece, I used transfer paper and traced the seam lines using the 1st front piece as my guide. This is similar to what CK does in his video.

Then, before cutting the 2nd front piece, I basted the center-fronts together at the stitching line. I used the Charles Kleibacker (CK) technique for basting that is also referenced on this blog for Folkwear patterns. I did have to carefully pick up both pieces as I basted to make sure the basted seam lines on the 1st front aligned with the marked seamlines on the 2nd front.

Note that the two fronts must be mirror images of each other. The same is true of the two back pieces. This is due to the fact that there are two bias grains. The two biases will hang differently depending on where the warp and weft threads are located, and will twist as you sew if the pieces are not mirrored. Continue to mirror the grain as you work your way around the body. If there are not CF or CB seams, then be sure that the front piece mirrors the back piece in terms of the bias chosen.

I rough-cut the 2nd front piece, generally following my rough-cut on the 1st front piece. I was anxious to try the CK method of machine sewing bias cut seams. He said over and over again, "Stretch like mad!"

The cool basting technique created enough give in the basted seam to allow me to do just that, stretch like mad. It was fun! I was sure it would fail but I pressed pedal to the metal with wild abandon and sewed with a typical 2.4 mm length straight stitch.
Next I carefully cut and sewed the two back pieces in the same manner. I must confess that at this point my patience was just barely in check, but I persisted.

After sewing the center-front and center-back seams, I basted first one side seam, and then the next. Again I used the CK method for basting seams so that I could *stretch like mad* at the machine. I followed the same technique for the shoulder seams though I probably did not need to do so.

Then I tried it on. Ta-da! It fit. I could not believe my eyes. It totally fit. And the stripes even matched up creating satisfying chevrons.
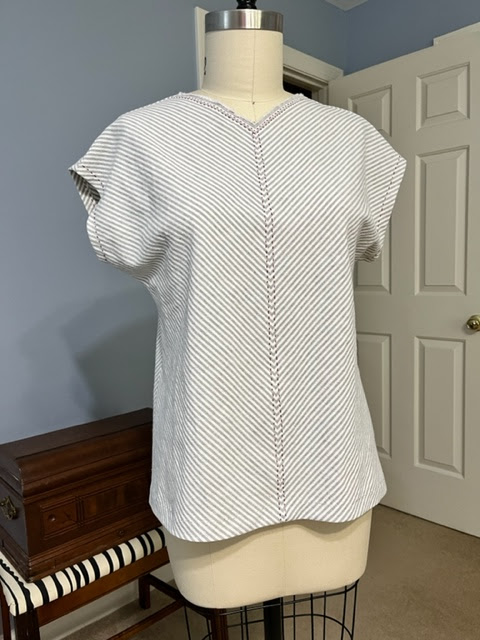
At this point, I happily finished all seams with a 3-thread serger. I finished the hemline by simply folding it up an inch and using a running stitch and light gray pearl cotton thread. I finished the armholes by folding under 5/8" and stitching with a contrast pearl cotton thread. I added a bit of that to the neckline, as well as along the CF and CB seams.

And I have worn it and washed it. No torqueing or stretching occurred.
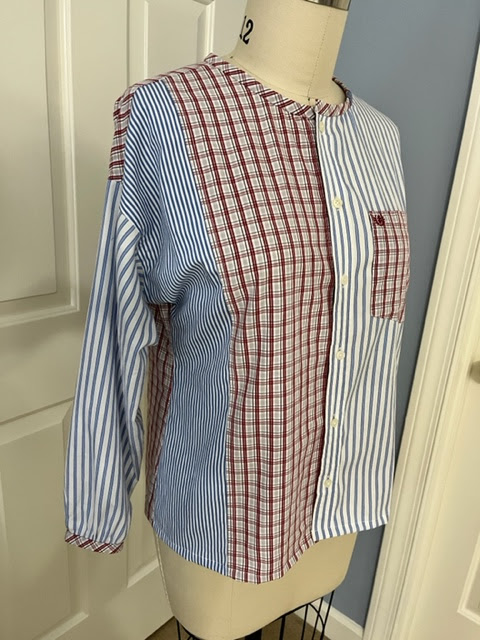
I made another Eureka after this, using thrifted men's shirts with yarn-dyed designs. I want to make a straight-of-grain version that would be very close to this XS one on the bias for comparison. I blogged about this second experimental shirt here.
Too bad I did not carefully record the original length of the bias version, but I am convinced that the process did not distort the pattern in any significant way. Here they are aligned on my cutting table. Both have been worn and washed.

How cool is that!
Very informative Post - Thank you!
ReplyDeleteIt's VERY cool!!!
ReplyDeleteYour blog is always informative, entertaining, and/or inspiring. You have sent me down a rabbit hole on this one with Rae's pattern and a linen dress. I need something for a wedding in TN in September so this just might be it. And, surprise, I already seem to have a number of linen pieces that will work. Jean
ReplyDeleteGasping with delight! What a wonderful description you've given. It's just lovely!!!!
ReplyDeleteDid you ever make that bias blouse from two squares of fabric, in the July 2009 Threads magazine? That one is a winner for me.
ReplyDeleteNo, I haven't. I'll check it out
DeleteThis is a Master Class for sewing on the bias! I’ve made several bias garments and got here thru trial and error, especially with the torquing issue. But I never tried ‘stretch like mad’…seems counter-intuitive but your garment is lovely and hangs beautifully. Did that remove the need for the usual ‘let it hang before hemming’ instruction? Thank you for sharing your wisdom. I always love reading your blog and sewing your creations.
ReplyDeleteThanks! I believe that the stretch-like-mad technique did take care of needing to hang over night. But then this fabric is fairly stable so that had an effect too.
Delete‘Seeing’ your creations!
ReplyDeleteThis is amazing and thank you so much for this tutorial. I have always felt that bias does not look good on me but it may be that I needed a "lift" fabric that did not cling to my curves unwantingly. I am a huge fan of the Eureka and have great fun make it in many creative ways but not bias. Your inspiration has me looking forward to trying these techniques. Yours looks, hangs and wears beautifully.
ReplyDelete