In April 2022, I was lucky enough to attend an Alabama Chanin workshop from their School of Making. It is such a fun place to play and sew and chat. The workshop includes your choice of one of their kits. A kit is created for you and ready to start the second day of the workshop. Students are able to select from a number of their garments, as well as a few non-garments (baby blanket, for example). The kits include two layers of their organic cotton knit. One layer is stenciled professionally in the stencil of your choice. Each piece of the pattern is cut out and ready to embroider.
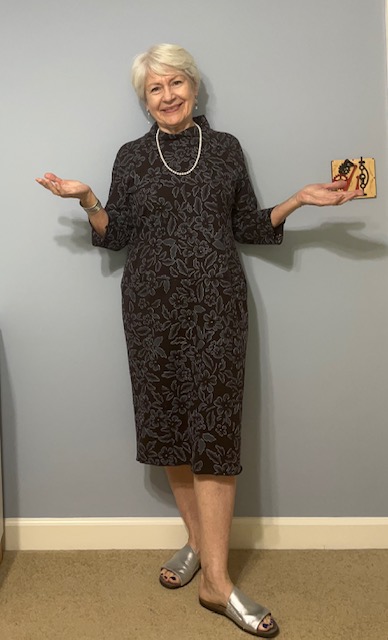
After trying on a number of their samples, I chose the Fractal Dress. It has a lantern shape and about a gazillion panels - 4 on the front bodice, 4 on the back bodice, 4 on the skirt front, 4 on the skirt back, 2 on each sleeve, and the collar.
My kit:
- Pattern: Fractal dress, size S
- Outer knit: brown (earth)
- Inner knit: brown (earth)
- Stencil: Abbie's Flower
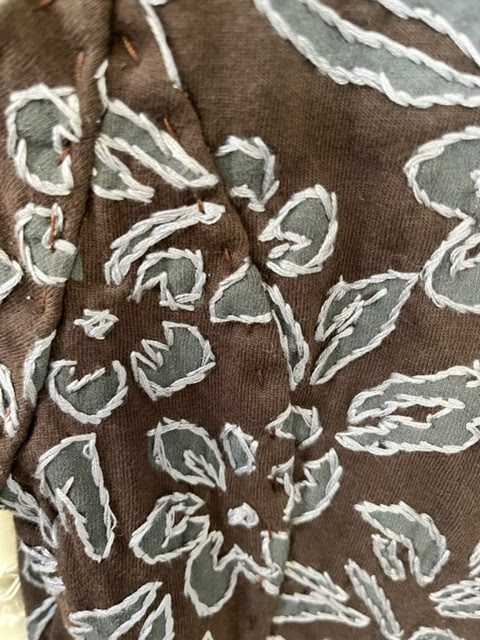
- Embroidery floss: Slate
Each kit includes two 8x10 rectangles, one with the stencil and one without it. This is a wonderful part of the kit, as it gives you the opportunity to test your ideas about how to stitch. There are so many ways to go - applique, reverse applique, and on and on.

The stencil I chose, Abbie's Flower, is complex. That is, there is not a lot of open space either between motifs, or within motifs. This makes the embroidery options challenging, IMO. Typically the embroidery motifs are outlined with an embroidery stitch. Then fabric from the inside, or the outside of each motif is cut away. This can produce a beautiful effect especially if the outer dress is a different color from the inner dress. The effect is lovely and, with a different motif, it will dramatically reduce the overall weight of the finished garment, in addition to allowing the under fabric to peek out.
After completing my 8x10 sample, I became convinced that the dress would be like armor if I constructed as two layers. There was simply too little to cut away, no matter whether I chose applique, or reverse applique, or negative reverse applique.
In a previous kit, I used a more open stencil. In that case, cutting away fabric gave the jacket a lovely drape that did not feel heavy at all.
And that is how I ended up with two dresses instead of one. I completed the plain one a while back and I've enjoyed wearing it. It is the fabric that would have been the underlayer of the dress.
As you may know, the kit comes with the pieces already cut out. There is no pattern included, although I could have purchased it. In retrospect, I certainly should have done so. It would have saved me a lot of hand-wringing during assembly of each of the two dresses.
Each panel is supposed to be labeled. I noticed some ambiguity in their labeling while I was still there and sent it back for more specific labels. It helped but they were inconsistently applied to all pieces. And, in the case of the skirt, it was going to be easy to sew pieces together upside down. Given the lantern shape of the dress, the waistline is actually larger around than the lower hem of the dress. But the difference is quite small, as it is spread over 8 panels. Finally I called them and asked for very specific measurements for the top and bottom of each skirt piece. I still had to identify some pieces by process of elimination.
Having said all of that, I actually enjoyed making both versions of the dress. And I love the effect of each. My *outer* dress, like the plain one, is single layer. I outlined each motif with a back stitch. It was fun to make it a bit jagged to mimic the edge of leaves.
And, obviously, I did finally finish it. Now I want to another kit to stitch, perhaps a long skirt next. I'll have to save up for that!


Gorgeous!
ReplyDeleteI'm amazed at the amount of work and patience involved.
Worth every minute!