Is it a kimono? a haori? a yukata? Well, perhaps none of these. Clearly it is inspired by Japanese clothing aesthetics and I am always enamored of that.

I was lucky to visit Japan for a couple of weeks 15 years ago. I would go back in a heart beat. It's beautiful and the people are lovely and friendly. But the biggest draw to me is their love of simple beauty, sometimes not as simple as it seems, always beautiful.

The original Ikina from the Sewing Workshop was a short jacket with interesting side flanges.

I made it twice. The first time, I lengthened it almost to the floor. I made the side flanges slightly shorter, and the front collar band shorter still. It came out of a workshop here in Atlanta with Nancy Shriber's guidance. We brought fabrics that inspired us and she guided us in planning an artful design.

The second one was a trip back to the weeks leading up to my mother's death from liver cancer, more than 20 years ago now. I bought her a 3-piece ensemble from her once-favorite dress shop in Dallas, hoping she would be able to wear it and feel pretty. The pieces were unlined coordinating linens, fresh, pretty. I think she wore it for a while just to please me.

This second one omitted the side flanges, so it is most similar to the Ikina 2, recently released by the Sewing Workshop. I cut up the 3 pieces in Mother's ensemble and pieced this jacket together. I seem never to have anything to wear with it, but I will not let it go.


In the drawing, it looks more like a conventional set-in sleeve, but it is decidedly a kimono sleeve, with a slightly shaped sleeve head, much like a man's shirt. Except for the collar band, none of the Ikina pieces are rectangles, as they are in a traditional Japanese haori or other kimono-like garment. The shoulder seams are also shaped and there are neckline darts in the back. There are separate cuffs.

The original pattern called for cutting the front collar panel on the bias, taking up a lot of fabric for very little effect, I think. The new version has a more narrow collar cut on straight-of-grain. It hugs the neck and sits in a more flattering manner than the original did.

I did like those flanges, though. Such an interesting take on an otherwise simple garment. I may need to make that version again.
For the Ikina 2, the Sewing Workshop is promoting kits with printed rayon challis. This creates a feminine, relaxed, yet chic look. My first choice was a rayon challis I purchased at Gail K here in Atlanta.

Then, in the middle of the night, I remembered a piece of crisp cotton in stash. During early spring, I enjoy wearing a light weight third piece that I can shed as things warm up in the afternoon. This cotton piece will better fill that role for me as it coordinates with so many of my existing pieces.

The black and white fabric is a crisp cotton, possibly Japanese. The weave reads window-pane checks and has floats on the back that may prove problematic. I'll see how it wears. I may decide to line it, though I prefer it unlined.

Linen black and cream pin-stripe became piping, after trying out a few others:

The pin-striped linen is *vintage* stash fabric. Before cutting large swaths of bias for the piping, I cut out a Eureka top to make later. That may prove foolish as this fabric is ideal for trim and not really a great color for an entire garment on me.

I did not have white rat tail on hand and so this piping is flat. I'm actually happy with that, as there is less bulk to deal with at seam intersections.

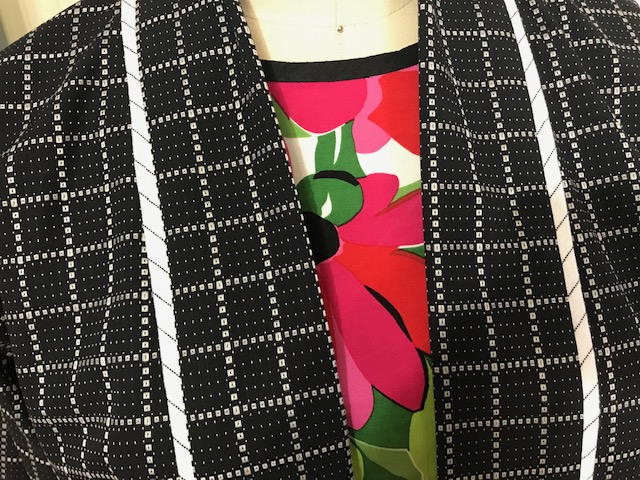
Inserting the piping took some time. I wanted the plaid to match across the jacket fronts and collar bands. Also I wanted the piping to spiral in opposite directions on left and right fronts. I took it slowly and did not have to use the seam ripper overly much. That's good because those floating threads can be challenging to avoid when ripping.

As I worked on the front collar bands, I considered how I might use piping on cuffs or even faux cuffs. In the end, I was worried the jacket was beginning to look like a bathrobe and thought the additional piping on sleeves would tip the scales. There are moments when I hold back on details. Less is more. Sometimes.

I have 3" deep hems on the 3/4 length sleeves, as well as the bottom hems. I faced the side vents, smoothly covering the side seam transition and giving the vents some weight. It was an opportunity to use Linda Lee's method of mitering, a go-to technique for me.

For seam finishes, I used a mock flat-felled approach. I have a tuck on one underarm where the 4 seams come together. I worked the flat-felled seams from each direction, meeting at that intersection. It's one of those cases where you are sewing into a hole.

I'm not surprised that a tuck resulted. At least it did not happen on both sides. I'm still carefully removing stitches until I can find enough room to ease everything in. It may all be hand-work. It is hard to control the sewing machine in such instances, I think. There is always a blind side in machine sewing.

I have a few details to add. It needs a back neckline patch. And pockets, too. I'm very short on remnants but may be able to squeeze out 1 or 2 pockets. I'll only do so if I have enough to match the pattern.

There will be no sashiko on this piece. The weave is too dense. It was difficult enough to hand-stitch the front collar panels down.

True confession - I did not purchase the new Ikina 2 pattern. Instead I modified my original Ikina pattern, lengthening it and re-drafting the front collar band. It was not difficult. And I had such a good time making it!

Always love your aesthetic. My daughter was in Japan for 3 years, and we were lucky to have one visit. Thanks for sharing your Ikina sewing tips - esp. like hearing that flat piping would work, as I don't have rattail and really didn't want to buy any. I would be interested in hearing about your challis version.
ReplyDeleteThanks for such a comprehensive post. It was interesting to see the differences between the two Ikinas (accepting you didn't have the actual Ikina 2 pattern). Loved all of your garments in this post - you are so good at getting TSW patterns to work for you. My favourite was the short version of the Ikina 1 and such a great memory for you. Personally wasn't that attracted to Ikina 2 and if I sew anything it will likely be the Ikina 1. To be honest I am still on month one having sewn multiple versions of the Maison top (none yet true to the pattern) and am getting ready to move onto the Charlie bomber. Thanks for the inspiration.
ReplyDelete